This is a trouble shooting for using bpy.ops.constraint.childof_set_inverse.
Trouble
When I tried to set “Set Inverse” for “Child Of” constraint in bone and executed bpy.ops.constraint.childof_set_inverse(constraint=”Child Of”, owner=’BONE’) on Blender, the following error occurred. How can we solve it?
>>> bpy.ops.constraint.childof_set_inverse(constraint="Child Of", owner='BONE')
Traceback (most recent call last):
  File "<blender_console>", line 1, in <module>
  File "C:\Program Files\Blender Foundation\Blender 2.83\2.83\scripts\modules\bpy\ops.py", line 201, in __call__
    ret = op_call(self.idname_py(), None, kw)
RuntimeError: Operator bpy.ops.constraint.childof_set_inverse.poll() Context missing 'constraint'
Environment
Windows 10 Blender 2.83
Solution
To execute this operation, we should pass the context that contains target constraint and activate the target bone in pose mode.
import bpy

bone_name = "foot.IK.L"
bpy.ops.object.mode_set(mode='POSE', toggle=False)
pose_bone = bpy.context.active_object.pose.bones[bone_name]

# set the target constraint to the context
context_py = bpy.context.copy()
context_py["constraint"] = pose_bone.constraints["Child Of"]

# activate target bone
bpy.context.active_object.data.bones.active = pose_bone.bone
bpy.ops.constraint.childof_set_inverse(context_py, constraint="Child Of", owner='BONE')
When trying to call “glutInit()” of PyOpenGL, I got the error “NullFunctionError: Attempt to call an undefined function glutInit, check for bool(glutInit) before calling”.
# python source code
from OpenGL.GL import *
from OpenGL.GLUT import *
from OpenGL.GLU import *

glutInit()
glutInitDisplayMode(GLUT_SINGLE | GLUT_RGB)
Error Detail

---------------------------------------------------------------------------
NullFunctionError                         Traceback (most recent call last)
/tmp/ipykernel_14/3289264930.py in <module>
      3 from OpenGL.GLU import *
      4
----> 5 glutInit()
      6 glutInitDisplayMode(GLUT_SINGLE | GLUT_RGB)
      7

/usr/local/lib/python3.9/site-packages/OpenGL/GLUT/special.py in glutInit(*args)
    331     try:
    332         # XXX need to check for error condition here...
--> 333         _base_glutInit( ctypes.byref(count), holder )
    334     finally:
    335         os.chdir( currentDirectory )

/usr/local/lib/python3.9/site-packages/OpenGL/platform/baseplatform.py in __call__(self, *args, **named)
    421                 pass
    422             else:
--> 423                 raise error.NullFunctionError(
    424                     """Attempt to call an undefined function %s, check for bool(%s) before calling"""%(
    425                         self.__name__, self.__name__,

NullFunctionError: Attempt to call an undefined function glutInit, check for bool(glutInit) before calling
The documentation says “Win32 and Win64 binary installers for PyOpenGL include a copy of GLUT”. So uninstall current pyopengl first. And download binary installer for windows. Put the downloaded file in some directory, then run the command “pip install <file name>” in the directory where the file is saved.
Put freeglut\bin\x64\freeglut.dll into C:\Windows\System32.
Add “C:\Windows\System32” to environment variable “PATH” to enable python find the library.
If the error still occurred, check if your library name is in Win32Platform.GLUT() <python>\Lib\site-packages\OpenGL\platform\win32.py
    @baseplatform.lazy_property
    def GLUT( self ):
        for possible in ('freeglut%s.%s'%(size,vc,), 'freeglut', 'glut%s.%s'%(size,vc,)):  # Added 'freeglut' because the library name is freeglut.dll
            # Prefer FreeGLUT if the user has installed it, fallback to the included
            # GLUT if it is installed
            try:
                return ctypesloader.loadLibrary(
                    ctypes.windll, possible, mode = ctypes.RTLD_GLOBAL
                )
            except WindowsError:
                pass
        return None
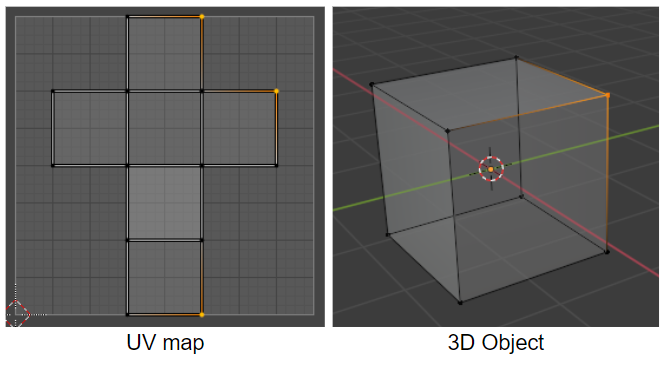
In unfolded UV, the correspondence between the point of UV map and the vertex of 3D object is not one-to-one. Thus we use ‘Mesh Loop’ instead of vertex or edge to distinct point of UV map.
Mesh Loop is an element surrounding a face, which consists of edges and vertices. Each quad face consists of 4 Mesh Loops as below. For example, cube objects have 6face, 24 mesh loops.
import bpy

obj = bpy.data.objects[obj_name]
mesh_loops = obj.data.loops
for mesh_loop in mesh_loops:
    print(mesh_loop)
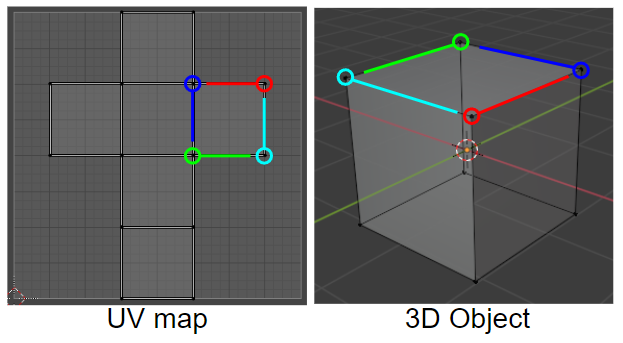
Mesh UV Loop
UVs have Mesh UV Loops as a counterpart to the Mesh Loops. And the correspondence between Mesh Loop and MeshUVLoop is one-to-one.
Today’s goal is to construct development environment for data analytics and machine learning with Anaconda.
What is Anaconda?
Anaconda is open source Python distribution for data science. You can see the list of package lists here.
the open-source Individual Edition (Distribution) is the easiest way to perform Python/R data science and machine learning on a single machine. Developed for solo practitioners, it is the toolkit that equips you to work with thousands of open-source packages and libraries.
Access the websiteanaconda.com/products/individual and click “Download” button to download the installer of the edition that you want.
Start the installer and click “Continue”.
Check if anaconda is completely installed with terminal.
Start Anaconda Navigator
Start applications > Anaconda-Navigator.
Create virtual environment
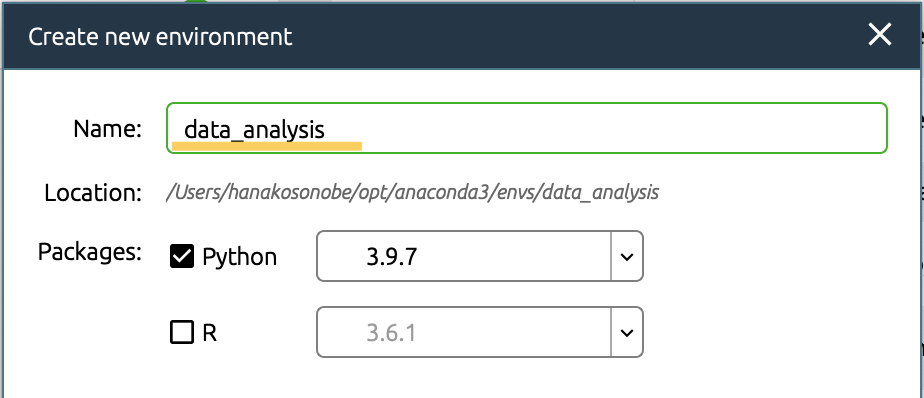
Click Environments and create new environment.
I named new environment “data_analysis”.
Install libraries or modules with conda
Conda is an open source package management system and environment management system.
Open terminal in the environment where you want to install libraries.
Then put the “conda install” command to install libraries. For example, I installed pytorch in the “pytorch” environment. The option “-c” is the channel (What is a “conda channel”?).
conda install pytorch torchvision -c pytorch
Start Application
Select environment what you want to use and install or launch application.
I launched “Jupyter notebook” and check that “pythorch” library is installed successfully.
Today’s goal is to understand a layer of process “convolution” in neural network. In other words, this article describes convolutional neural network (CNN or ConvNet) that is a neural network contains convolutional layers in its architecture.
What Convolution Is
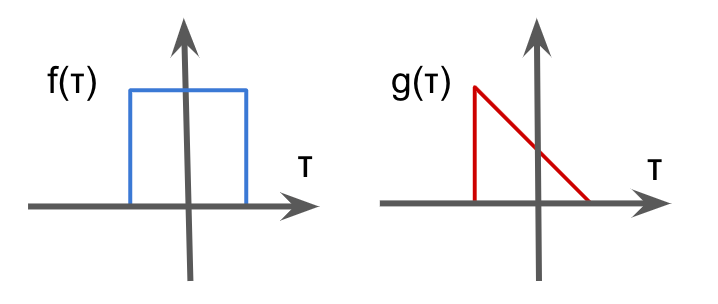
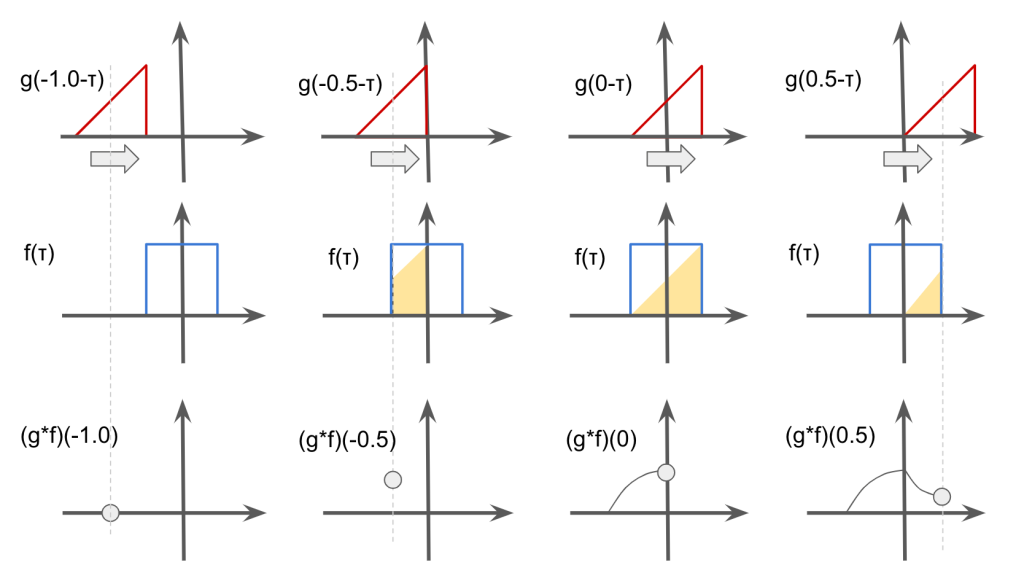
Convolution is the binary operation to takes 2 functions and produces a function \(f * g\), which is defined as the integral of the product of the two functions after one is reversed and shifted.
$$(f*g)(t) = \int f(\tau)g(t – \tau)d\tau $$
Examples of 2 function
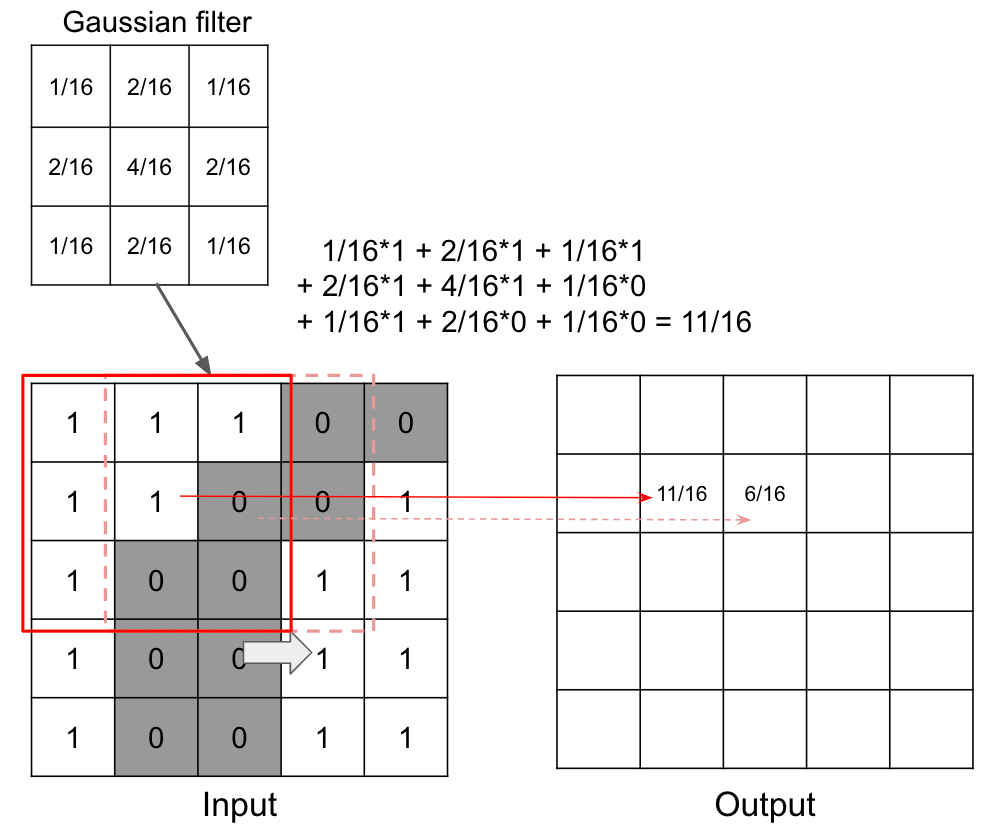
In the context of image processing, convolution is the process of generating output image by weighting input image with the filter. For example, convolution is used in smoothing with gaussian filter.
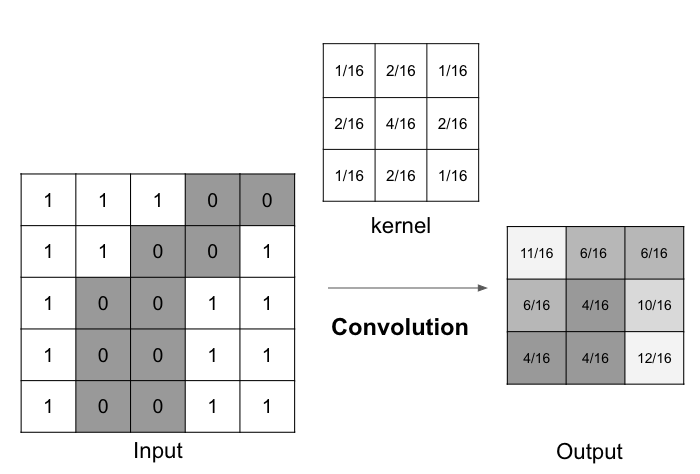
Example of convolution by Gaussian filter
The image of weights is called “kernel” in convolution. And the output is the compression of input.
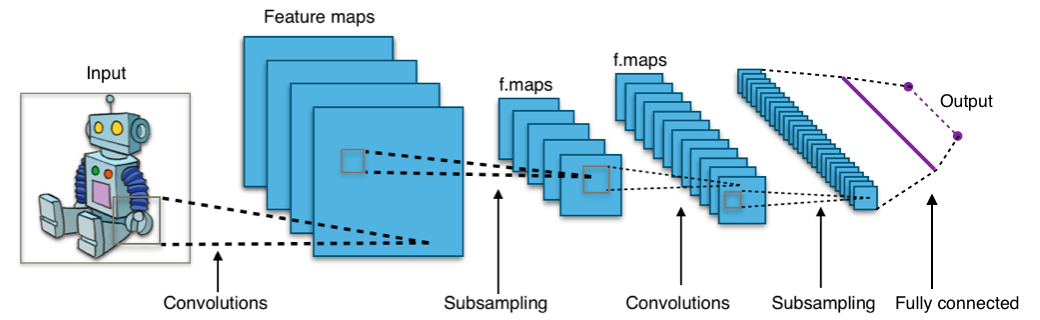
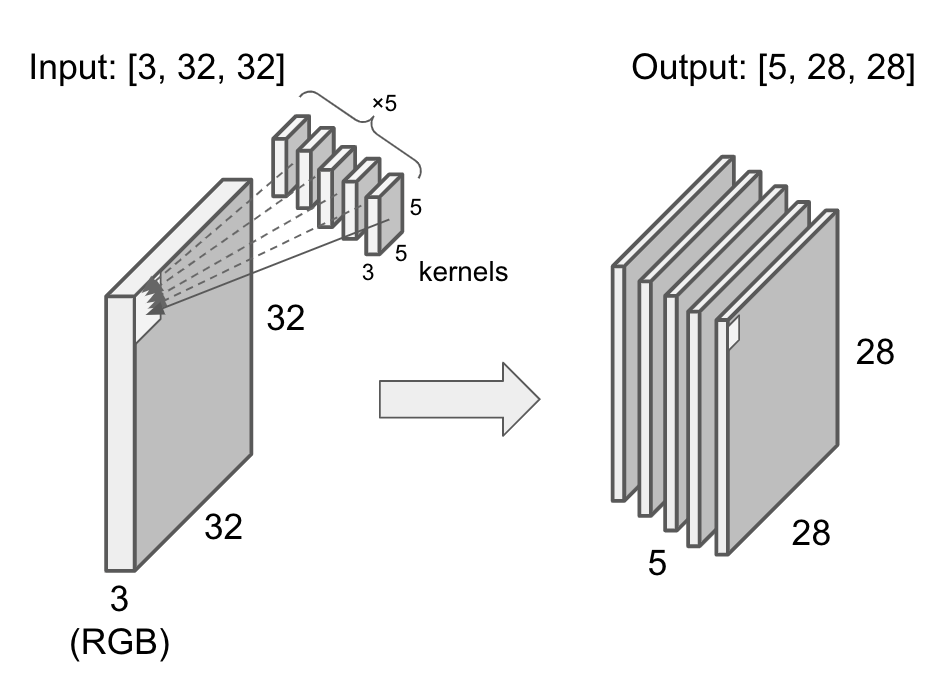
In CNN, the convolution layer is used to generate output image that represents feature of input image while compressing local region. 1 layer can have several kernels and the output is the same number of feature maps as kernels.
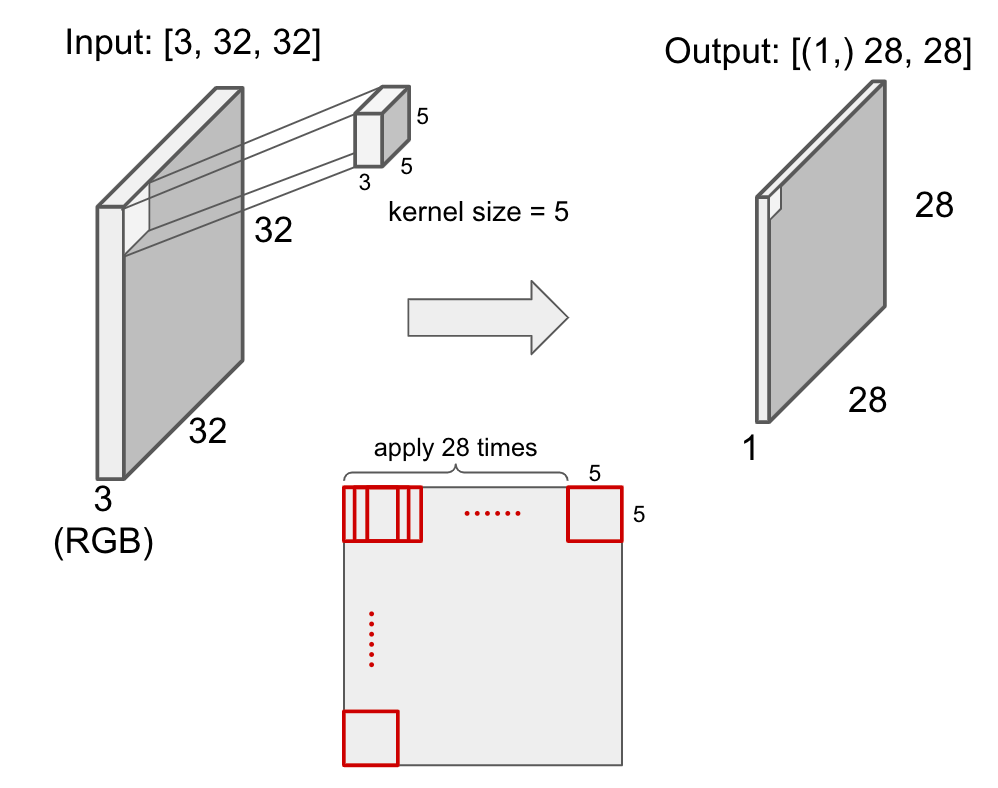
In convolution layer, the input image will be converted. For example, a 5*5 kernel is applied to RGB 32*32 image to generate 28*28 output as below.
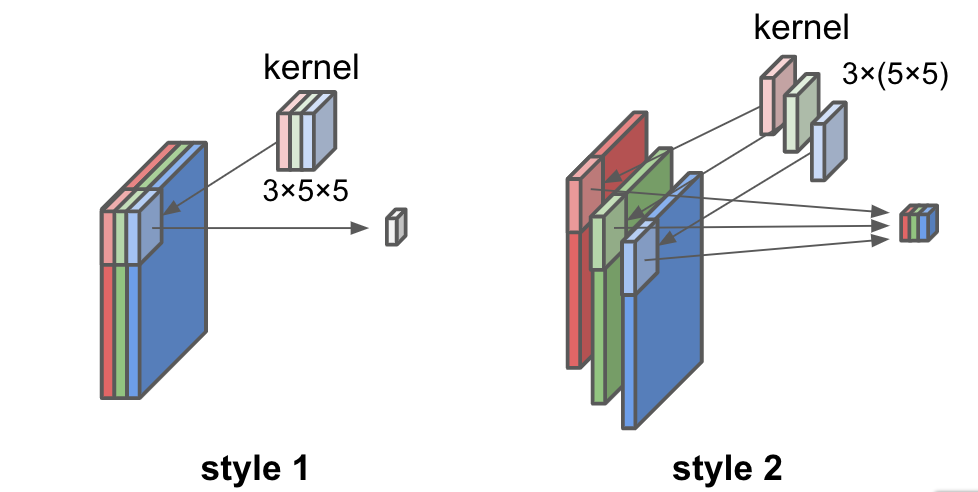
Note that there are 2 styles of convolution for RGB image. The first one is the way in which 3 maps generated from RGB channels by convolution are added together to 1 channel output image. In the second way, each channel is converted to each channel of output image. In the latter case the output image has 3 channels.
The former is commonly used in CNN.
If the convolution layer has 5 different kernels, the output has 5 channels.
Parameters
Parameters that determines convolution process.
channel
kernel size
stride
padding
dilation
Channel and kernel size
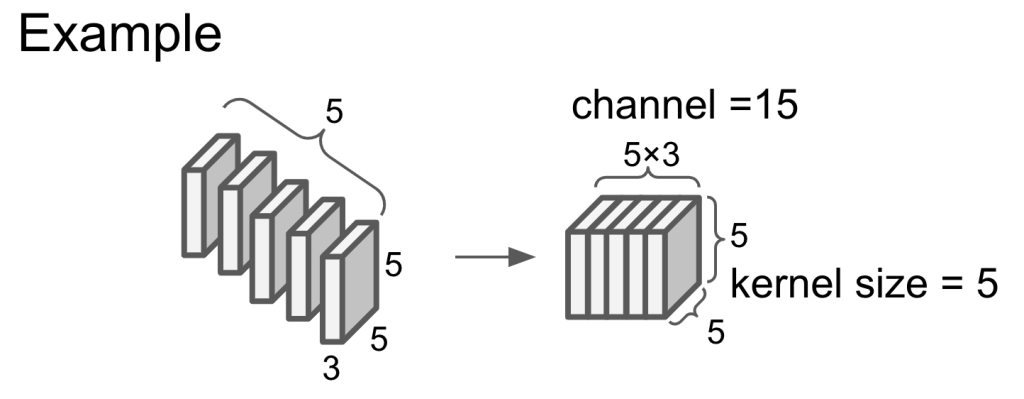
channel = input channel * the number of kernel. The channel of output is the same as the channel of kernel.
Kernel size is the size of kernel side.
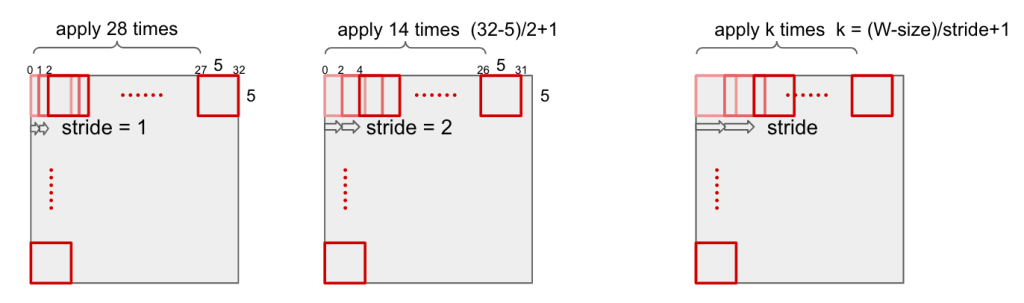
Stride
Stride is the size that filter sliding to input image.
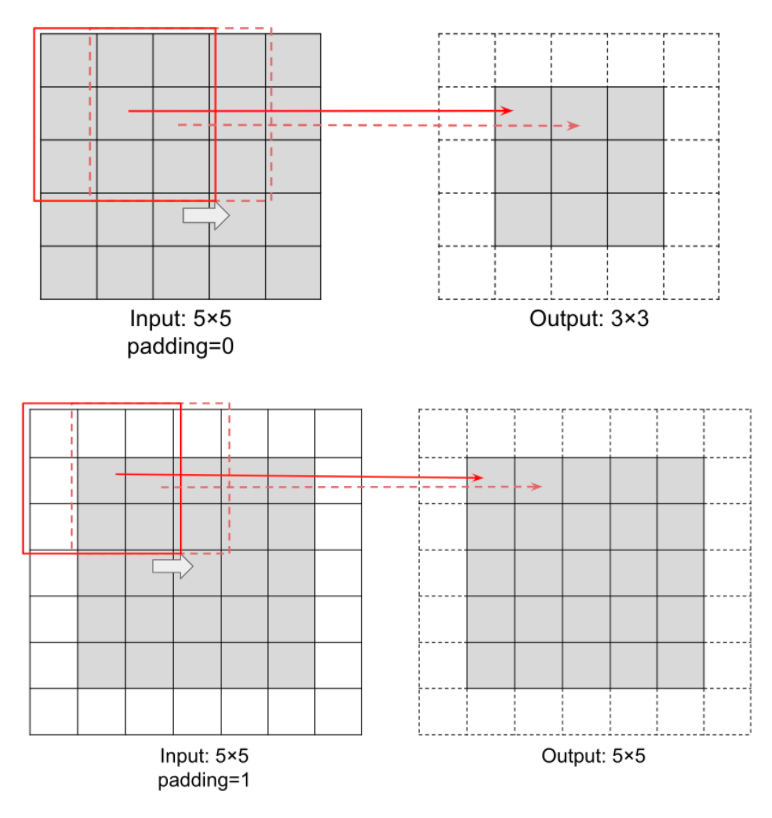
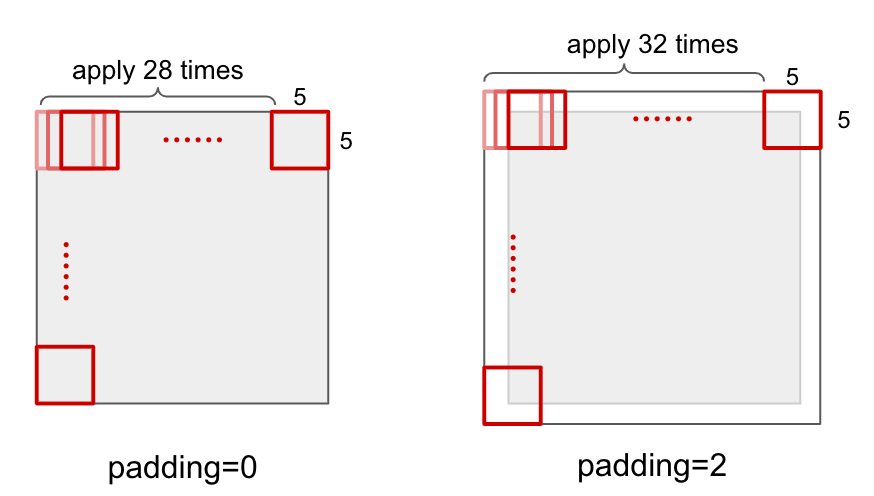
Padding
Padding is the amount of padding space applied on both sides of input. Padding changes output size to fit input image size.
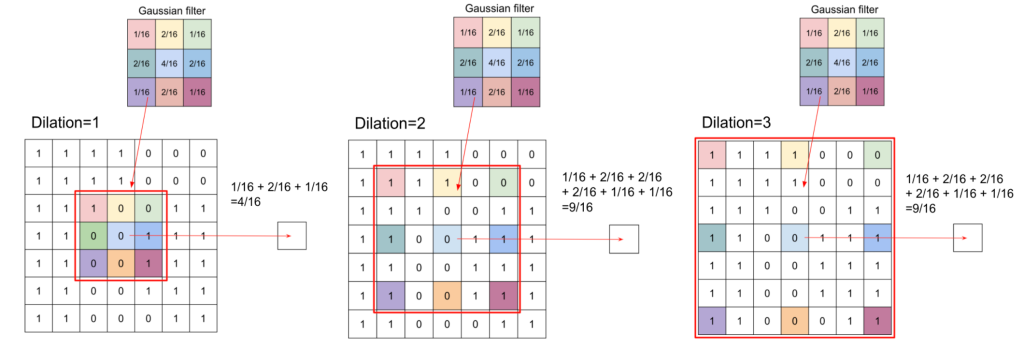
Dilation
Dilation controls the spacing between the kernel points.
Convolution In PyTorch
PytTorch provides a method torch.nn.Conv2d() for 2D convolution. Conv2d makes a convolutional layer in network class that extends nn.Module as below.
import torch
import torch.nn as nn
import torch.nn.functional as F

class Net(nn.Module):
  def __init__(self):
    super(Net, self).__init__()
    self.conv1 = nn.Conv2d(1, 6, 3) #1channel input, 6channel output (6kernels), 3*3 kernel
    self.conv2 = nn.Conv2d(6, 16, 3) #6channel input, 16channel output, 3*3 kernel

    self.fc1 = nn.Linear(16 * 6 * 6, 120) #Linear transform from 16*6*6 features into 84 features
    self.fc2 = nn.Linear(120, 84)
    self.fc3 = nn.Linear(84, 10)

  def forward(self, x):
    x = F.relu(self.conv1(x))
    x = F.max_pool2d(x, (2, 2))
    x = F.relu(self.conv2(x))
    x = F.max_pool2d(x, 2)
    x = x.view(-1, self.num_flat_features(x))
    x = F.relu(self.fc1(x))
    x = F.relu(self.fc2(x))
    x = self.fc3(x)
    return x

  def num_flat_features(self, x):
    size = x.size()[1:]
    num_features = 1
    for s in size:
      num_features *= s
    return num_flat_features

net = Net()
I installed “matblotlib” by using pip3 command on the terminal as below. I can import matplotlib on the terminal.
% pip3 install matplotlib
% python3
Python 3.8.4 (default, Jul 14 2020, 02:58:48)
[Clang 11.0.3 (clang-1103.0.32.62)] on darwin
Type "help", "copyright", "credits" or "license" for more information.
>>> import matplotlib
>>>
In jupyter notebook,
import matplotlib
---------------------------------------------------------------------------
ModuleNotFoundError                       Traceback (most recent call last)
<ipython-input-3-0484cd13f94d> in <module>
----> 1 import matplotlib

ModuleNotFoundError: No module named 'matplotlib'
Check the situation
The reference path for jupyter notebook might differ from the one of host python3.
Jupyter notebook refers the python 3.8 in jupyterlab/2.2.0/libexec/lib
In my case, the problem caused by homebrew. Installation of Jupyter Lab or Jupyter Notebook with brew command caused the different reference to python3 as above.
We can check the list of installed items with the following command on the terminal.
Addon directory and files are snake_case with only lower cases. See examples in your addon directory, C:/Program Files/Blender Foundation/Blender 2.83/2.83/scripts/addons.
Addon Name
Addon name defined in bl_info is defined with the first letter of each word capitalized.
Class Name
2.8x enforces naming conventions for class name. Refer to “Class Registration” > “Naming” in “Blender 2.80: Addon API” reference for details.
The naming convention is UPPER_CASE_{SEPARATOR}_mixed_case. And {SEPARATOR} is defined according to the type of class as below.
Header -> _HT_
Menu -> _MT_
Operator -> _OT_
Panel -> _PT_
UIList -> _UL_
The followings are examples of panel class name.
# Header
# from "oscurart_tools" addon
class OSSELECTION_HT_OscSelection(bpy.types.Header):
    bl_label = "Selection Osc"
    bl_space_type = "VIEW_3D"

# Menu
# from "space_view3d_spacebar_menu" addon
class VIEW3D_MT_Space_Dynamic_Menu(Menu):
    bl_label = "Dynamic Context Menu"

class VIEW3D_MT_View_Menu(Menu):
    bl_label = "View"

# Operator
# from "add_camera_rigs" addon
class ADD_CAMERA_RIGS_OT_set_scene_camera(Operator):
    bl_idname = "add_camera_rigs.set_scene_camera"
    bl_label = "Make Camera Active"
    bl_description = "Makes the camera parented to this rig the active scene camera"

# Panels
# from "add_camera_rigs" addon
class ADD_CAMERA_RIGS_PT_camera_rig_ui(Panel, CameraRigMixin)
    bl_label = "Camera Rig"
    bl_space_type = 'VIEW_3D'
    bl_region_type = 'UI'
    bl_category = 'Item'

# UIList
# from "cycles" addon
class CYCLES_RENDER_UL_aov(bpy.types.UIList):
    def draw_item(self, ...
bl_idname
bl_idname is specified to access the operator from python script in Blender. The bl_idname consists of snake_case words connected with dots.
# bl_idname in cycle/operators.py in cycle addon

class CYCLES_OT_use_shading_nodes(Operator):
    bl_idname = "cycles.use_shading_nodes"

class CYCLES_OT_add_aov(bpy.types.Operator):
    bl_idname="cycles.add_aov"

class CYCLES_OT_remove_aov(bpy.types.Operator):
    bl_idname="cycles.remove_aov"

class CYCLES_OT_denoise_animation(Operator):
    bl_idname = "cycles.denoise_animation"

class CYCLES_OT_merge_images(Operator):
    bl_idname = "cycles.merge_images"
For headers, menus and panels, the bl_idname is expected to match the class name (automatic if none is specified). Refer to “Class Registration” > “Naming” in “Blender 2.80: Addon API” reference.
Other – PEP 8
Basically the naming rules of module, variable and so on is compliant with PEP 8.
Today’s goal is to implement “Undo” in my Blender addon.
Environment
Blender 2.83 Windows10
Method
Add bl_options “UNDO” or “UNDO_GROUPED” into the your custom operator. It’s easy.
UNDO Undo: Push an undo event (needed for operator redo). UNDO_GROUPED: Grouped Undo, Push a single undo event for repeated instances of this operator.
class ADDMATRIX_add_cube(bpy.types.Operator):
    bl_idname = 'add_matrix_obj.add_cube'
    bl_label = "Add matrix cube"
    bl_options = {'REGISTER', "UNDO"} # Add "UNDO" option here

    input1: bpy.props.IntProperty()
    input2: bpy.props.IntProperty()

    def execute(self, context):
        for xi in range(self.input1):
            x = xi*1.2
            for yi in range(self.input2):
                y = yi*1.2
                bpy.ops.mesh.primitive_cube_add(size=0.5, enter_editmode=False, align='WORLD', location=(x, y, 0))
        return {'FINISHED'}
That was fixed in Blender 2.93, the latest version. And You can fix the error by adding bl_options “UNDO_GROUPED” into the ConsoleExec operation in C:/Program Files/Blender Foundation/Blender 2.83/2.83/scripts/startup/bl_operators/console.py.
class ConsoleExec(Operator):
    """Execute the current console line as a python expression"""
    bl_idname = "console.execute"
    bl_label = "Console Execute"
    bl_options = {"UNDO_GROUPED"} # add undo here

    interactive: BoolProperty(
        options={'SKIP_SAVE'},
    )

    @classmethod
    def poll(cls, context):
        return (context.area and context.area.type == 'CONSOLE')
Today’s goal is to create operator that takes arguments in Blender Python.
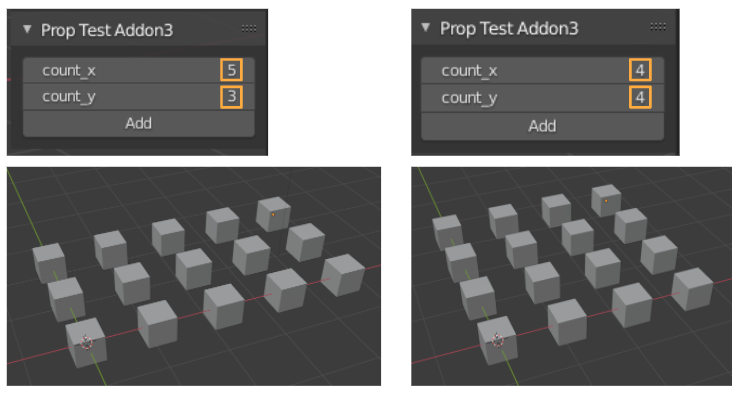
The following is a custom operator that takes 2 argument “count_x” and “count_y”, and add cube object in the form of count_x rows and count_y columns.
Environment
Blender 2.83(LTS) Windows10
Method
1. Create operator with properties
Pass the argument values through the properties to custom operator. Use “:” to add property in Blender custom operator as below. Check “Operator Example” in Blender manual for details.
class ADDMATRIX_add_cube(bpy.types.Operator):
    bl_idname = 'add_matrix_obj.add_cube'
    bl_label = "Add matrix cube"
    bl_options = {'REGISTER', "UNDO"}

    input1: bpy.props.IntProperty() # add argument1 as property "input1"
    input2: bpy.props.IntProperty() # add argument2 as property "input2"

    def execute(self, context):
        for xi in range(self.input1):
            x = xi*1.2
            for yi in range(self.input2):
                y = yi*1.2
                bpy.ops.mesh.primitive_cube_add(size=0.5, enter_editmode=False, align='WORLD', location=(x, y, 0))
        return {'FINISHED'}
You can execute operator with passing values of arguments “input1” and “input2” as below.