To understand Qt and PySide(PySide2) and create PySide application that
Emvironment
WIndows10 Python2.7.8
*I use python2 because python3 can’t be used in Maya, but I think python3 is better for general application development. And PySide2 which is used in Maya2017~ is easy to use in python3.
What is Qt?
Qt is a cross-platform application framework with many modules providing services like network abstraction and XML handling, along with a very rich GUI package.
Though Qt is developed in C++, it can be used in Python, Java, Perl and so on with API. The application developed with Qt can be executed in any platform such as Windows, Linux, macOS, desktop and mobile.
Qt has been upgraded constantly, and the latest version in 2020 is Qt5.
What is PySide?
PySide is the python module as a Python binding of Qt. Functions, variables and modules of Qt can be used in Python via PySide. GUI application can be developed on multi platform, windows, Linux and macOS using Python with PySide.
PySide and Pyside2
PySide2 is upgraded PySide. PySide2 provides access to the Qt 5 framework while PySide provide access to Qt4 or below. Qt4 and PySide can be used in Maya2016 and before, Qt5 and PySide2 is used in Maya2017 and after.
If you are using python2, it’s easy to install PySide by using pip install, but you should build PySide2 by yourself. So If you want to use PySide2, please use python3 and its pip install.
The difference between PySide and PyQt
PyQt is also one of the python modules as a Python binding of Qt. The document “Differences Between PySide and PyQt” is clear and detailed. And “PyQt vs Pyside” is easy to understand their advantages and disadvantages.
Method
The following is the method to create your first PySide application. This is for PySide so please replace words for PySide2 if you need.
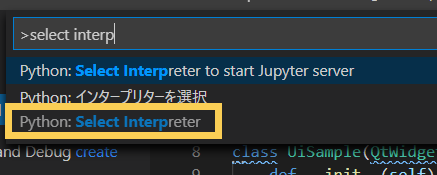
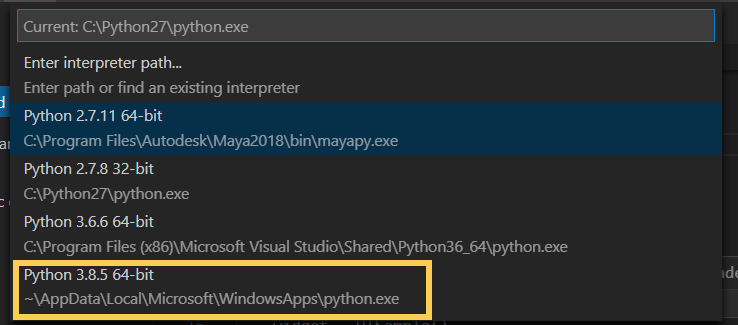
Install PySide
Open Command prompt and input pip command. In my case, ‘pip2’ is used because python3 is installed and the command just ‘pip’ is equal to pip3.
This is an application program to display HelloWorld.
import sys
from PySide.QtCore import *
from PySide.QtGui import *

#Create QApplication
firstApp = QApplication(sys.argv)
# Create a Label
label = QLabel("Hello World")
label.show()
# Enter Qt application main loop
firstApp.exec_()
sys.exit()
Execute and small window will appear.
QtGui
QtGui module contains classes that control widgets of PySide. Widget is a UI component that is used in GUI application such as button, label, Matrix, Layout and so on. You can see all class in PySide.QtGui.
Create Widget
You can create original widget as a Class. Add single widgets into QVBoxLayout.
When I install my custom addon in Blender2.80, the warning “class CLASS_NAME contains a property which should be an annotation!” occured. the class CLASS_NAME is an operator class that inherits bpy.types.Operator. And the class contains bpy.props properties as below.
Classes that contain properties from bpy.props now use Python’s type annotations (see PEP 526) and should be assigned using a single colon : in Blender 2.8x instead of equals = as was done in 2.7x
ANOVE is is a method of statistical hypothesis testing that determines the effects of factors and interactions, which analyzes the differences between group means within a sample. Details will be longer. Please see the following site.
One-way ANOVA is ANOVA test that compares the means of three or more samples. Null hypothesis is that samples in groups were taken from populations with the same mean.
Implementation
The following is implementation example of one-way ANOVA.
Import Libraries
Import libraries below for ANOVA test.
import pandas as pd
import numpy as np
import scipy as sp
import csv # when you need to read csv data
from scipy import stats as st

import statsmodels.formula.api as smf
import statsmodels.api as sm
import statsmodels.stats.anova as anova #for ANOVA
from statsmodels.stats.multicomp import pairwise_tukeyhsd #for Tukey's multiple comparisons
csv_line = []
with open('test_data.csv', ) as f:
    for i in f:
        items = i.split(',')
        for j in range(len(items)):
            if '\n' in items[j]:
                items[j] =float(items[j][:-1])
            else:
                items[j] =float(items[j])
        print(items)
        csv_line.append(items)
The smaller the p-value, the stronger the evidence that you should reject the null hypothesis. When statistically significant, that is, p-value is less than 0.05 (typically ≤ 0.05), perform a multiple comparison.
Tukey’s multiple comparisons
Use pairwise_tukeyhsd(endog, groups, alpha=0.05) for tuky’s HSD(honestly significant difference) test. Argument endog is response variable, array of data (A[0] A[1]… A[6] B[1] … B[6] C[1] … C[6]). Argument groups is list of names(A, A…A, B…B, C…C) that corresponds to response variable. Alpha is significance level.
def tukey_hsd(group_names , *args ):
    endog = np.hstack(args)
    groups_list = []
    for i in range(len(args)):
        for j in range(len(args[i])):
            groups_list.append(group_names[i])
    groups = np.array(groups_list)
    res = pairwise_tukeyhsd(endog, groups)
    print (res.pvalues) #print only p-value
    print(res) #print result
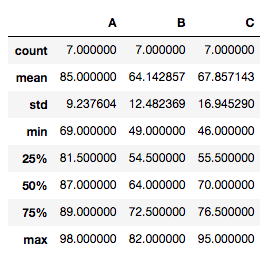
print(tukey_hsd(['A', 'B', 'C'], tdata['A'], tdata['B'],tdata['C']))
>>[0.02259466 0.06511251 0.85313142]
 Multiple Comparison of Means - Tukey HSD, FWER=0.05
=====================================================
group1 group2 meandiff p-adj   lower    upper  reject
-----------------------------------------------------
     A      B -20.8571 0.0226 -38.9533 -2.7609   True
     A      C -17.1429 0.0651 -35.2391  0.9533  False
     B      C   3.7143 0.8531 -14.3819 21.8105  False
-----------------------------------------------------
None
Supplement
If you can’t find ‘pvalue’ key, check the version of statsmodels.
To understand what @classmethod in python is and how to use it
What is classmethod?
@classmethod is a function decorator.
class C:
    @classmethod
    def f(cls, arg1, arg2, ...):
A class method can be called either on the class (such as C.f()) or on an instance (such as C().f()). The instance is ignored except for its class. If a class method is called for a derived class, the derived class object is passed as the implied first argument.
WARN (bpy.rna): c:\b\win64_cmake_vs2017\win64_cmake_vs2017\blender.git\source\blender\python\intern\bpy_rna.c:1476 pyrna_enum_to_py: current value ‘3’ matches no enum in ‘SpaceNodeEditor’, ‘(null)’, ‘tree_type’
There’s also a corner case when having the Shader editor visible (for example when Cycles is active) and then switching to a render engine that has bl_use_shading_nodes_custom=True: the icon for the editor will become blank, but the Shader editor remains visible. In the console I warnings in this case: WARN (bpy.rna): ../source/blender/python/intern/bpy_rna.c:1451 pyrna_enum_to_py: current value ‘3’ matches no enum in ‘SpaceNodeEditor’, ‘(null)’, ‘tree_type’
When I activate my custom render engine and switch to the Shading workspace, the node menus disappear and I get the error: WARN (bpy.rna): c:\b\win64_cmake_vs2017\win64_cmake_vs2017\blender.git\source\blender\python\intern\bpy_rna.c:1449 pyrna_enum_to_py: current value ‘0’ matches no enumin ‘SpaceNodeEditor’, ‘(null)’, ‘tree_type’
The cause is unclear. However, in my case, this error occurs when I access SpaceNodeEditor.tree_type in register() function with the flag “bl_use_shading_nodes_custom” set to True. My solution was one of the following:
To set SpaceNodeEditor.tree_type not to be accessed in register() function.
Set the flag “bl_use_shading_nodes_custom to False and use my node in ShaderEditor for existing Eevee, Cycles.
Chi-square test which means “Pearson’s chi-square test” here, is a method of statistical hypothesis testing for goodness-of-fit and independence.
Goodness-of-fit test is the testing to determine whether the observed frequency distribution is the same as the theoretical distribution. Independence test is the testing to determine whether 2 observations that is represented by 2*2 table, on 2 variables are independent of each other.
Details will be longer. Please see the following sites and document.
The following is implementation for chi-square test.
Import libraries
import numpy as np
import pandas as pd
import scipy as sp
from scipy import stats
Data preparing
gourp A
group B
group C
success
23
65
158
failure
100
44
119
success rate
0.187
0.596
0.570
chi_square_data.csv
A,B,C
23,65,158
100,44,119
Read and Set Data
csv_line = []
with open('chi_square_data.csv', ) as f:
    for i in f:
        items = i.split(',')
        for j in range(len(items)):
            if '\n' in items[j]:
                items[j] =float(items[j][:-1])
            else:
                items[j] =float(items[j])
        csv_line.append(items)
group = csv_line[0]
success = [int(n) for n in csv_line[1]]
failure = [int(n) for n in csv_line[2]]

groups = []
result =[]
count = []
for i in range(len(group)):
    groups += [group[i], group[i]] #['A','A', 'B', 'B', 'C', 'C']
    result += ['success', 'failure'] #['success', 'failure', 'success', 'failure', 'success', 'failure']
    count += [success[i], failure[i]] #[23, 100, 65, 44, 158, 119]

data =  pd.DataFrame({
    'groups' : groups,
    'result' : result,
    'count' : count
})
cross_data = pd.pivot_table(
    data = data,
    values ='count',
    aggfunc = 'sum',
    index = 'groups',
    columns = 'result'
)
print(cross_data)
>>result  failure  success
groups
A           100       23
B            44       65
C           119      158
The expected frequencies, based on the marginal sums of the table.
The smaller the p-value, the stronger the evidence that you should reject the null hypothesis. When statistically significant, that is, p-value is less than 0.05 (typically ≤ 0.05), the difference between groups is significant.
ANOVA(analysis of variance) is a method of statistical hypothesis testing that determines the effects of factors and interactions, which analyzes the differences between group means within a sample. Details will be longer. Please see the following site.
One-way ANOVA is ANOVA test that compares the means of three or more samples. Null hypothesis is that samples in groups were taken from populations with the same mean.
Implementation
The following is implementation example of paired one-way ANOVA.
Import Libraries
Import libraries below for ANOVA test.
import statsmodels.api as sm
from statsmodels.formula.api import ols
import pandas as pd
import numpy as np
import statsmodels.stats.anova as anova
csv_line = []
with open('test_data.csv', ) as f:
    for i in f:
        items = i.split(',')
        for j in range(len(items)):
            if '\n' in items[j]:
                items[j] =float(items[j][:-1])
            else:
                items[j] =float(items[j])
        print(items)
        csv_line.append(items)
aov=anova.AnovaRM(df, 'Point','Subjects',['Conditions'])
result=aov.fit()

print(result)

>>                 Anova
========================================
           F Value Num DF  Den DF Pr > F
----------------------------------------
Conditions  5.4182 2.0000 12.0000 0.0211
========================================
The smaller the p-value, the stronger the evidence that you should reject the null hypothesis. When statistically significant, that is, p-value is less than 0.05 (typically ≤ 0.05), perform a multiple comparison. This p value is different between paired ANOVA and unpaired ANOVA.
Tukey’s multiple comparisons
Use pairwise_tukeyhsd(endog, groups, alpha=0.05) for tuky’s HSD(honestly significant difference) test. Argument endog is response variable, array of data (A[0] A[1]… A[6] B[1] … B[6] C[1] … C[6]). Argument groups is list of names(A, A…A, B…B, C…C) that corresponds to response variable. Alpha is significance level.
def tukey_hsd(group_names , *args ):
    endog = np.hstack(args)
    groups_list = []
    for i in range(len(args)):
        for j in range(len(args[i])):
            groups_list.append(group_names[i])
    groups = np.array(groups_list)
    res = pairwise_tukeyhsd(endog, groups)
    print (res.pvalues) #print only p-value
    print(res) #print result
print(tukey_hsd(['A', 'B', 'C'], tdata['A'], tdata['B'],tdata['C']))
>> [0.02259466 0.06511251 0.85313142]
 Multiple Comparison of Means - Tukey HSD, FWER=0.05
=====================================================
group1 group2 meandiff p-adj   lower    upper  reject
-----------------------------------------------------
     A      B -20.8571 0.0226 -38.9533 -2.7609   True
     A      C -17.1429 0.0651 -35.2391  0.9533  False
     B      C   3.7143 0.8531 -14.3819 21.8105  False
-----------------------------------------------------
None
Return the value of the named attribute of object. name must be a string. If the string is the name of one of the object’s attributes, the result is the value of that attribute. For example, getattr(x, 'foobar') is equivalent to x.foobar. If the named attribute does not exist, default is returned if provided, otherwise AttributeError is raised.