The goal of this article it to describe an algorithm to find first target item or last target item from sorted list with duplication using binary search and how to implement them in C++.
What is binary search?
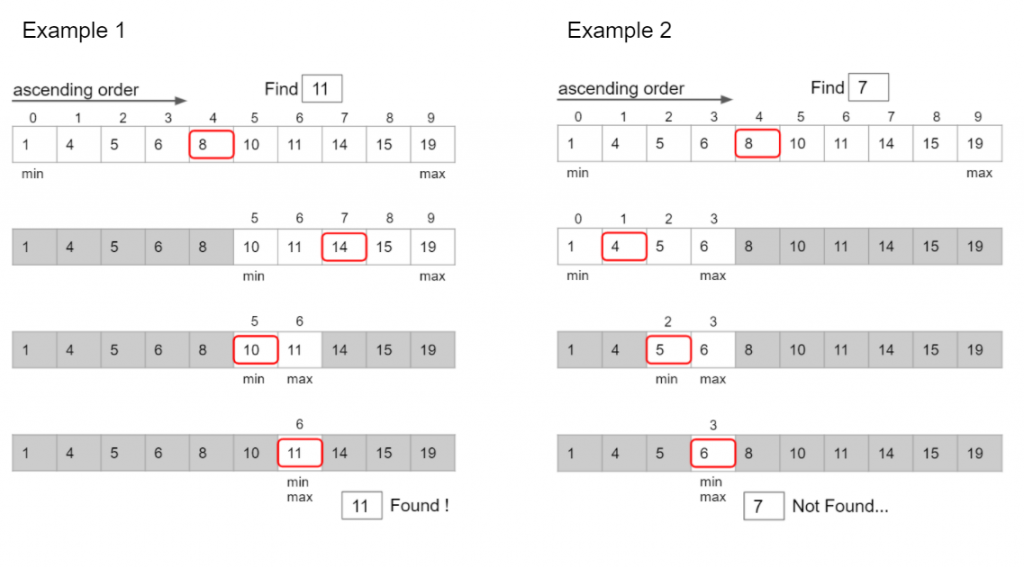
Binary search is one of the search algorithms, that finds position or judges existence of an target value on sorted array.
Binary search compares the current value defined as a half of target range of the array to the target value. Binary search compares the middle element of current target range in the array to the target value. The current target range is narrowed according to the result of comparison as below.
What if there are same values in the array?
If there are same values, the found element can be first one, last one or other. How can we change this algorithm to search for the smallest or largest element?
Find first index
If the value currently focused is equal to the target value, the current value is contained to the next range as a max value. End the process when min index equal to max index, then check if the min value is equal to the target value.
If you just detect enter key pressed at any time, use getchar() or cin.get() function.
C language
#include <stdio.h>
#include <windows.h> // for Sleep function

int main(void)
{
	while(true){
		if (getchar() == '\n') {
			printf("Enter key is pressed");
			Sleep(1000); //wait for check printed message.
			break;
		}
	}
	return 0;
}
C++
#include <iostream>
using namespace std;

int main() {
	while (1) {
		if (cin.get() == '\n') {
			cout << "Enter key is pressed" << endl;
			break;
		}
	}
	return 0;
}
Method 2. get line
If you’d like to detect that only enter key is pressed without input another key before enter, use scanf() , fgets() or gets() in C language or getline() in C++
C language
#include <stdio.h>
#include <string.h>
#include <windows.h> // for Sleep function

int main(void)
{
	while (1) {
		//if (getchar() == '\n') {
		char str[32];
		gets(str);
		if(strcmp(str,"")==0){
			printf("Enter key is pressed");
			Sleep(1000); //wait for check printed message.
			break;
		}
	}
	return 0;
}
C++
#include <iostream>
using namespace std;

int main() {
	string str;
	while (1) {
		getline(cin, str);
		if (str == "") {
			cout << "Enter key is pressed" << endl;
			break;
		}
	}
	return 0;
}
Method 3. GetKeyState
GetKeyState() is only provided on Windows. You can get the current “state” of the key. It returns 0 when the key is not pressed.
When I create a new C/C++ project in VisualStudio, an header file named “pch.h” is generated.
GOAL
To understand what is pch.h and how to use it.
Environment
Windows 10 VisualStudio 2017
What is pch.h
pch.h is a precompiled header that is an header file where any stable header files such as Standard Library headers are included. You can add header files you’d like to pre compile. The precompiled header is compiled only when it, or any files it includes, are modified.
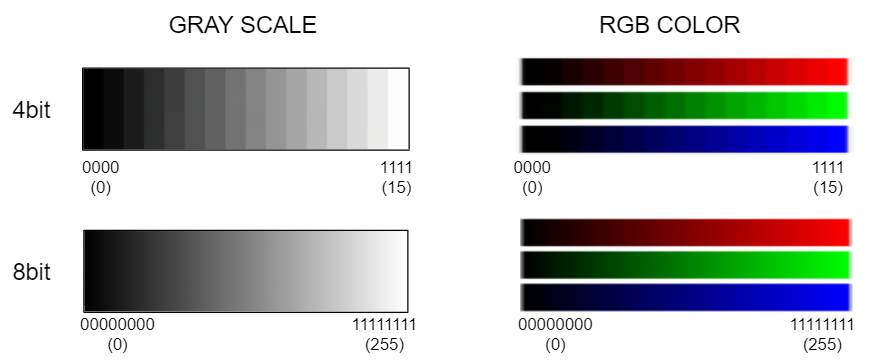
Colors are represented as numbers in computers. In RGB color system, color is represented (R, G, B) such as (100, 120, 144) or (0.5, 0.2, 0.7). In gray scale mode, color is represented as one value such as a integer form 0 to 255 or float from 0 to 1.0.
Color bit depth is resolution of each values. When the color is 8 bpc(bit per channel) each channel, R, G, B and A is expressed using 8bit. When the color is 8bpp(bit per pixel), each pixel color is expressed using 8bit, 3bit for R and G and 2 bit for B.
The following is the image of the difference between 4bit color (4bpc) and 8bit color (8bpc).
8bit: 0-255 for each channel (256 gradation) 16bit: 0-32767 for each channel (32,768 gradation) 32bit: The range represented by a 32-bit float for each channel (4,294,967,296 gradation)
The color is represented by integer in 8bpc and 16bpc color. Float value is clamped into [0.0 – 1.0] and convert to [0-255] or [0-32767] in 8bpc and 16bpc.
Color bit depth in AE plug-in development
When you develop After Effects plug-in, you should consider all color 8/16/32bit.
//this is from AE_Effect.h

typedef struct {
	#ifdef PF_PIXEL16_RENAME_COMPONENTS
		// this style is useful for debugging code converted from 8 bit
		A_u_short		alphaSu, redSu, greenSu, blueSu;
	#else
		A_u_short		alpha, red, green, blue;
	#endif
} PF_Pixel16;
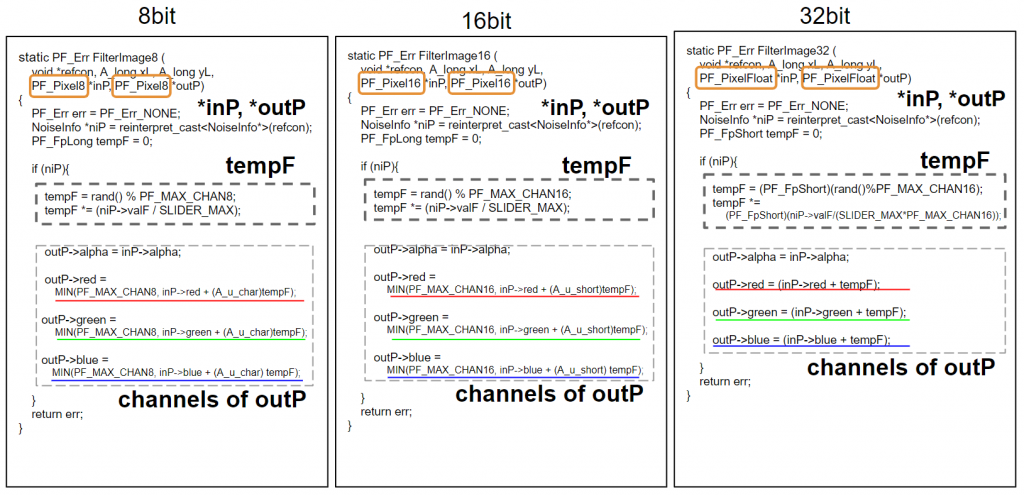
And as you can see below, each channel is char type (8bit) in PF_Pixel or PF_Pixel8, unsigned short type (16bit) in PF_Pixel16 and float type (32bit) in PF_PixelFloat or PF_Pixel32.
//picked up from A.h

typedef char			A_char;
typedef float			A_FpShort;
typedef unsigned short	A_u_short;
Tips of color depth handling in AE plug-in development
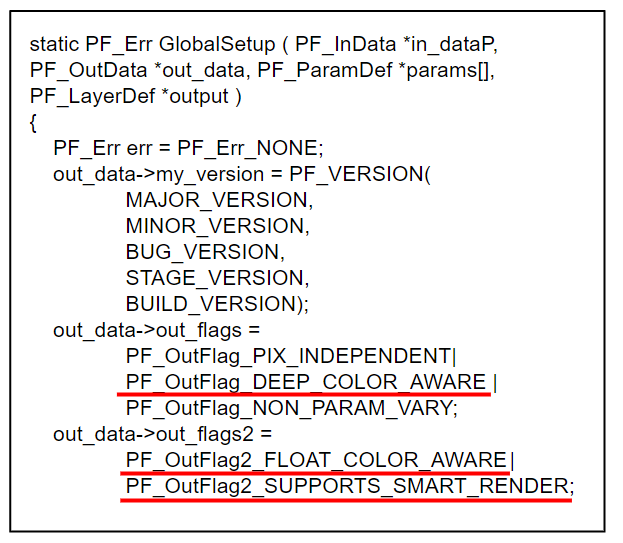
Global setup
To make your effect handle 16-bpc color, set out_data->out_flags PF_OutFlag_DEEP_COLOR_AWARE.
And to make your effect supports 32-bpc colors, set out_data->out_flags2 PF_OutFlag2_FLOAT_COLOR_AWARE and PF_OutFlag2_SUPPORTS_SMART_RENDER.
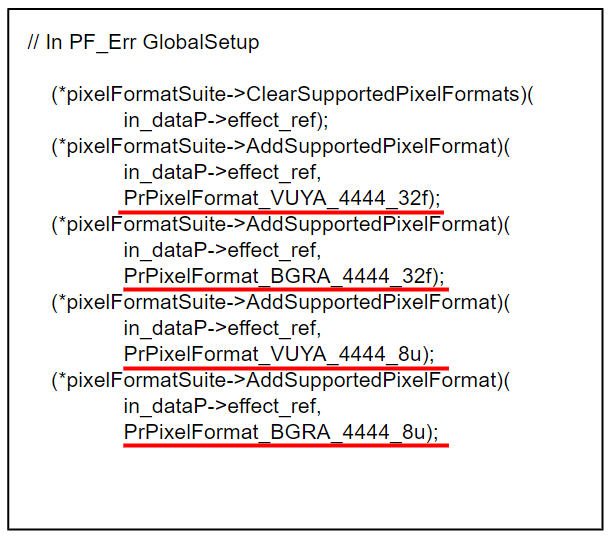
Set pixel format
Before CS6, PF_CHECKOUT_PARAM() only returned 8-bit ARGB buffers, regardless of the pixel format currently being used for rendering. Starting in CS6, an effect can opt in to get frames in the same format as the render request, whether it is 32-bit float, YUV, etc.
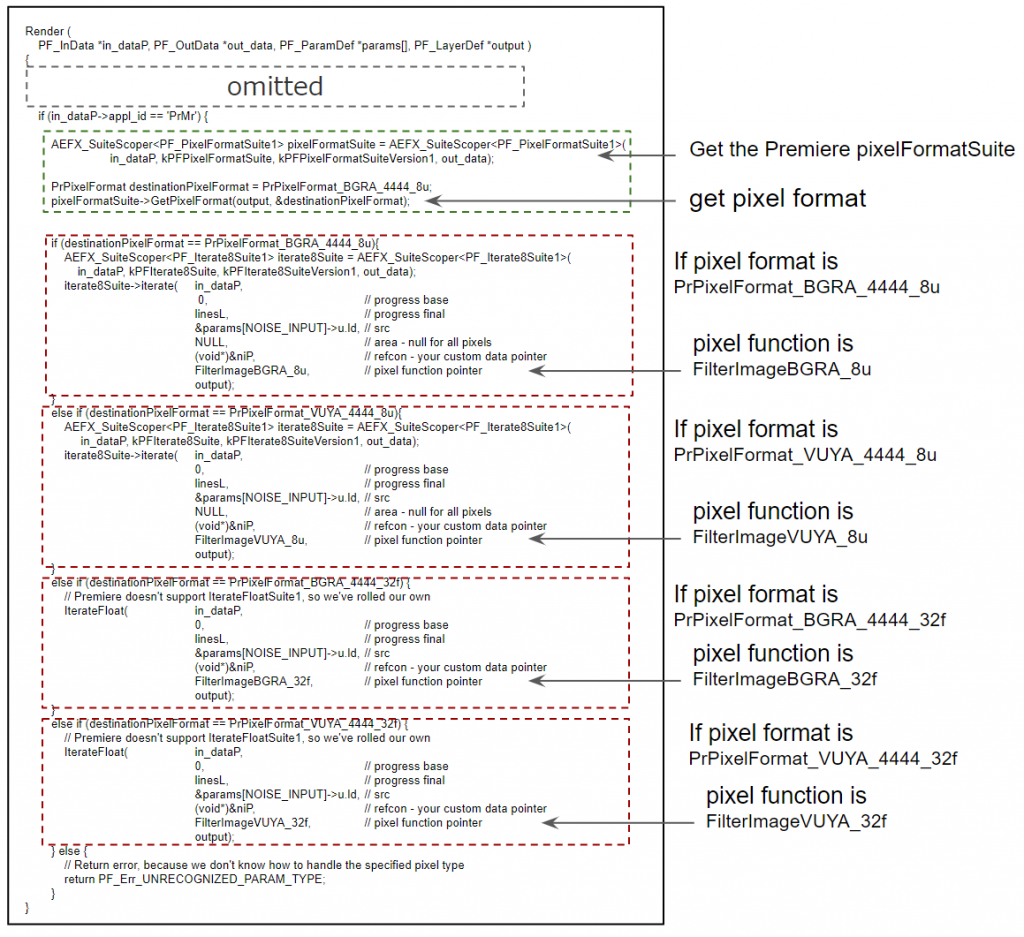
In Render function, the iterate function scan input flame and calculate output frame as pixel to pixel operation, pixel function. The iterate functions is selected separately depending on the PrPixelFormat of destination pixels. Check After Effects SDK Guide “Progress During Iteration” for details.
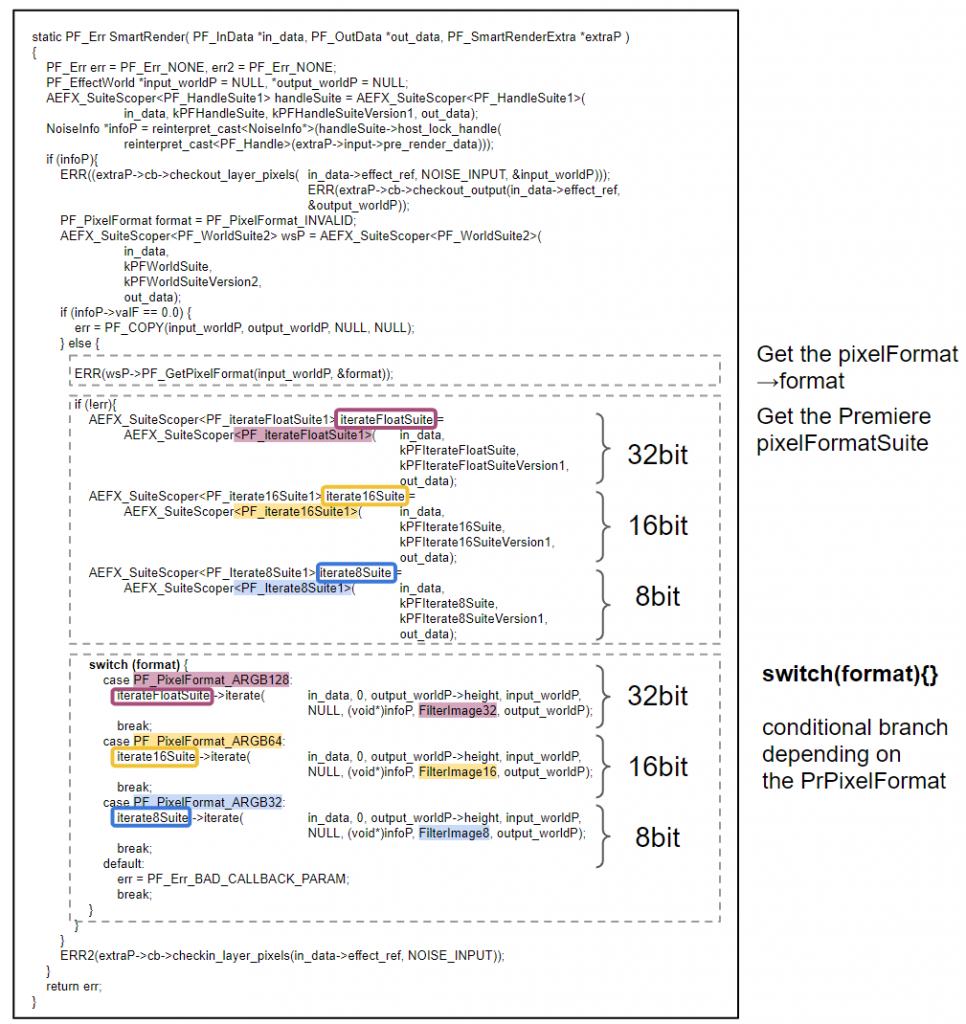
Smart Render
In Smart Render function, pixel functions is selected separately depending on the PrPixelFormat like Render function.
If you want to know about the difference between Render function and SmartRender function, check the article “The difference of Render and Smart Render in After Effects”. (sorry, it will come soon)
The conditional branch by switch sentence is following.
typedef is a reserved keyword that gives a new name to existing data type used in C/C++ programming. That new name like this is called alias or synonym.
The following is an example of typedef. typedef is used just for user convenience.
typedef int USER_Id;
USER_Id john_id; //this is same as int john_id
john_id = 24;
When to use typedef
These are some of many use cases of type def.
To clarify the meaning of variable
For example, when you handle data of date many times, you may want to identify month and day.
typedef  int Month;  //define alias "Month"
typedef int Day;  // define alias "Day"
This is an example of use.
#include <iostream>
using namespace std;

typedef  int Month;
typedef int Day;

void print_birthday(Month m,  Day d){
    printf("your birthday is %d/%d\n",m, d);
}
Day last_day(Month m){
    if(m == 4 && m==6 && m==9 && m==11)
        return 30;
    if(m == 2)
        return 28; //ignore leap year
    else
        return 31;
}
int main(void){
    print_birthday(12,24);  /* output is "your birthday is 12/24" */
    cout << last_day(10);  /* output is "31"*/
}
To omit long type
typedef long long unsigned int LLUInt;

int main(void){
    LLUInt test1 = 10;
    LLUInt test2 = 20;
    cout << test1+test2 << endl;  /* output is "30"*/
}
To omit the “struct” keyword in C language
When you declare a defined structure, you should use the “struct” keyword in C language.
struct person{
    char *nickname;
    int age;
};
//declare
struct person john;
If you use typedef and rename the structure, you don’t need the “struct” keyword.
#include <iostream>
using namespace std;

typedef char* my_str;

int main(void){
    my_str name = "Nako";
    printf("My name is %s\n", name); /* output is "My name is Nako"*/
}
In this example, variable f can store a pointer to function int FUNC(int n).
#include <iostream>
using namespace std;

int next_int(int x) { return x + 1; } //example of int FUNC(int n)
int half_int(int x) { return x/2;}  //example of int FUNC(int n)

int main(void){
    int (*f1)(int n);
    int (*f2)(int n);
    f1 = next_int;
    f2 = half_int;
    cout << f1(4) << " " << f2(4) << endl;  /*output is "5 2"*/
}
Typedef can add the name to the pointer of function.
typedef int (*FUNCT)(int n);
The above example of function pointer can be changed as below.
#include <iostream>
using namespace std;

int next_int(int x) { return x + 1; }
int half_int(int x) { return x/2;}

typedef int (*FUNCT)(int n);

int main(void){
    FUNCT f1;
    FUNCT f2;
    f1 = next_int;
    f2 = half_int;
    cout << f1(4) << " " << f2(4) << endl;    /*output is "5 2"*/
}
list
typedef can define list as type.
#include <iostream>
using namespace std;

typedef int Members[5];

int main(void){
    Members team_a = {13, 25, 66, 89, 100};
    Members team_b = {21, 22, 50, 78, 81};
    for(int i=0; i<5; i++){
        cout << team_a[i] << " ";  /*output is "13 25 66 89 100 "*/
    }
    cout << endl;
    for(int i=0; i<5; i++){
        cout << team_b[i] << " ";  /*output is "21 22 50 78 81 "*/
    }
}
using in C++
The “using” declaration introduces a name into the declarative region in C++. The “using” declaration is usually used for making a declaration of namespace such as “using namespace std;”, but it can be also used for alias.
using Month = int;
using Day = int;
using FUNCT = int (*)(int);
I’ll write about the difference between typedef and using and its features someday. Thank you!
To understand the rules and general method to separate header files and source files in C++.
What is header files?
Header files are files where class definitions and function declarations are summarized. You can use the class written in the header file by writig #include or #include “myheader.h” in source file as follows.
#include <iostream>
#include "myClass.h"
using namespace std;
int main(){
   myClass instance1;
   cout << instance1.getName() << endl;
}
Why are header files necessary?
In C++, variables, classes, functions and so on should be declared before used, like sayHello() or myClass in the sample code below.
If this declaration is missed or called by wrong name, an error will occur. And when you use the same function or class in multiple files, you have to declare it many times in each file. It is difficult to understand the structured of code if the names of functions that have same function are different. And it is also difficult to make corrections collectively. For this reasons, the declaration part are split into the header files separately from the main source files.
//mysource.cpp
#include <iostream>
#include "myClass.h"
using namespace std;
int main() {
    myClass cat1("Joe");
    cout << cat1.getName() << endl;
}
//console result
Joe
About #include
Header files can be loaded with #include or #include “filename”. The difference between the two styles is that when #include is used, the system searches the directory of the library specified by the compiler preferentially, but on the other hand, when #include “filename” is used, the system searches the current directory.
In header files, write classes, methods and variable declarations. You can also make class-related definitions.
Definitions
Class definition
Inline function definition
Macro definition
Declarations
extern variable declaration
typedef declaration
Global function declaration
The declared functions in the header file are defined in the source file. Be aware of items not to be included in the header file. For example, the next chapter explains why variables are only declarated and are’nt defined in the header file.
Items that should not be written in the header file
Items such as duplicate definitions, that may cause confusion.
Definition of built-in types (int, float, string, etc.)
Anonymous namespace
That is definition a class in a namespace that is not named.
Using directive
If “using” is used, the namespace is also applied indirectly to the source file that read the header file, and it is easy to get confused.
Items that allocate memory area. (When multiple source files are read, each item reserves another area with the same name, which results in duplicate definition.)
Non-inline function definition
Inline function will be expanded to the call destination, so they have no problem.
Defining non-const variables (variables that are not constants)
Even if it is static, the variables are not shared and the entity is created for each source file.
Use const variables to define constants.
How to define a function?
Write only the declaration in the header file myClass.h.
//myClass.h
void myFunction();
Define the function in one of the .cpp files that are compiled together (either the main source file or myClass.cpp created for each header file).
//myClass.cpp
#include "myClass.h"
void myFunction(){
    printf("This is my function!");
}
In other .cpp files, you can use and use myFuction() defined in myClass.cpp by including only myClass.h.
How to define a variable?
Only “extern” is used in the header file myClass.h.
//myClass.h
extern int myVar;
Define the global variables in one of the .cpp files that are compiled together (either the main source file or myClass.cpp created for each header file).
//myClass.cpp
#include "myClass.h"
int myVar;
In other .cpp files, you can use variables by including only myClass.h. However, it is not recommended because it rarely uses variables in header file and it’s good to use class variables in C++.
Include guard is a mechanism to prevent duplicate inclusion of header files. Duplicate inclusion can occur, for example, if you include one header file A in another header file B, then include A and B from a C++ source file.
When I compile c++ file using g++ command as below, the fatal error: numpy/arrayobject.h: No such file or directory occurred.
>g++ filename.cpp -std=c++11 -IC:\Python27\include -lpython2.7
In file included from filename.cpp:1:
../libs/matplotlibcpp.h:17:12: fatal error: numpy/arrayobject.h: No such file or directory
   17 | #  include <numpy/arrayobject.h>
matplotlibcpp.h in the source code is c++ header file to plot a graph.
numpy/arrayobject.h is in the directory C:\Python27\Lib\site-packages\numpy\core\include\numpy.
Cause
The compiler could not find arrayobject.h because that file is not included in the include search path.
Solution
Add the path to arrayobject.h using -I command line option as follows.
Add the 3 directories, \devkit , \mkspecs in devkitBase into Maya installation directory (e.g. C:\Program Files\Autodesk\Maya2018).
* To compile custom plug-ins, you can also find the C++ API header files(\include\maya ) and libraries(\lib).
Build enclosed plug-ins in Visual Studio
Open devkit/plug-ins folder( either maya installation folder or newly created folder where plug-in folder is copied and put would be fine). I create a folder named “maya_cpp_plugin” and copy plug-in files to the new folder.
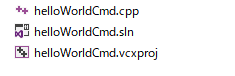
Find “Hello World Cmd” and open it.
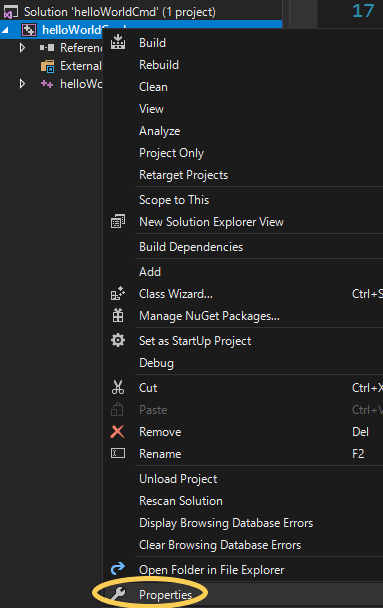
Add folder “include” into the list of include directories for Visual Studio. Right Click the name of project name and open Properties.
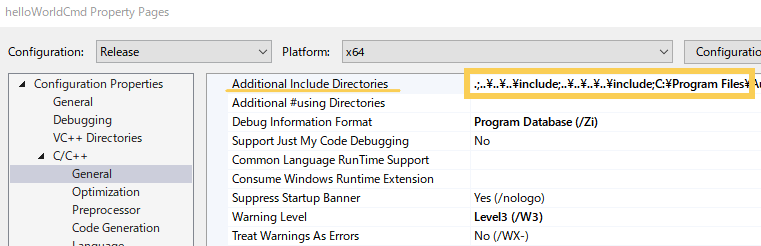
Then, add ” C:\Program Files \ Autodesk\Maya2018\include” into the Additional Include Directories.
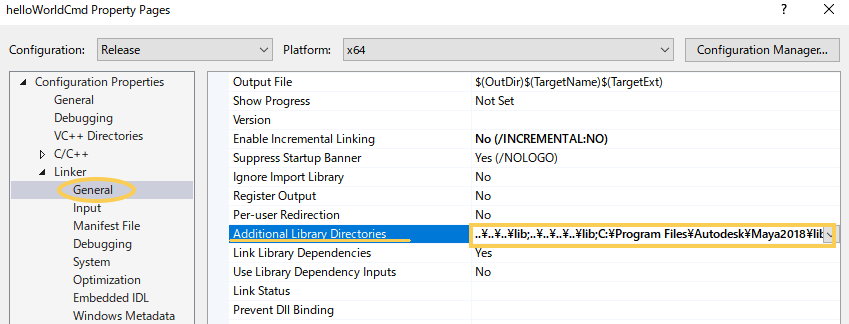
Add ” C:\Program Files\Autodesk\Maya2018\lib” into Additional Library Directories.
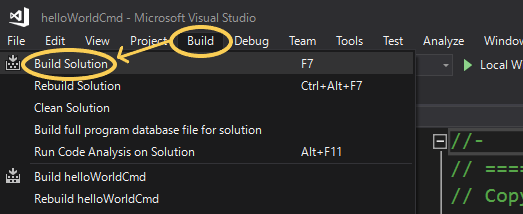
Open solution file *.sln, then Visual Studio will start up. Click Build > Build Solution.
The output files are in the directory maya_cpp_plugin\helloWorldCmd\x64\Release(or Debug). “helloWorldCmd.mll” is the main plugin file.
Add plugin helloWorldCmd.mll to the plug-in directory defined as MAYA_PLUG_IN_PATH in <username>\Documents\maya\<version>\Maya.env file. If Maya.env doesn’t exist, create it according to “Setting environment variables using Maya.env“.
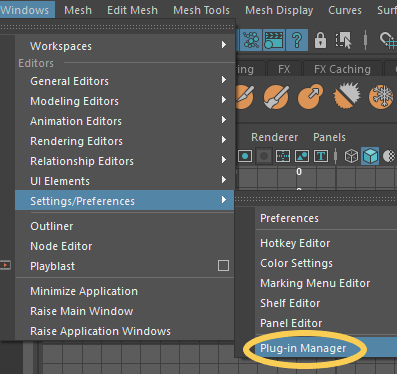
Start Maya and open Plug-in Manager.
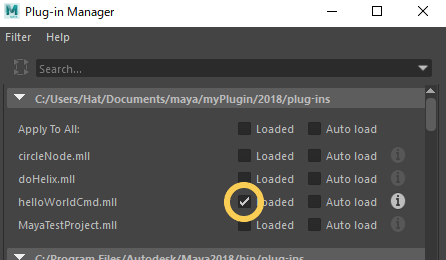
Click a check mark next to helloWorldCmd.mll
Execute the Plug-in with command
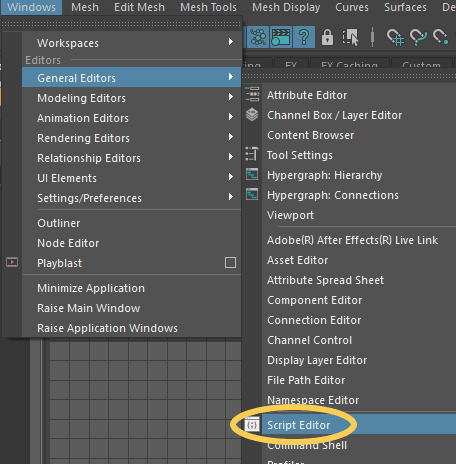
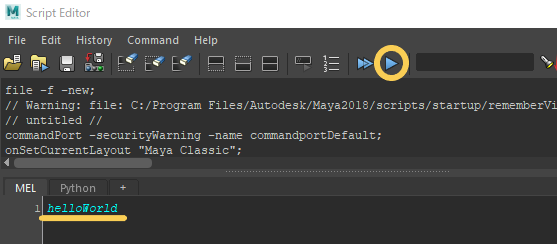
Open Script Editor and execute the Command “helloWorld”.
The message “helloWorld” is displayed on the console, upper side of the Script Editor.
To install g++ in Windows10 and compile a c++ file. g++ is included in
What is g++?
g++ is the command to compile c++ and the name of C++ compiler included in GCC, the GNU Compiler Collection. You can use g++ on GNU such as Cygwin and MinGW.
Method
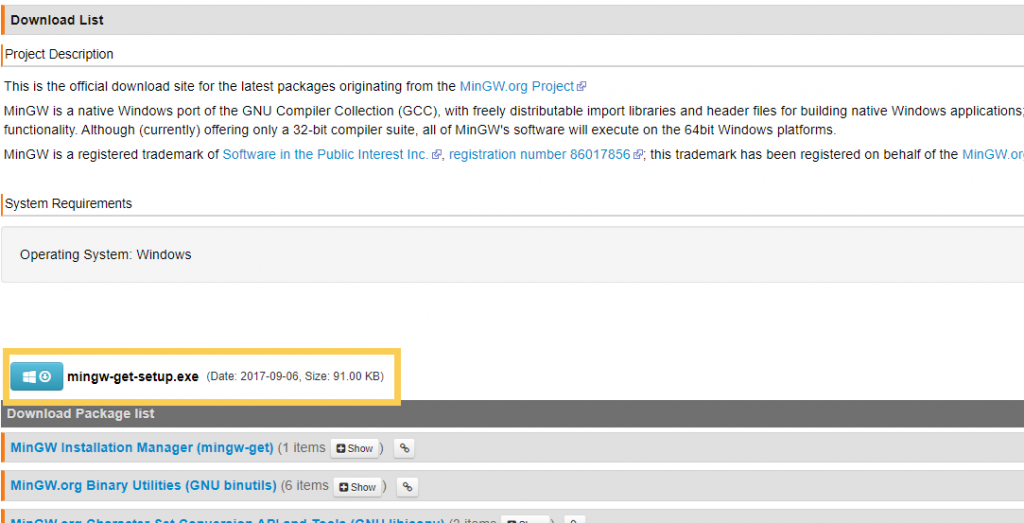
I’ll use MinGW
Get mingw-get-setup.exe
Access the MinGW web site and go to the Downloads page. Click and downloads mingw-get-setup.exe.