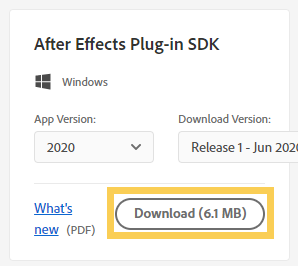
Select After Effects “View downloads” and download After Effects Plug-in SDK. Then extract downloaded folder.
Build single plug-in
Select project
Open AfterEffectsSDK\Examples and select a project that you’d like to build. For example, “AfterEffectsSDK\Examples\AEGP\Artie” is one of the project directory. See the list of sample project in Sample Project Descriptions.
Open solution file
Open the solution file (for example, AfterEffectsSDK\Examples\AEGP\Artie\Win\Artie.sln) with Visual Studio 2015(v140). While you can use later versions, you should upgrade the project from v140 to using version.
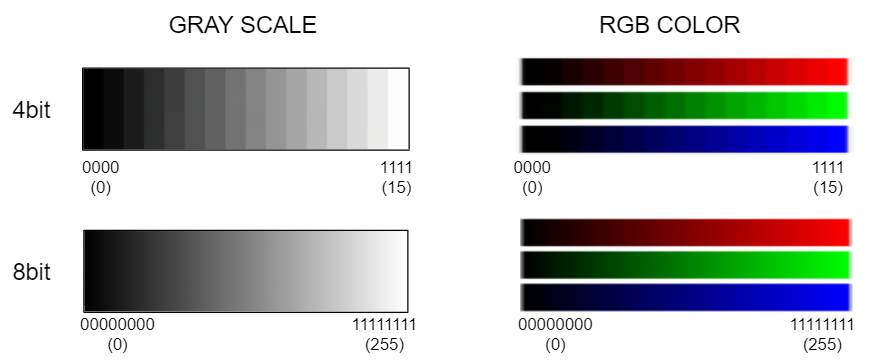
Colors are represented as numbers in computers. In RGB color system, color is represented (R, G, B) such as (100, 120, 144) or (0.5, 0.2, 0.7). In gray scale mode, color is represented as one value such as a integer form 0 to 255 or float from 0 to 1.0.
Color bit depth is resolution of each values. When the color is 8 bpc(bit per channel) each channel, R, G, B and A is expressed using 8bit. When the color is 8bpp(bit per pixel), each pixel color is expressed using 8bit, 3bit for R and G and 2 bit for B.
The following is the image of the difference between 4bit color (4bpc) and 8bit color (8bpc).
8bit: 0-255 for each channel (256 gradation) 16bit: 0-32767 for each channel (32,768 gradation) 32bit: The range represented by a 32-bit float for each channel (4,294,967,296 gradation)
The color is represented by integer in 8bpc and 16bpc color. Float value is clamped into [0.0 – 1.0] and convert to [0-255] or [0-32767] in 8bpc and 16bpc.
Color bit depth in AE plug-in development
When you develop After Effects plug-in, you should consider all color 8/16/32bit.
//this is from AE_Effect.h

typedef struct {
	#ifdef PF_PIXEL16_RENAME_COMPONENTS
		// this style is useful for debugging code converted from 8 bit
		A_u_short		alphaSu, redSu, greenSu, blueSu;
	#else
		A_u_short		alpha, red, green, blue;
	#endif
} PF_Pixel16;
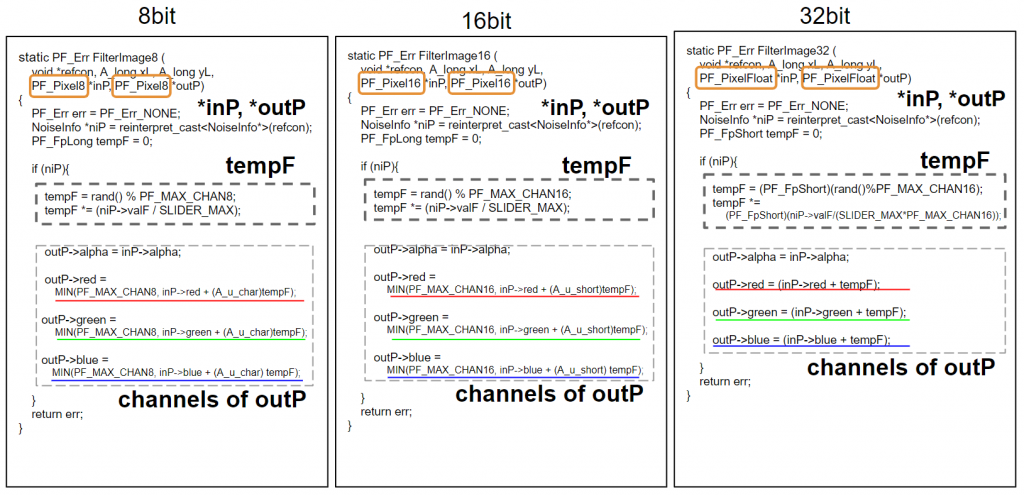
And as you can see below, each channel is char type (8bit) in PF_Pixel or PF_Pixel8, unsigned short type (16bit) in PF_Pixel16 and float type (32bit) in PF_PixelFloat or PF_Pixel32.
//picked up from A.h

typedef char			A_char;
typedef float			A_FpShort;
typedef unsigned short	A_u_short;
Tips of color depth handling in AE plug-in development
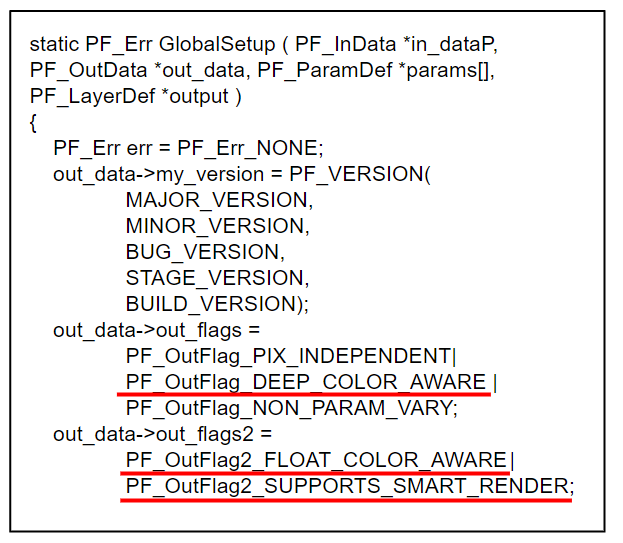
Global setup
To make your effect handle 16-bpc color, set out_data->out_flags PF_OutFlag_DEEP_COLOR_AWARE.
And to make your effect supports 32-bpc colors, set out_data->out_flags2 PF_OutFlag2_FLOAT_COLOR_AWARE and PF_OutFlag2_SUPPORTS_SMART_RENDER.
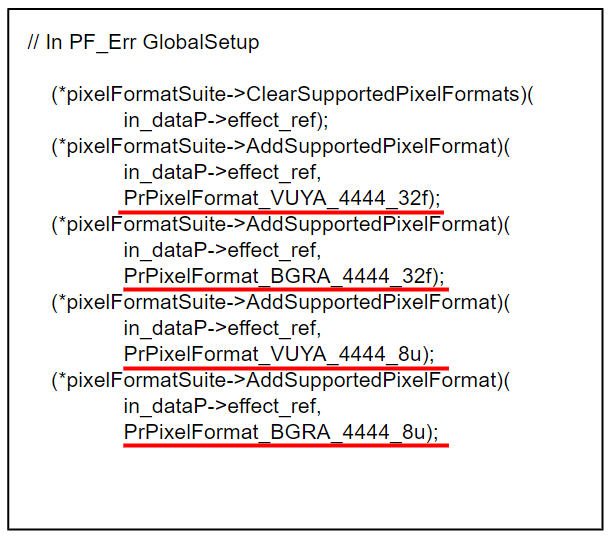
Set pixel format
Before CS6, PF_CHECKOUT_PARAM() only returned 8-bit ARGB buffers, regardless of the pixel format currently being used for rendering. Starting in CS6, an effect can opt in to get frames in the same format as the render request, whether it is 32-bit float, YUV, etc.
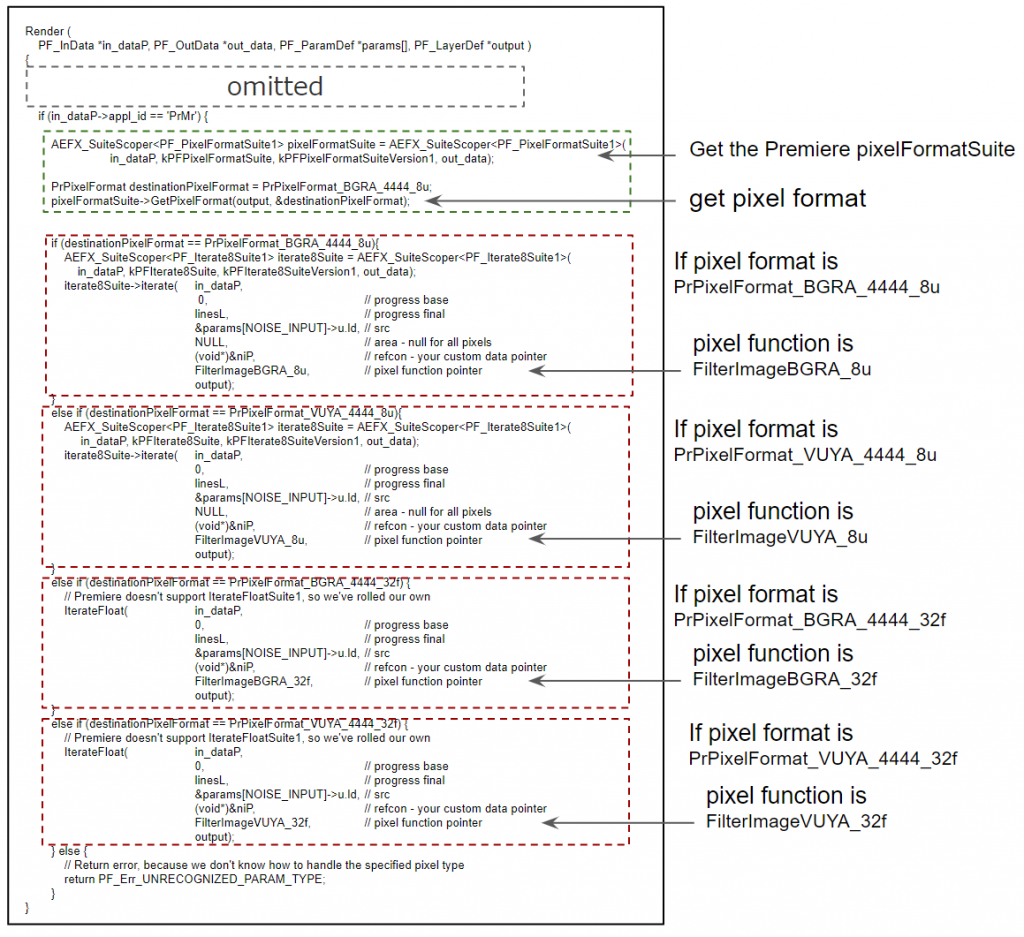
In Render function, the iterate function scan input flame and calculate output frame as pixel to pixel operation, pixel function. The iterate functions is selected separately depending on the PrPixelFormat of destination pixels. Check After Effects SDK Guide “Progress During Iteration” for details.
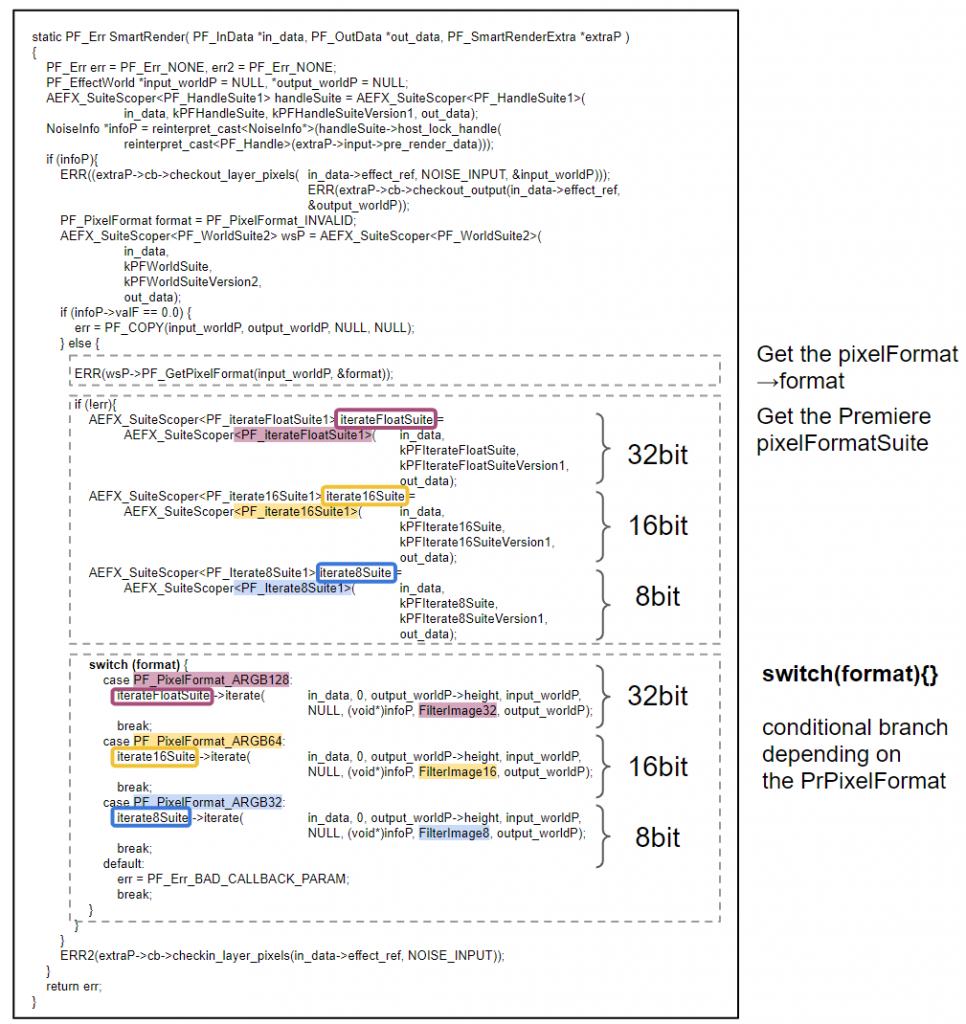
Smart Render
In Smart Render function, pixel functions is selected separately depending on the PrPixelFormat like Render function.
If you want to know about the difference between Render function and SmartRender function, check the article “The difference of Render and Smart Render in After Effects”. (sorry, it will come soon)
The conditional branch by switch sentence is following.
To set up the environment for After Effects plugin. To build sample plug-in and execute it.
Environment
Adobe CC2019 v16.0.0 Windows10 with environment for C++ compile Microsoft Visual C++ 2017 ver15.8.4
Method
1 Download The After Effects SDKs
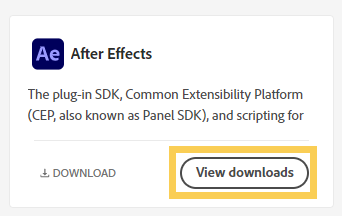
Access Adobe Web site and click “Get the SDKs” button to get After Effects SDKs. Select “After Effects Plug-in SDK” for your AE version.
2 Set build path as environment variable
Add environment variable “AE_PLUGIN_BUILD_DIR” and set output directory. If it doesn’t exist, the error “fatal error LNK1104: cannot open file ‘***.aex” will occur.
3 Build sample plug-in
Unzip “After+Effects+CC+16.0+Win+SDK.zip” and put the unzipped directory “AfterEffectsSDK” into appropriate location.
Open AfterEffectsSDK\Examples\BuildAll.sln then Visual studio will start.
Copy Skeleton template from “AfterEffectsSDK\Examples\Template\Skeleton” , with directory hierarchies of “Skeleton”, “Headers”, “Resources” and “Util” preserved .
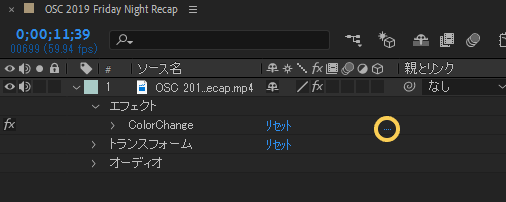
Rename file names and replace “Skeleton” with “Color Change” in it. DON’T rename “SkeletonPiPL.rc” because binary .rc file is automatically generated from .r file (AE Plugin SDK Guide “PiPL Resources”).
EffectMain Function
Main function is defined in SkeletonPiPL.r as follows.
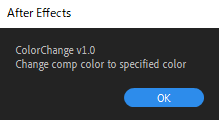
EffectMain is the Function accepts PF_Cmd cmd as a parameter and call functions using cmd as a selector such as “PF_Cmd_ABOUT”, “PF_Cmd_PARAMS_SETUP” and “PF_Cmd_RENDER”. Refer to “AE Plugin SDK Guide command selectors.”
The iterate function scan input flame and calculate output frame as pixel to pixel operation, pixel function. In this case, the pixel function is “MySimpleGainFunc16” or “MySimpleGainFunc8”. Rename and change them into “MyColorChangeFunc16” and “MyColorChangeFunc8”.
if (PF_WORLD_IS_DEEP(output)){
paramDataP.color16.red = CONVERT8TO16(paramDataP.color.red);
paramDataP.color16.green = CONVERT8TO16(paramDataP.color.green);
paramDataP.color16.blue = CONVERT8TO16(paramDataP.color.blue);
paramDataP.color16.alpha = CONVERT8TO16(paramDataP.color.alpha);
ERR(suites.Iterate16Suite1()->iterate(
in_data,
0, // progress base
linesL, // progress final
¶ms[COLORCHANGE_INPUT]->u.ld, // src
NULL, // area - null for all pixels
(void*)¶mDataP, // refcon - your custom data pointer
MyColorChangeFunc16, // pixel function pointer
output));
}else {
ERR(suites.Iterate8Suite1()->iterate(
in_data,
0, // progress base
linesL, // progress final
¶ms[COLORCHANGE_INPUT]->u.ld, // src
NULL, // area - null for all pixels
(void*)¶mDataP, // refcon - your custom data pointer
MyColorChangeFunc8, // pixel function pointer
output));
}
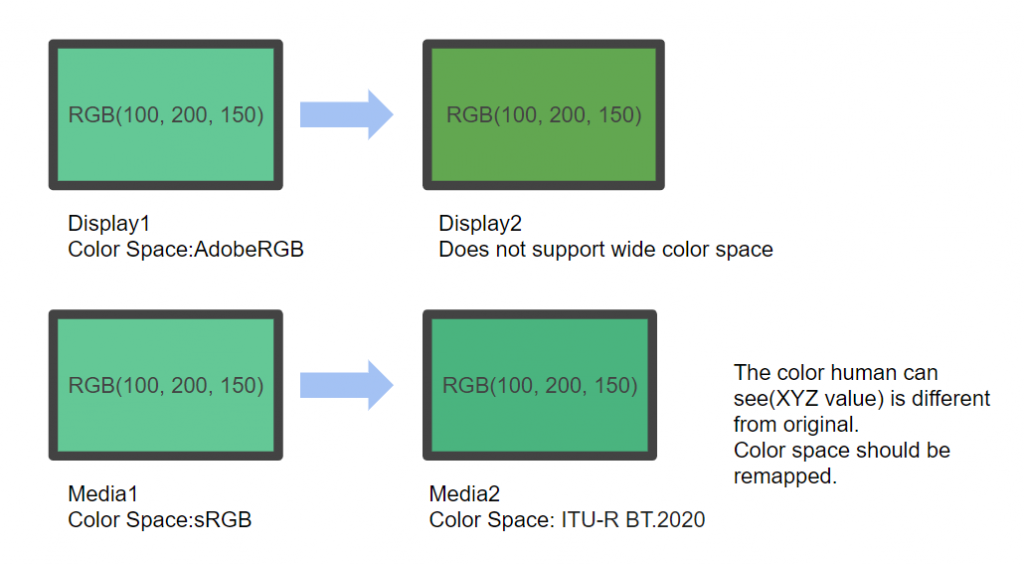
Color manager (also called “color management system” or “management solution”) is an application to change the color space of image and video.
In VFX production, many color spaces are used according to the tools such as digital cinema camera, rendered CG, photos and matte paint. it is necessary to unify or convert the color space. Color space conversion is an important process in VFX production.
What is color space?
Color space is a specific organization of colors in which colors are represented as coordinates.
Color model
Color model is an abstract mathematical model describing colors with some channels ( e.g. RGB, CMYK). Although color model is not the same thing as color space, some color system such as Adobe RGB and sRGB are based on color model.
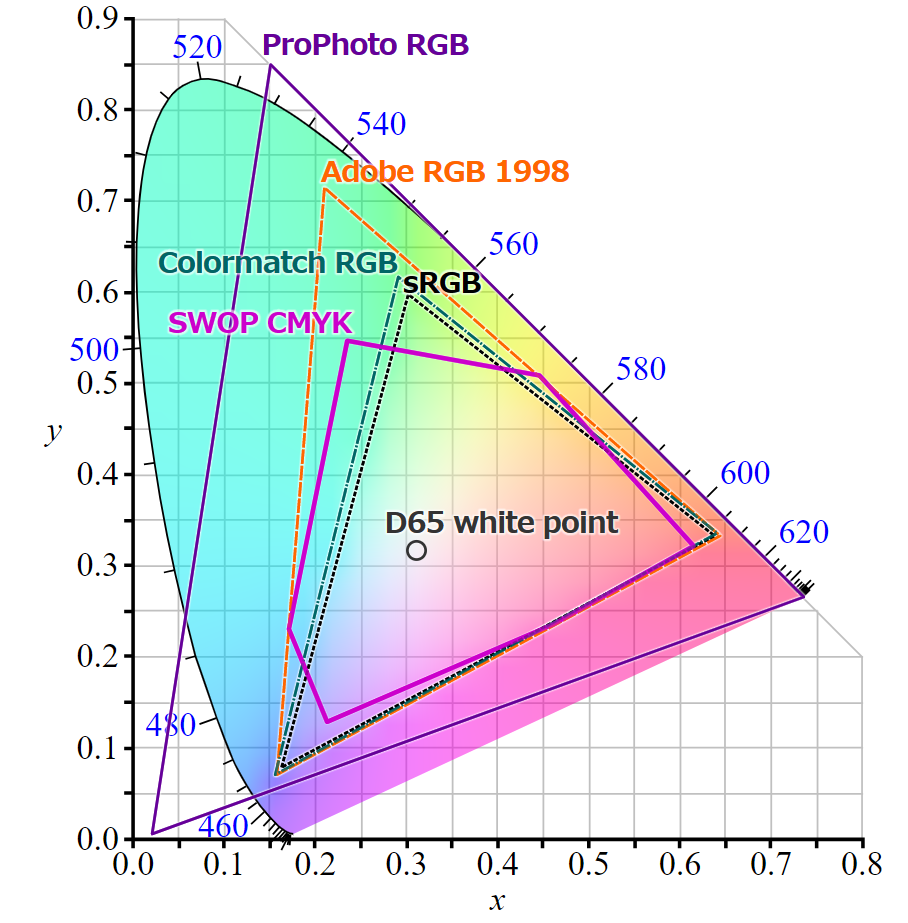
sRGB (standard Red Green Blue) is an RGB color space to use mainly on monitors, printers, and the Internet. The color gamut that can be represented in this method is the color triangle defined by three primary colors, Red, Green and Blue.
CIE 1931 xy chromaticity diagram showing the gamut of the sRGB color space and location of the primaries.( CC BY-SA 3.0) * This image is colored in sRGB space, so the colors outside of the triangle are interpolated.
Adobe RGB
Adobe RGB is a color space definition proposed by Adobe Systems. It has a wider RGB color reproduction range than sRGB (especially green), designed to cover most of the colors achievable with CMYK color printers. It encompasses about 50% of the visible colors specified in the CIELAB color space.
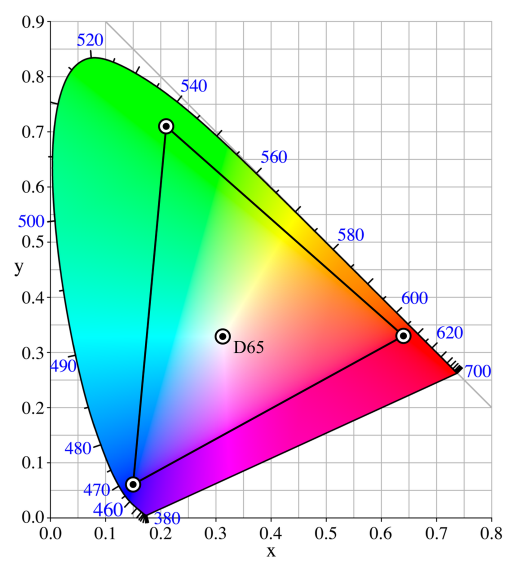
The CIE 1931 xy chromaticity diagram showing the primaries of the Adobe RGB (1998) color space. The CIE Standard Illuminant D65 white point is shown in the center.( CC BY-SA 3.0)
NTSC (BT.601)
NTSC Color Space is designed for television. It features a color gamut that is much wider than sRGB.While NTSC is not used in modern displays, it is commonly used to compare and specify color gamut. This is also one of the major television formats in the world including PAL, SECAM.
Rec.2020
ITU-R Recommendation BT.2020 aka Rec.2020 or BT.2020 defines various aspects of ultra-high-definition television (UHDTV) with standard dynamic range (SDR) and wide color gamut (WCG). It defines picture resolutions, frame rates with progressive scan, bit depths, color primaries, RGB and luma-chroma color representations, chroma subsamplings, and an opto-electronic transfer function. full HD and HDR are not supported.
Rec.2100
Rec.2100 is upward compatible with Rec.2020. ITU-R Recommendation BT.2100 aka Rec.2100 or BT.2100 is an international standard for specifications that must be met by devices that handle full HD(2K), 4K and 8K resolutions. It was established by the International Telecommunication Union Wireless Communication Sector (ITU-R).
CMYK(or just CMY)
CMYK uses subtractive color mixing used in the printing process. CMYK corresponds to Ink colors, Cyan, Magenta, Yellow and Black.
HSV
HSV(Hue, Saturation, Value) is used for painting or color sample on computers. Painting artists use it because it is more natural and intuitive to consider colors in terms of hue, color and saturation than additive mixing or subtractive mixing. HSV is a transformation of an RGB color space. HSV is also called HSB (hue, saturation, brightness).
HSL
HSL (hue, saturation, lightness / luminance) is quite similar to HSV, with “lightness” replacing “brightness”. The difference is a value calculation method. HSV uses a hexagonal pyramid model in which the brightness of pure color is equal to the brightness of white, while HLS uses a bi-hexagonal pyramid model in which the brightness of pure color is 50% of the brightness of white.(Please refer this image). It is also called HSI (hue, saturation, intensity).
LMS
LMS color place is based on three kinds of cone cells that human eye with normal vision has. These cone cells sense light and have peaks of spectral sensitivity in Short wavelength, Middle wavelength and Long wavelength. The three parameters corresponding to levels of stimulus of the three kinds of cone cells(L, M, S) describe any human color sensation. So LMS color space can contain all visible colors. However LMS is not objective representation of colors because parameters L, M and S is different between people and emvironment.
CIE 1931 color spaces
CIE (Commission internationale de l’éclairage, the International Commission on Illumination) is the organization that creates international standards related to light and color. CIE 1931 color spaces is the first defined quantitative relations between distributions of wavelengths in the electromagnetic visible spectrum, and physiologically perceived colors.
The CIE XYZ is remap of the color space in which the tristimulus values are conceptualized as amounts of three primary colors.These primary colors are unvisible for human. The CIE XYZ color space is designed so that Y component corresponds to luminance. CIE XYZ can contain all visible colors.While RGB can’t represent some of visible colors without using negative value, CIE XYZ can contain all visible colors in positive quadrant.
When you transfer exported video to another media, color gamut remapping, gamma correction, setting of white chromaticity (white point) are required and so on.
What is ACES?
ACES(Academy Color Encoding System) is a color image encoding system created under the auspices of the Academy of Motion Picture Arts and Sciences. The system defines its own primary color that encompass the visible spectral locus as defined by the CIE xyY specification.
When you use ACES in Video editing software such as Adobe AfterEffects , Maya and Nuke, color manager is needed. Color manager is usually provided as a plugin or built-in function.
Representative Color manager
OpenColorIO
OpenColorIO (OCIO) is a complete color management solution geared towards motion picture production with an emphasis on visual effects and computer animation.


