Category: Tools

How To Start Anaconda

GOAL

Today’s goal is to construct development environment for data analytics and machine learning with Anaconda.

What is Anaconda?

Anaconda is open source Python distribution for data science. You can see the list of package lists here.

the open-source Individual Edition (Distribution) is the easiest way to perform Python/R data science and machine learning on a single machine. Developed for solo practitioners, it is the toolkit that equips you to work with thousands of open-source packages and libraries.

from anaconda.com/products/individual

Environment

macOS Catalina 10.15.5
Python 3.9.7

Method

Download & Install

Access the websiteanaconda.com/products/individual and click “Download” button to download the installer of the edition that you want.

Start the installer and click “Continue”.

Check if anaconda is completely installed with terminal.

Start Anaconda Navigator

Start applications > Anaconda-Navigator.

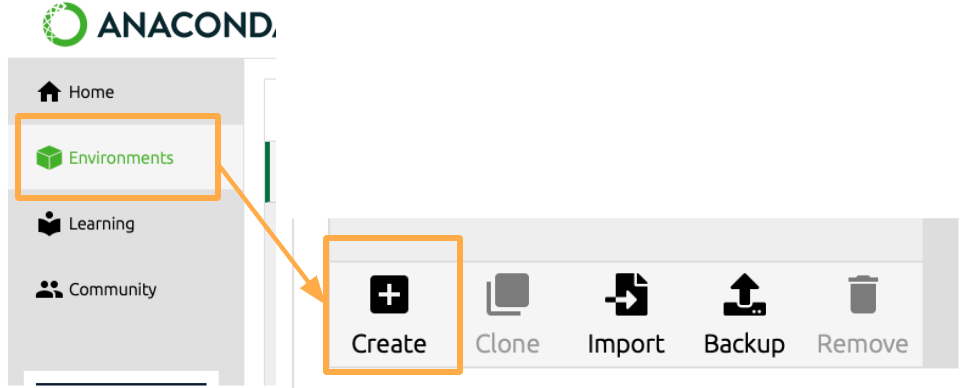
Create virtual environment

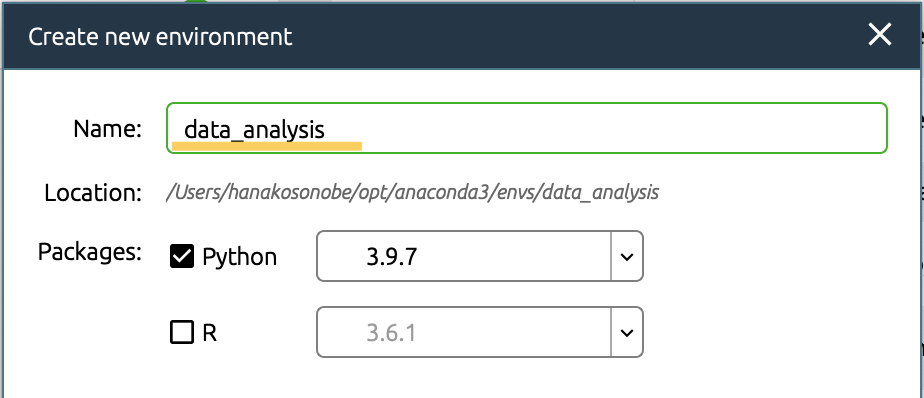
Click Environments and create new environment.

I named new environment “data_analysis”.

Install libraries or modules with conda

Conda is an open source package management system and environment management system.

Open terminal in the environment where you want to install libraries.

Then put the “conda install” command to install libraries.
For example, I installed pytorch in the “pytorch” environment. The option “-c” is the channel (What is a “conda channel”?).

conda install pytorch torchvision -c pytorch

Start Application

Select environment what you want to use and install or launch application.

I launched “Jupyter notebook” and check that “pythorch” library is installed successfully.

Error “Docker.ApiServices.WSL2.WslKernelUpdateNotInstalledException”

This is a trouble shooting log.

Problem

I downloaded the installer of Docker-Desktop from download page here. And executed the installer and start Docker. Then the error was displayed after starting Docker-Desktop.

Cause

Let’s see the window behind the exception window by Microsoft .NET Framework.

The WSL 2 Linux kernel is now installed using a separate MSI update package.
Please click the link and follow the instructions to install the kernel update:
http://aka.ms/wsl2kernel.

Press Restart after installing the Linux kernel.

That’s the cause of the error. We should install “WSL 2” by ourselves now.

Solution

Install WSL 2 Linux kernel whose installer is in http://aka.ms/wsl2kernel.

from wsl_update_x64.msi

After installing WSL 2, restart the Docker-Desktop.

The window displayed when started successfully

Token Authentication For GitHub

GOAL

Today’s goal is to setup for using token-based authentication in GitHub.

Background

In July 2020, we announced our intent to require the use of token-based authentication (for example, a personal access, OAuth, or GitHub App installation token) for all authenticated Git operations. Beginning August 13, 2021, we will no longer accept account passwords when authenticating Git operations on GitHub.com.

from “Token authentication requirements for Git operations”

Refer to “Token authentication requirements for Git operations” in the GitHub blog for more information.

Environment

Windows10
Git 2.19.0
GitHub

Method

See Creating a personal access token.

You can use generated token instead of the password for GitHub in Git Bash or Git GUI.

[Trouble Shooting] error “fatal: refusing to merge unrelated histories” in Git

Problem

When I tried to pull from remote repository, the error “fatal: refusing to merge unrelated histories” occurred. How can I solve it?

$ git pull origin main
warning: no common commits
remote: Enumerating objects: 3, done.
remote: Counting objects: 100% (3/3), done.
remote: Compressing objects: 100% (2/2), done.
remote: Total 3 (delta 0), reused 0 (delta 0), pack-reused 0
Unpacking objects: 100% (3/3), done.
From https://github.com/s-nako/ColorSelector
 * branch            main       -> FETCH_HEAD
 * [new branch]      main       -> origin/main
fatal: refusing to merge unrelated histories

Cause

This error occurs because “pull” command is targeted for 2 branches that has same root. In my case, remote main was generated on GItHub and local main was generated in local directory by “git init”.

Solution

Use “–allow-unrelated-histories” option for pull command as below.

$ git pull origin main --allow-unrelated-histories
From https://github.com/s-nako/ColorSelector
 * branch            main       -> FETCH_HEAD
Merge made by the 'recursive' strategy.
 README.md | 2 ++
 1 file changed, 2 insertions(+)
 create mode 100644 README.md

How To Install Older Visual Studio

GOAL

Today’s goal is to install Visual Studio Community 2015 in Windows. It was complicated a little to install from scratch.

Environment

Windows10(2021/05)

Method

1. Access the site to install visual studio

Access https://my.visualstudio.com/  and login with your Microsoft account. If you don’t have Microsoft account, please create here.

2. Buy visual Studio subscription or Join Dev Essentials

In my case, I’d like to install Visual Studio community edition only, so click “join Dev Essentials program” (that doesn’t cost anything). User can access to developer tools and services in this way.

(more…)

[tips]How To Convert Tab To Space In Sublime

This is just a tip about editor “sublime”.

GOAL

Today’s goal is to summarize the 3 way to convert tab to space in sublime.

  1. How to convert tabs in the current code to the spaces
  2. How to convert the spaces in the current code to the tab
  3. How to change the tab into spaces. In other words, how to insert spaces when tab key is pressed.

Method

1. How to convert tabs in the current code to the spaces

Use command pallet. Open command pallet with Ctrl+Shift+P on Windows and Cmd+Shift+P on OSX.

The command pallet

And click “Indentation: Convert to Spaces“.

(more…)

What is Github Gist?

GOAL

Today’s goal is to understand what is Gist and how to use it.

What is Gist?

Gist is a source code sharing service provided by GitHub. Gist manages all or parts of the source of projects or documentations such as a manual.

Gist is used for sharing or versioning source codes or documentations.

The difference between Git, GitHub and Gist.

Git: Git is a distributed revision control system. Refer git page for details.
GitHub: GitHub is a source code hosting service for version control and collaboration using Git. It is a service for sharing the entire project as a repository.
Gist: Gist is a one of the services provided by GitHub. It is a service for sharing the source codes and documentations. You can create a Gist of a single source or a part of the source, too.

(more…)

How To Push To The Remote Repository From Local One

This is just a memo. I often forget how to create and connect local repository and remote repository on GitHub.

GOAL

Today’s goal is to summarize how to create remote repository and local repository, and push the committed change from local repository.

Environmet

Windows10
Git 2.19.0
GitHub

Method

1. Create remote repository

Access GitHub and create new repository.

2. Create local repository

Access local directory and create local repository by using command “git init”.

> cd path\wordpressTheme
> git init

.git will be generated.

3. Commit the changes

Add files

> git add *

Commit them

> git commit -m "First commit, The simplest template."

4. Add remote repository

Add the created remote repository by using the command “git remote add <repository_name> URL”. You can copy the URL from the repository page in GitHub.

I named it “origin” conventionally.

> git remote add origin https://github.com/s-nako/wordpressTheme.git

5. Push the changes

Push the local repository to the remote repository. I push the main branch to the remote repository named origin by using “git push” command.

> git push origin main

* The name of the branch “main” is the default name of branch in remote repository in GitHub. The default name was “master” until 2020.10.1.
* You can check the current branch name by using the command “git branch”
* You can change the name of the branch by using the command “git branch -m <before_name> <new_name>” ([Tips]Change the branch name in Git)

Postscript

Generate access token and use it instead of GitHub password. (Token Authentication For GitHub)

[Tips]Change the branch name in Git

GOAL

To change the name of the branch

Method

Change the existing branch to the new name with “git branch -m” or “git branch –move”.

> git branch -m <current_name> <new_name>

If you would like to change the name of the branch currently checked out, the first argument <current_name> doesn’t need.