Category: Blender

How to Bake Normal Map in Blender

GOAL

Today’s goal is to bake normal, i.e., generate a normal map from an uneven mesh in Blender.

In my case, I baked normal map from high-level model and apply it into the low-level model as below.

Environment

Blender2.83(LTS)
Windows 10

Method

First generate add image to bake normal. You can create an Image from Shader Editor or Image Editor. And select the added image on the Shader Editor.

Open “Bake” tab from Cycles Render Properties and click “Bake” button. You can choose either “Tangent” space or “Object” space you like.

Then save the baked image from Image Editor.

Result

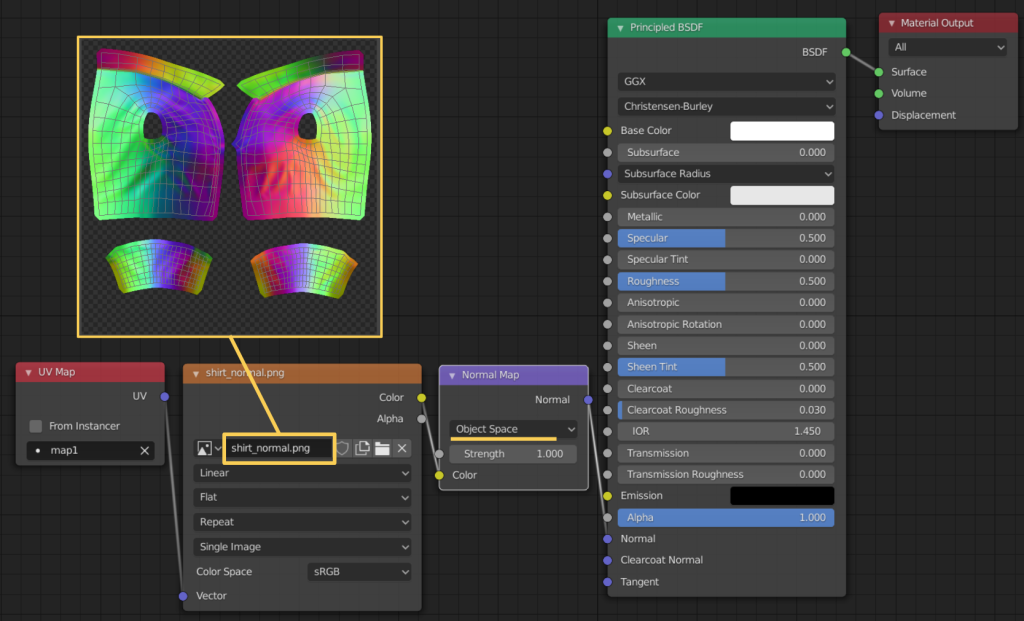
Apply result image as a normal map. For example, we can connect nodes as below in the cycle renderer.

Shader Editor

The following is rendered result. It looks well.

A strange thickness of faces in Blender

This is trouble shooting in Blender. Actually it was a foolish mistake…

Problem

I found a strange thickness in my model in Blender. Though this is only one surface, it looks like a cube with thickness.

Cause and Solution

In my case, I’ve added “Solidify” modifier by mistake before.
So the solution was to check modifiers and remove unused one.

[Trouble Shooting] Where is “Shader to RGB” Node in Blender?

This is a problem I am stuck on, but it is easy to solve.

Problem

I was finding the shade node “Shader to RGB” that converts the output color of a shade into RGB. However I couldn’t find it in Blender 8.3.

Solution

“Shader to RGB” node is prepared for “EEVEE” renderer only. So we need to change the Render Engine into “EEVEE” and we can find “Shader to RGB” in Add > Converter.

[Tips] “Set Inverse” for “Child Of” Constraint using Blender Python

This is a trouble shooting for using bpy.ops.constraint.childof_set_inverse.

Trouble

When I tried to set “Set Inverse” for “Child Of” constraint in bone and executed bpy.ops.constraint.childof_set_inverse(constraint=”Child Of”, owner=’BONE’) on Blender, the following error occurred. How can we solve it?

>>> bpy.ops.constraint.childof_set_inverse(constraint="Child Of", owner='BONE')
Traceback (most recent call last):
  File "<blender_console>", line 1, in <module>
  File "C:\Program Files\Blender Foundation\Blender 2.83\2.83\scripts\modules\bpy\ops.py", line 201, in __call__
    ret = op_call(self.idname_py(), None, kw)
RuntimeError: Operator bpy.ops.constraint.childof_set_inverse.poll() Context missing 'constraint'

Environment

Windows 10
Blender 2.83

Solution

To execute this operation, we should pass the context that contains target constraint and activate the target bone in pose mode.

import bpy

bone_name = "foot.IK.L"
bpy.ops.object.mode_set(mode='POSE', toggle=False)
pose_bone = bpy.context.active_object.pose.bones[bone_name]

# set the target constraint to the context
context_py = bpy.context.copy()
context_py["constraint"] = pose_bone.constraints["Child Of"]

# activate target bone
bpy.context.active_object.data.bones.active = pose_bone.bone 
bpy.ops.constraint.childof_set_inverse(context_py, constraint="Child Of", owner='BONE')

Reference

bpy.ops.constraint.apply
Childof_set_inverse

How To Get Mapping of UV and Vertex

GOAL

To get correspondence of UV coordinates and vertex id in the object in Blender scene by Blender Python. The following is output of the script.

uv: 0.625 0.5 vertex id: 0
uv: 0.875 0.5 vertex id: 4
uv: 0.875 0.75 vertex id: 6
uv: 0.625 0.75 vertex id: 2
uv: 0.375 0.75 vertex id: 3
.
.
.

Environment

Blender 2.83 (Python 3.7.4)
Windows 10

Method

Mesh Loop

Use Mesh Loop to get UV and vertex data.

In unfolded UV, the correspondence between the point of UV map and the vertex of 3D object is not one-to-one. Thus we use ‘Mesh Loop’ instead of vertex or edge to distinct point of UV map.

Mesh Loop is an element surrounding a face, which consists of edges and vertices. Each quad face consists of 4 Mesh Loops as below. For example, cube objects have 6face, 24 mesh loops.

import bpy

obj = bpy.data.objects[obj_name]
mesh_loops = obj.data.loops 
for mesh_loop in mesh_loops:
    print(mesh_loop)

Mesh UV Loop

UVs have Mesh UV Loops as a counterpart to the Mesh Loops. And the correspondence between Mesh Loop and MeshUVLoop is one-to-one.

import bpy

obj = bpy.data.objects[obj_name]
mesh_uv_loop = obj.data.uv_layers[0].data[loop_index]

Source Code

import bpy

def get_uvs(obj_name):
    obj = bpy.data.objects[obj_name]
    mesh_loops = obj.data.loops

    for i, mesh_loop in enumerate(mesh_loops):
        mesh_uv_loop = obj.data.uv_layers[0].data[i]
        print("uv:", mesh_uv_loop.uv[0], mesh_uv_loop.uv[1], "vertex id:", mesh_loop.vertex_index)

get_uvs("Cube")

How To Import Another Blender File

GOAL

Today’s goal is to show how to import data from another blender file.

We can import .fbx, .obj and so on by “menu File>import”, but how can we import .blend file to current scene?

The way to import fbx file

I have 2 blender scene and want to import scene_from.blend to scene_to.blend directly.

Environment

Blender2.83(LTS)
Windows 10

Method

Click File>Append

Double click the scene you want to import. Then select what you want. In my case, I imported collection that contains all objects.

Result of “Append”

The objects in scene_from.blend is imported to scene_to.blend with their materials.

Supplement

Link

You can use File>Link too, but the result is different.

Result of “Link”

You can’t modify linked objects in scene_to.blend. If you’d like to modify the object, change the scene_from.blend.

Blender Addon Naming Rules

GOAL

Today’s goal is to list naming rules and conventions of Blender addon.

Reference:
AddonPreferences(bpy_struct) from Blender 2.93.2 Release Candidate Python API documentation
Script Meta Info from wiki.blender.org

Environment

Blender 2.83 (Python 3.7.4)
Windows10

directory_name and file_name.py

Addon directory and files are snake_case with only lower cases. See examples in your addon directory, C:/Program Files/Blender Foundation/Blender 2.83/2.83/scripts/addons.

Addon Name

Addon name defined in bl_info is defined with the first letter of each word capitalized.

Class Name

2.8x enforces naming conventions for class name. Refer to “Class Registration” > “Naming” in “Blender 2.80: Addon API” reference for details.

The naming convention is UPPER_CASE_{SEPARATOR}_mixed_case. And {SEPARATOR} is defined according to the type of class as below.

  • Header -> _HT_
  • Menu -> _MT_
  • Operator -> _OT_
  • Panel -> _PT_
  • UIList -> _UL_

The followings are examples of panel class name.

# Header
# from "oscurart_tools" addon
class OSSELECTION_HT_OscSelection(bpy.types.Header):
    bl_label = "Selection Osc"
    bl_space_type = "VIEW_3D"

# Menu
# from "space_view3d_spacebar_menu" addon
class VIEW3D_MT_Space_Dynamic_Menu(Menu):
    bl_label = "Dynamic Context Menu"

class VIEW3D_MT_View_Menu(Menu):
    bl_label = "View"

# Operator
# from "add_camera_rigs" addon
class ADD_CAMERA_RIGS_OT_set_scene_camera(Operator):
    bl_idname = "add_camera_rigs.set_scene_camera"
    bl_label = "Make Camera Active"
    bl_description = "Makes the camera parented to this rig the active scene camera"

# Panels
# from "add_camera_rigs" addon
class ADD_CAMERA_RIGS_PT_camera_rig_ui(Panel, CameraRigMixin)
    bl_label = "Camera Rig"
    bl_space_type = 'VIEW_3D'
    bl_region_type = 'UI'
    bl_category = 'Item'

# UIList
# from "cycles" addon
class CYCLES_RENDER_UL_aov(bpy.types.UIList):
    def draw_item(self, ...

 bl_idname

bl_idname is specified to access the operator from python script in Blender. The bl_idname consists of snake_case words connected with dots.

# bl_idname in cycle/operators.py in cycle addon

class CYCLES_OT_use_shading_nodes(Operator):
    bl_idname = "cycles.use_shading_nodes"

class CYCLES_OT_add_aov(bpy.types.Operator):
    bl_idname="cycles.add_aov"

class CYCLES_OT_remove_aov(bpy.types.Operator):
    bl_idname="cycles.remove_aov"

class CYCLES_OT_denoise_animation(Operator):
    bl_idname = "cycles.denoise_animation"

class CYCLES_OT_merge_images(Operator):
    bl_idname = "cycles.merge_images"

 For headers, menus and panels, the bl_idname is expected to match the class name (automatic if none is specified). Refer to “Class Registration” > “Naming” in “Blender 2.80: Addon API” reference.

Other – PEP 8

Basically the naming rules of module, variable and so on is compliant with PEP 8.

variable = "hello"
variable_two = 2

def function_name(arg_name):
    pass

class ClassName():
    def __init__(self, arg_name):
        self.variable = 1
    def method_name(self):
        pass

How To Use Human Meta-Rig in Rigify

GOAL

Today’s goal is to summarize the rigging method of Human Meta-Rig with Rigify addon in Blender.

I used a human model with MakeHuman.

Environment

Blender 2.83
Windows10

Method

1. Add Human meta rig

Activate addon “RIgging: Rigify” at first.

Import the model with Y-axis front.

Change the mode to “Object Mode” and click Add > Armature > Human(Meta-Rig).

Open metarig tab > Viewport Display and check “In Front” on to show the rig in front of all in the 3D View.

The human rig with “In Front” on

2. Adjust bones

Adjust rig size and locations of bone to fit the target mesh.
Don’t change the transforms of the object. Be sure to change transforms in “Edit Mode” not in “Object Mode“.

(more…)

How To Fix Texture Colored Pink In Blender

Problem

When I open Blender file, the textured model is rendered with pink single-colored texture. How can I fix it?

Texture node on Node Editor

Environment

Blender 2.8.3(LTS)
Windows10

Cause

Pink means missing texture. Blender couldn’t find the specified texture.

Solution

References: You can find solutions in the followings in most cases.
Why are all the textures in my file pink?
Pink textures in Blender and how to avoid them

However, this sometimes occurred when the texture is just overwritten. In that case, I fixed by following steps below.

1. Disconnect Image Texture Node from Base Color socket of Shader Node.

2. Reset texture in Image Texture Node on Node Editor

3. Reconnect Nodes