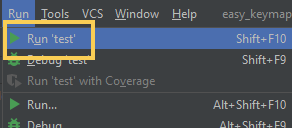
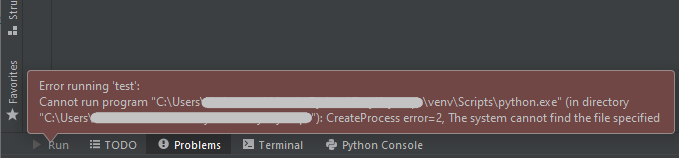
When I try to run python in PyCharm. The error occurred as below. What is venv\Scripts\python.exe?
Error running 'easy_keymaps_ui': Cannot run program "C:\Users\<USER_NAME>\source\test\venv\Scripts\python.exe" (in directory "C:\Users\<USER_NAME>\source\test"): CreateProcess error=2, The system cannot find the file specified
Environment
Windows 10 PyCharm 2020.3 Python 3.8
Cause
The python specified to use as interpreter in PyCharm cannot be found. In my case, the specified python is python that is bundled to the deleted virtual env of PyCharm project. Check “Configure a virtual environment” for details about virtual env of PyCharm.
Solution
Change the python to use
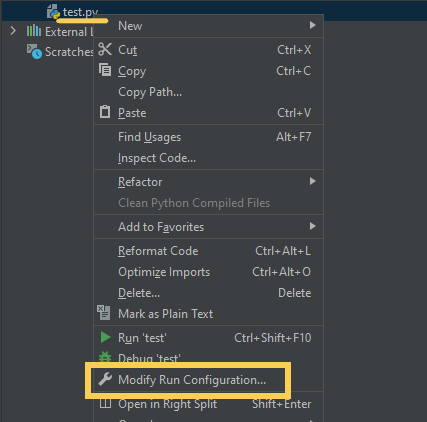
Right click the program to run. And click “Modify Run Configuratuib…”
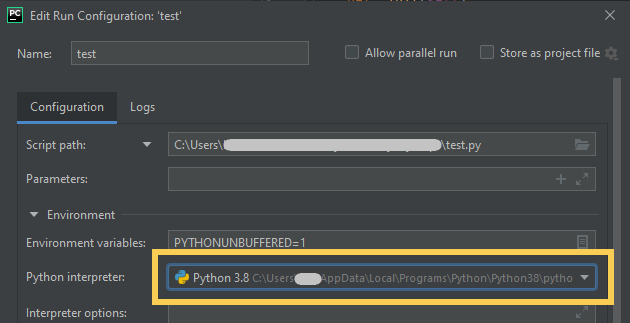
Select valid interpreter and click ”OK”.
How to remove and add python interpreters to the project
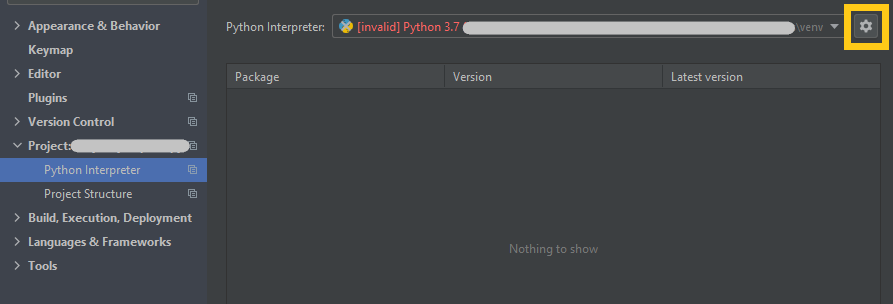
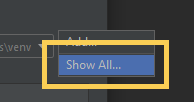
Open “File > Settings > Python Interpreter”. Click the gear icon and click “Show All” button.
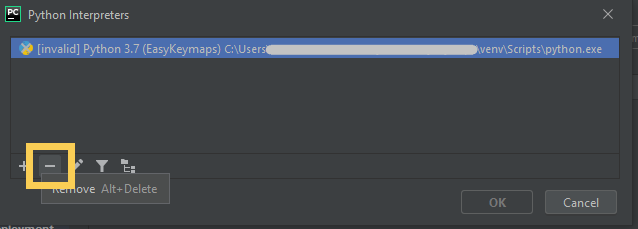
Click “-” button to delete invalid Python.
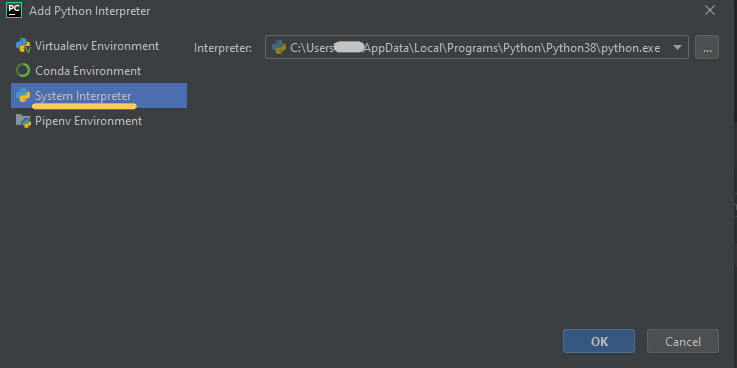
And click “+” button to add new valid python to use to run python program. I selected my local system python.
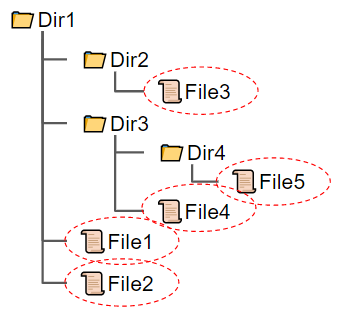
dir([object]) function return the list of only the object’s attributes. So the list returned by dir(User) includes class variables “number” but don’t include instance variables “name” and “age”.
 class User:
    number = 0
    def __init__(self, name, age=0):
        self.name = name
        self.age = age
        self.addNum()
    def isAdult(self):
        if 18 <= self.age:
            return True
        else:
            return False
    def profile(self):
        print("Name:"+self.name, " Age:"+self.age)
    @classmethod
    def addNum(cls):
        cls.number += 1

print(dir(User))
# output => ['__class__', '__delattr__', '__dict__', ... , 'addNum', 'number', 'profile']
If dir() takes no argument, it returns the list of names in the current local scope.
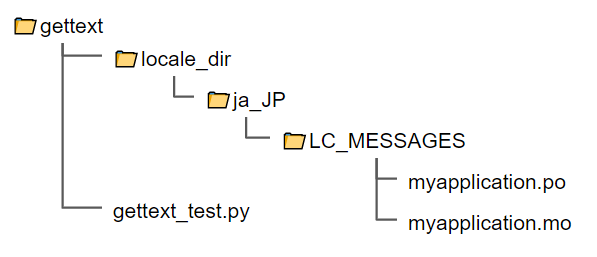
2. Create <domain>.pot file with pygettext.py that is in Python<version>\Tools\i18n directory. The pot file myapplication.pot will be generated in the directory “locale_dir”.
# SOME DESCRIPTIVE TITLE.
# Copyright (C) YEAR ORGANIZATION
# FIRST AUTHOR <EMAIL@ADDRESS>, YEAR.

msgid ""
msgstr ""
"Project-Id-Version: PACKAGE VERSION\n"
"POT-Creation-Date: 2020-07-20 01:35+0900\n"
"PO-Revision-Date: YEAR-MO-DA HO:MI+ZONE\n"
"Last-Translator: FULL NAME <EMAIL@ADDRESS>\n"
"Language-Team: LANGUAGE <LL@li.org>\n"
"MIME-Version: 1.0\n"
"Content-Type: text/plain; charset=cp932\n"
"Content-Transfer-Encoding: 8bit\n"
"Generated-By: pygettext.py 1.5\n"

#: gettext_test.py:7
msgid "Hello World!"
msgstr ""
3. Create po file and put it in the language directory.
Change the charset into utf-8, input the translation and save it chadnged myapplication.po. In my case, the Japanese “こんにちは世界!” that means “Hello World!” is put in msgstr.
Put the chadnged myapplication.po in the <directory_name>/language/LC_MESSAGES. The language is <language codes>_<country codes>. I put it in locale_dir/ja_JP/LC_MESSAGES. The list of language code and country code: ISO-3166 Country Codes and ISO-639 Language Codes
4. Generate mo file from po file with Python<version>\Tools\i18n\msgfmt.py
You can get the list of module search paths. Find the directory you’d like from the list.
>python
Python 3.8.6
Type "help", "copyright", "credits" or "license" for more information.
>>> import sys
>>> sys.path
---The list of module search paths---
Appendix
You can find the directory where python.exe is by using “where” command.
When I open the file in Python, the error “UnicodeDecodeError: ‘cp932’ codec can’t decode byte 0x99 in position ~ : illegal multibyte sequence” occurred.
The code is as below.
path = 'wordpress/wp-admin/about.php'

with open(path) as f:
            lines = f.readlines()
            print(lines)
Environment
Windows 10 Python 3.8.6
The cause of this problem
The character code ‘cp932’ is Microsoft Cade page 932(Shift_JIS). And ‘0x99’ is the number of 1byte represented by hexadecimal. This error occurs when the character code used for decoding the file does not match the character code of the file.
Solution
Solution 1. Use encoding option argument
If you know the coding of the file, you can specify it with option argument of open() function.
with open(path, encoding = "utf_8") as f:
    lines = f.readlines()
    print(lines)
Solution 2. Use try and except
If you’d like to use a few character coding and ignore files of other character coding.
try:
    with open(path, encoding = "shift_jis") as f:
        lines = f.readlines()
        print(lines)
except:
    pass
try:
    with open(path, encoding = "ascii") as f:
        lines = f.readlines()
        print(lines)
except:
    pass
try:
    with open(path, encoding = "utf_8") as f:
        lines = f.readlines()
        print(lines)
except:
    pass
Solution 3. Use chardet
Chardet is a module to detect the character encoding.
To understand what QtCreator is and how to use it.
What is Qt and PySide?
Qt is a cross-platform application framework with many modules providing services like network abstraction and XML handling, along with a very rich GUI package. Check the article “First PySide Application” for details of Qt and PySide.
What is Qt Designer?
Qt Designer is the Qt tool for designing and building GUIs with Qt Widgets. Qt Designer makes it easy to layout UI widgets with PySide. Reference: Qt Designer Manual
You can find the directory “PySide2” by PySide2.__file__
import PySide2
print(PySide2.__file__)
Or you can find the python directory with the command below.
C: >where python
If you are using Python2, designer.exe exists in Python2\Lib\site-packages\PySide directory.
Create Dialog
1. Create a new form
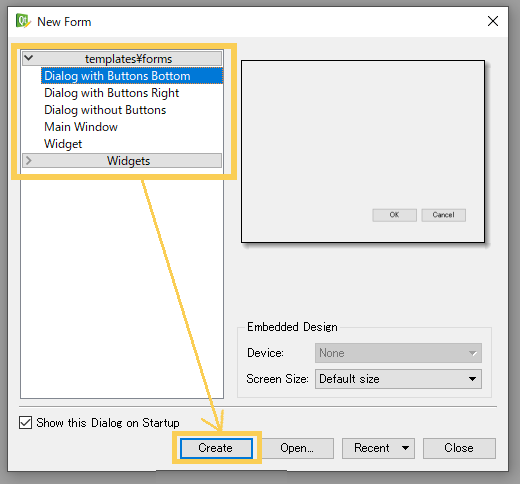
When you start the designer.exe, the “New Form” window will open automatically. If not, click File > New
Select any template you like and click the button “Create”.
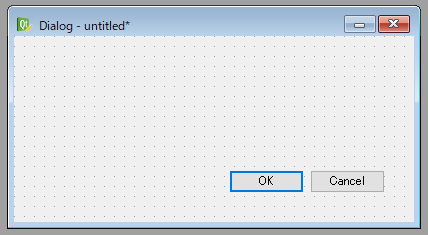
An empty untitled widget with “OK” and “Cancel” buttons will appear.
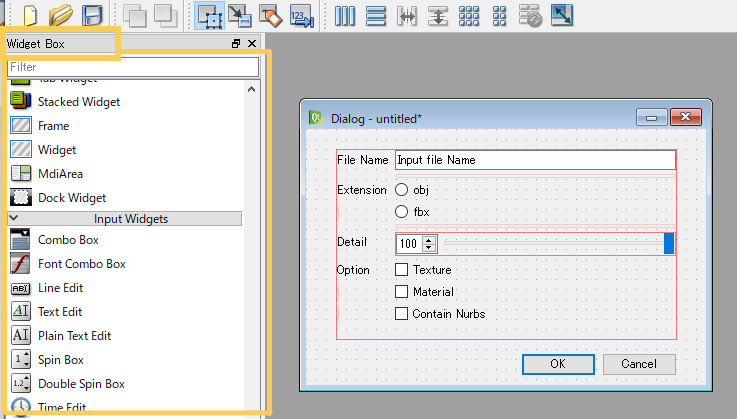
2 Put the widget on the empty Dialog
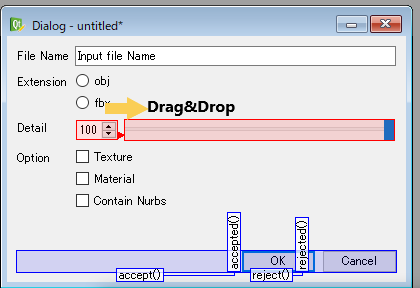
Drag & Drop any widget you like from “Widget Box” and put it into the empty Dialog. I created a dialog to export reduced object in DCC tool.
from Qt Designer
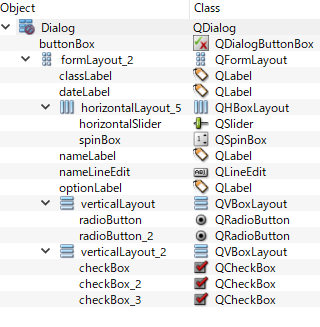
The construction of this form is the following.
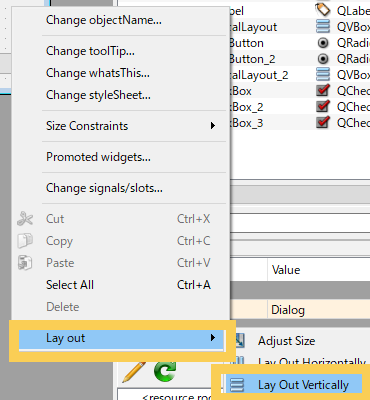
And reform the widgets in main layout. Right-click on the form outside of the form Layout and click layout>Lay Out Vertically.
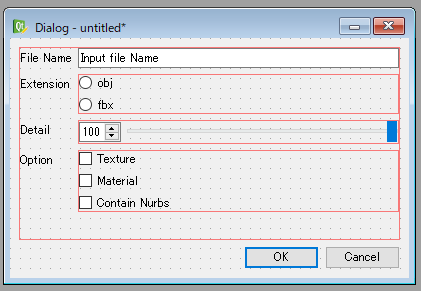
The widgets are arranged at even intervals in the main layout.
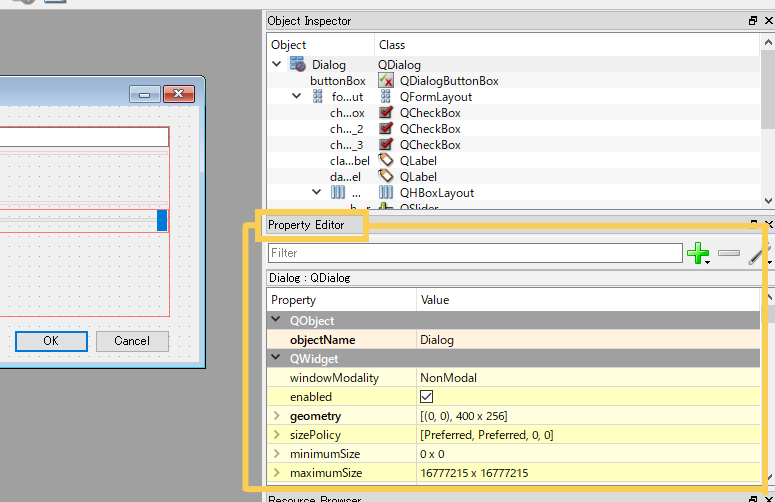
Set the default values and change settings of each property with “Property Editor.”
from Qt Designer
3. Connect the signals to the slots
In Qt Designer, you can connect the signal of the widget to the slot of another widget, in other words connect some widgets as input and output. In this case, Spin Box and Horizontal Slider should move in conjunction with each other.
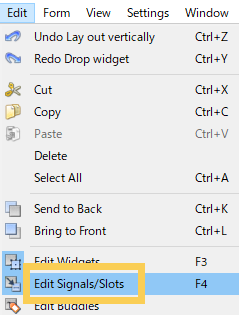
Change the mode to edit signals/slots by clicking Form>Edit Signals/Slots.
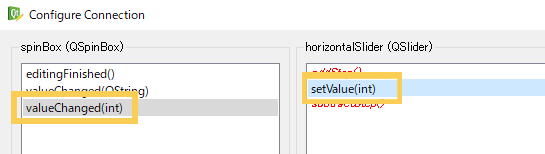
Drag & drop from Spin Box to Horizontal Slider.
The signal is valueChanged and the connected slot is setValue.
In contrast, drag & drop from Horizontal Slider to Spin Box and connect them in the same way.
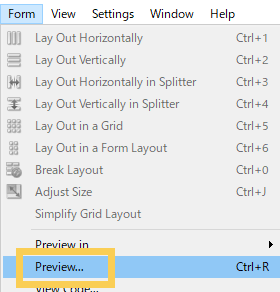
4. Preview
Preview the form you created by Form>Preview… and check if it works well.
5. Save the UI as Designer UI files (.ui)
Save the dialog you created as “reduced_export.ui”.
Load .ui from Python file
You can load .ui file you created from python file.
Run the program below and the dialog you created will be displayed.
# -*- coding: utf-8 -*
import sys
from PySide2 import QtWidgets
from PySide2.QtUiTools import QUiLoader

if __name__ == '__main__':
    app = QtWidgets.QApplication(sys.argv)
    loader = QUiLoader()
    widget = loader.load('reduced_export.ui', None)
    if not widget:
        print(loader.errorString())
        sys.exit(-1)
    widget.show()
    sys.exit(app.exec_())
Or define ExportUI class that inherits QMainWindow.
class ExportUI(QtWidgets.QMainWindow):
    def __init__(self, parent=None):
        super(ExportUI, self).__init__(parent)
        loader = QUiLoader()
        self.ui = loader.load('reduced_export.ui')
        if not self.ui:
            print(loader.errorString())
            sys.exit(-1)
        print("OPEN")
    def getUi(self):
        return self.ui

if __name__ == '__main__':
    app = QtWidgets.QApplication(sys.argv)
    exportUi = ExportUI()
    widget = exportUi.getUi()
    widget.show()
    sys.exit(app.exec_())
Connect functions you defined to the widgets
When the “OK” button is clicked, or the buttonBox widget is accepted, call the function export() that is the function to export the selected object in DCC tools. You can connect them by using “self.ui.buttonBox.accepted.connect(self.export)”.
In this example the function export() is omitted.
# -*- coding: utf-8 -*
import sys
from PySide2 import QtWidgets
from PySide2.QtUiTools import QUiLoader

def exportObj(name, extension, detail, options):
    # omitted the function to export object
    ext = 'fbx' if extension else 'obj'
    print(f"exported {name}.{ext} with {detail}% detail and option {options}.")

class ExportUI(QtWidgets.QMainWindow):
    def __init__(self, parent=None):
        super(ExportUI, self).__init__(parent)
        loader = QUiLoader()
        self.ui = loader.load('reduced_export.ui')
        if not self.ui:
            print(loader.errorString())
            sys.exit(-1)
        print("OPEN")
        self.ui.buttonBox.accepted.connect(self.export)

    def getUi(self):
        return self.ui

    def export(self):
        name = self.ui.nameLineEdit.text()
        extension = 0 if self.ui.radioButton.toggle() else 1
        detail = self.ui.horizontalSlider.value()
        options = [self.ui.checkBox.isChecked(), self.ui.checkBox_2.isChecked() ,self.ui.checkBox_3.isChecked()]
        exportObj(name, extension, detail, options)

if __name__ == '__main__':
    app = QtWidgets.QApplication(sys.argv)
    exportUi = ExportUI()
    widget = exportUi.getUi()
    widget.show()
    sys.exit(app.exec_())
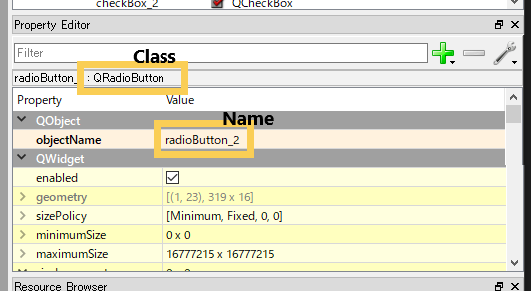
You should know the classes and functions to get values such as QnameLineEdit.text() or QRadioButton.isChecked(). And you can see the class and the name of each widget in Property Editor of Qt Designer.
Run
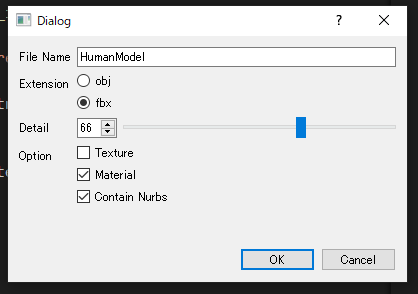
Run the python code above and set the values on the displayed dialog.
Click the “OK” button. Then the message below will be displayed on the console.
exported HumanModel.fbx with 66% detail and option [False, True, True].
Other tools for Qt programming
QtCreator
QtCreator is C++ IDE for development with Qt. It has an editor with useful functions, navigation tools, GUI tools for UI design and so on. Reference: Qt Creator Manual
Qt Linguist
Qt Linguist is a tool for translating Qt C++ and Qt Quick applications into local languages. Reference: Qt Linguist Manual
Qt Assistant
Qt Assistant is a tool for viewing on-line documentation for Qt programming. Reference: Qt Assistant Manual