Author: Nako

[Tips]How to use Image for Normal map in Blender

GOAL

To create normal map from RGB image.

Environment

Windows10
Blender 2.8a

Method

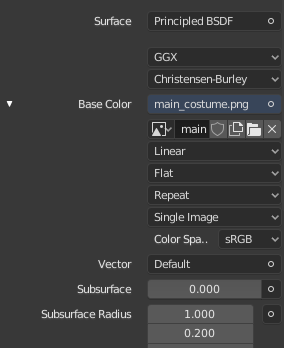
Create new Principled BSDF material.

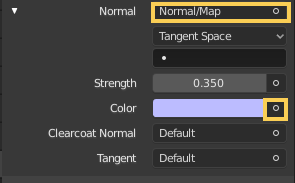
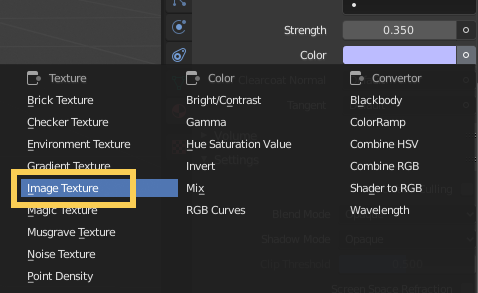
Set “NormalMap” to the parameter “Normal”. And set “Image Texture” to the parameter “Calor”.

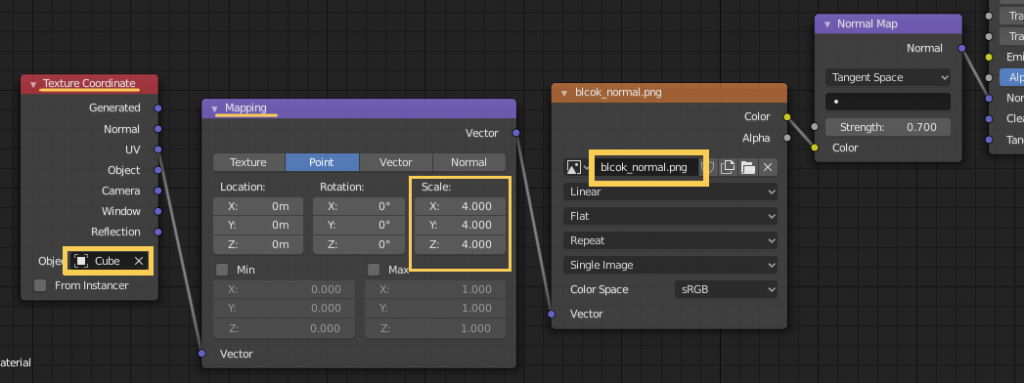
Open and select normal map to apply.

Open UV editor and adjust the UV Mapping.

You can use Nodes to change the scale of input image.

How to Build Local Server 2 -Change Root Directory-

GOAL

To change settings of Apache and use your local directory as root directory.

Before changing settings of Apache, install and setup Apache. Refer to “How to Build Local Server 1” for more about installation procedure.

Environment

Windows 10
Apache 2.4.43

Change local server root

1. Set DocumentRoot in httpd.conf.

I created new directory “root” in Apache24 and set it as DocumentRoot.

# DocumentRoot: The directory out of which you will serve your
# documents. By default, all requests are taken from this directory, but
# symbolic links and aliases may be used to point to other locations.
#
#DocumentRoot "${SRVROOT}/htdocs"
DocumentRoot "${SRVROOT}/root"

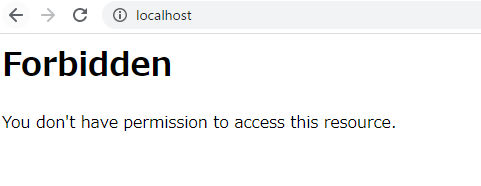
2. Confirm the result

Change Directives

Open httpd.conf. and change <Directory> Directive.

<Directory "${SRVROOT}/loot">
	Options Indexes FollowSymLinks
	AllowOverride None
	Require all granted
</Directory>

<Directory> Directive can control  group of directives.

Directives detail

Options: The Options directive controls which server features are available.
Indexes: If a URL which maps to a directory is requested and there is no DirectoryIndex (e.g., index.html) in that directory, then mod_autoindex will return a formatted listing of the directory.
FollowSymLinks: The server will follow symbolic links in this directory. This is the default setting.
You can see more of Options directive in Options Directive.

AllowOverride: When this directive is set to None, .htaccess files are completely ignored. .htaccess file is the configurations file for non-administrator users.
You can see more of Options directive in AllowOverride Directive.

Require: This directive tests whether an authenticated user is authorized according to a particular authorization provider and the specified restrictions.
all granted: Grant access to all requests.
You can see more of Options directive in Require Directives.

Confirm results

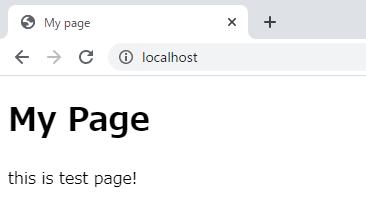
Put index,html and resources into root directory. Access localhost with any browser you like.

How to Build Local Server 1 -Install and Setup Apache-

GOAL

To setup Apache and build local web server with it. In this article, you can only display default page. If you would like to create new directory as a local serer, check “How to Build Local Server 2” after Apache setup.

Environment

Windows 10
Apache 2.4.43

What is Apache?

Apache is open source application for implementation of an HTTP (Web) server. You can build local web server and global web server regardless of whether it is commercial use or not.

Why is the local web server necessary? 

Local web server is used as a virtual environment for development and test before publishing to the live server. You can make local file a test server that only local users can access.

Installation and setup of Apache

Installation

1. Open Download page “Apache HTTP Server project website“.

2. Click Files for Microsoft Windows if you use windows.
* Click “Binaries” if you don’t use windows.
* I don’t know why but I couldn’t click “Source: httpd-2.4.43.tar.bz2”.

3. Select one sit from the list. In my case, I clicked “Apache Lounge”.

4. Install Apache 2.4.43 Win64 or Apache 2.4.43 Win32

Setup

1. Unzip httpd-2.4.43-win64-VS16.zip and open it. You can see the directory named “Apache**”.

2. Put the directory “Apache24” into the directory you want. I put it on document directory.

3. Open Apache24>conf>httpd.conf with your favorite text editor.

Change definition of SRVROOT into the path to “Apache24”

#default
#Define SRVROOT "c:/Apache24"
Define SRVROOT "C:\Users\USER_NAME\Documents\Apache24\conf"

ServerRoot "${SRVROOT}"

Change ServerName

# If your host doesn't have a registered DNS name, enter its IP address here.
#
#ServerName www.example.com:80
ServerName localhost:80

Start Apache

Use command as below or just double-click httpd.exe.

Open command prompt and change directory into the Apache24¥bin

> cd C:\Users\USER_NAME\Documents\Apache24\bin
> httpd
AH00558: httpd: Could not reliably determine the server's fully qualified domain name, using ******. Set the 'ServerName' directive globally to suppress this message

If you got an warning about fire wall, allow the access in private network.

Access localhost

How to run httpd in the background?

You should register httpd as a windows service. Open command prompt as administrator and install httpd.

> cd C:\Users\USER_NAME\Documents\Apache24\bin
>  httpd -k install
Installing the 'Apache2.4' service
The 'Apache2.4' service is successfully installed.
Testing httpd.conf....

Then you can start httpd by command as below.

httpd -k start

You can stop/shutdown by commands as below. It works only when command prompt is run by an user as administrator.

> httpd -k stop
> httpd -k shutdown

Change contents

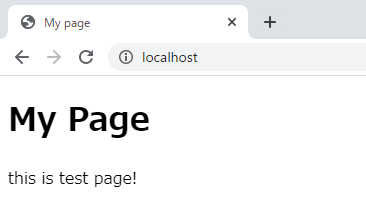
Put index.html and resources into Apache24\htdocs. I put index.html below.

<!doctype html>
<html lang="en">
<head>
  <meta charset="utf-8">

  <title>My page</title>
  <meta name="description" content="The HTML5 Herald">
  <!--[if lt IE 9]>
    <script src="https://cdnjs.cloudflare.com/ajax/libs/html5shiv/3.7.3/html5shiv.js"></script>
  <![endif]-->
</head>

<body>
  <h1>My Page</h1>
  <p>this is test page!</p>
</body>
</html>

Next Step

Change root directory from Apache24\htdocs into your local directory. Check How to Build Local Server 2 -Change Root Directory- for details.

What is Cross-Origin Resource Sharing (CORS)

GOAL

To understand Cross-Origin Resource Sharing (CORS) and how to avoid error regarding it.

Reference

Cross-Origin Resource Sharing (CORS)

Cross-Origin Resource Sharing (CORS)

Cross-Origin Resource Sharing is sharing resources from a different origin by using additional HTTP headers to allow a web application to access to that resources.

What is origin?

Origin is the currency to decide resource sharing and isolating.
Usually actors in the Web platform that share the same origin trust each other and have the same authority.

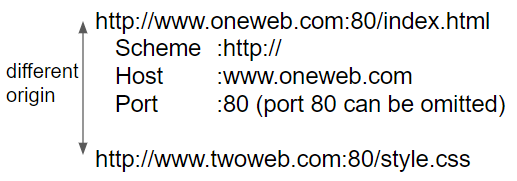
Origin is defined by the scheme, host and port of the URL of the resource. Scheme is client server protocol, http or https.

They are examples of same-origin and different-origin.

What is origin for?

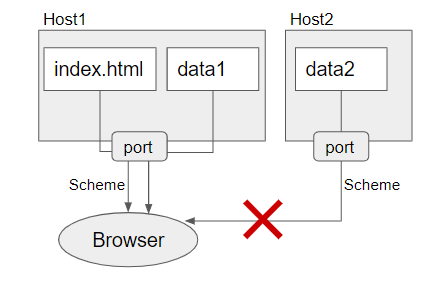
When a browser need to get resource from a server, the browser should check whether the server is different from the one where index.html is. That’s because access to the cross-origin server can causes cross-site printing. The rule is called cross-origin policy.

Mechanism of CORS

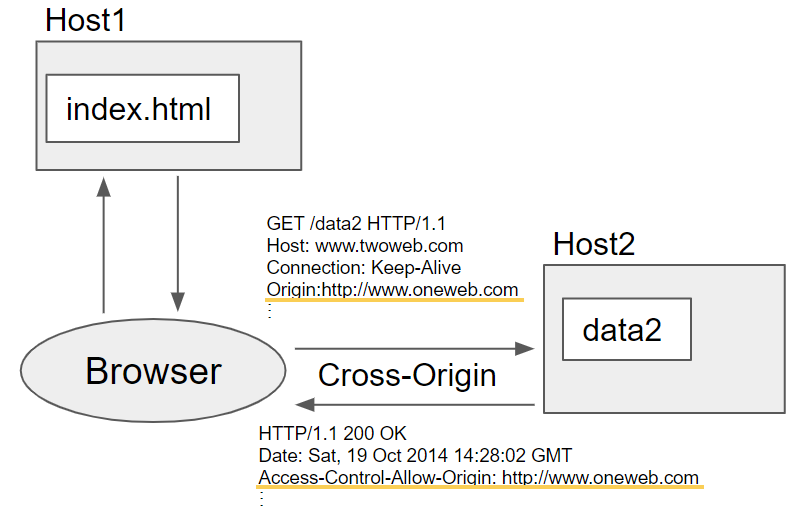
Client (Web browser) adds “Origin” to HTTP Request header. If the origin is included in Access-Control-Allow-Origin of HTTP Response header, data can be transmitted.

You can see more about HTTP request/response more in “What is http request/response.”

Preflighted requests

There are 3 types of Cross-Origin Request.

1 Simple requests

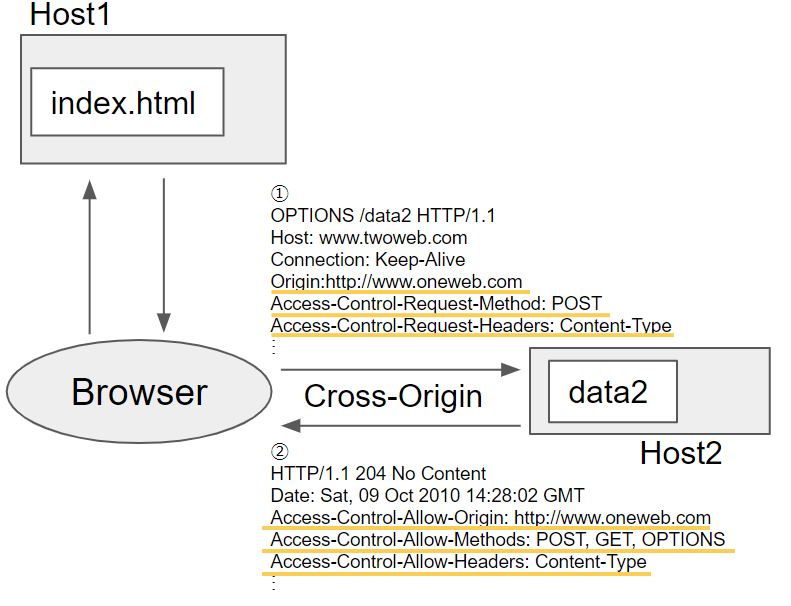
In cross-origin resource sharing, browser uses the HTTP OPTION request method to preflight the request. Preflighting is to check if a request is accepted to the server before sending it.

However, simple requests that meet some conditions don’t trigger preflight. There are multiple conditions, and you can see them from the link below.

“Simple requests” from https://developer.mozilla.org/en-US/docs/Web/HTTP/CORS

2 Preflighted requests

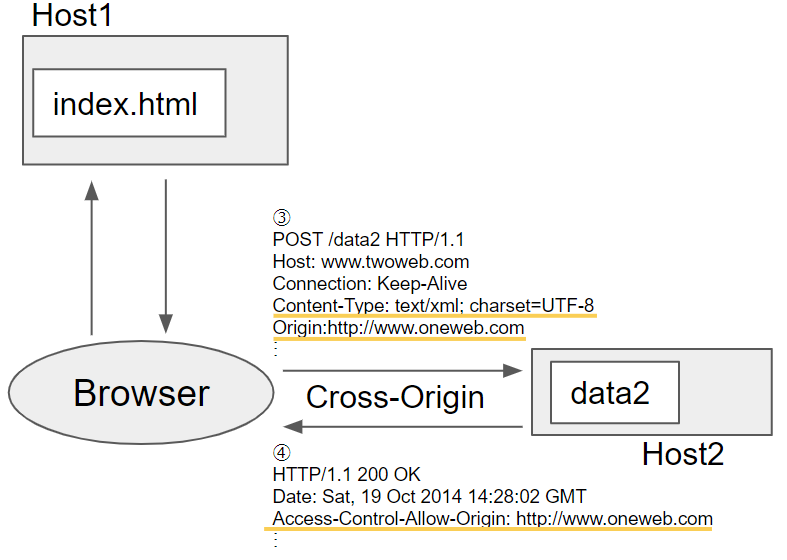
If the request from browser is not simple request, browser first send an HTTP request by the OPTIONS method. Then server responses to preflight request. After preflight request is complete, the real request is sent:

The value of Origin in request should be contained in Access-Control-Allow-Origin in response.
The value of Access-Control-Request-Method should be contained in Access-Control-Allow-Methods in response
The values of Access-Control-Request-Headers should be contained in Access-Control-Allow-Headers in response.

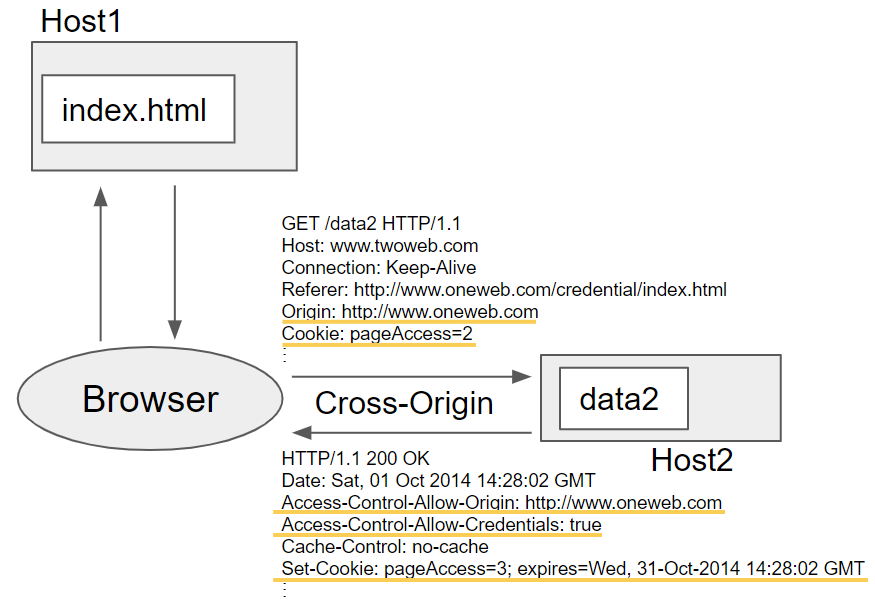
3 Requests with credentials

Browser can send request that are aware of HTTP cookies and HTTP Authentication information.
If web application needs a resource on cross-origin server which sets Cookies, browser send GET request with Origin and Cookie header. Then server send response with Access-Control-Allow-Origin, Access-Control-Allow-Credentials(true) and Set-Cookie header.

The origin of Access-Control-Allow-Origin should be the same one as the value of Origin in the request header.

Problems with CORS

You can see some errors and solutions in “CORS errors” from Web technology for developers document.

Problem with WebGL texturing

In my case, the error below occurred in WebGL texture call.

Uncaught DOMException: Failed to execute 'texImage2D' on 'WebGLRenderingContext': The image element contains cross-origin data, and may not be loaded.

How to solve this problem

If it works on the server, you should add crossOrigin to image.

 image.src = url;
 image.crossOrigin = origin; 
#origin is the domain where the image exists

If it works on local development environment (directory on your HDD), you should set up a server.

Use php or python command

Open terminal and input command.

1. python

cd <path to the directory where index.html and resource exists>
python -m SimpleHTTPServer 8080

2. php

cd <path to the directory where index.html and resource exists>
php -S localhost:8080

Use XAMPP

XAMPP is a free and open-source cross-platform web server solution package.

What is http request/response?

GOAL

To understand mechanism and meaning of http request and response message.

What is HTTP?

HTTP stands for Hypertext Transfer Protocol that is a protocol of transfer of hypertext written in HTML or XML, and other data.

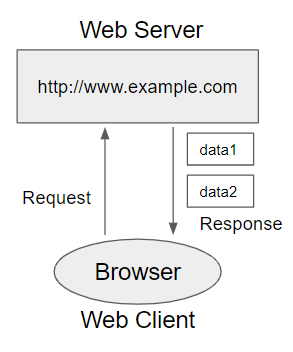
HTTP is request-response type data communication protocol. The client sends request to the server and the server sends to the response.

HTTP Request

These are example of HTTP request.

GET / HTTP/1.1
Accept: image/image01.png, */*
Accept-Language: ja
Accept-Encoding: gzip, deflate
User-Agent: Mozilla/4.0 (Compatible; MSIE 6.0; Windows NT 5.1;)
Host: www.example.com
Connection: Keep-Alive
GET /index.html HTTP/1.1 
Host: localhost:8080
Connection: keep-alive
User-Agent: Mozilla/5.0 (Macintosh; Intel Mac OS X 10_11_4) 
Referer: http://localhost:8080/
Accept-Encoding: gzip, deflate
Accept-Language: ja,en-US

HTTP Response

These are example of HTTP request.

HTTP/1.1 200 OK
Date: Sat, 09 Oct 2010 14:28:02 GMT
Server: Apache
Last-Modified: Tue, 01 Dec 2009 20:18:22 GMT
ETag: "51142bc1-7449-479b075b2891b"
Accept-Ranges: bytes
Content-Length: 29769
Content-Type: text/html

<!DOCTYPE html... 

Constitution of HTTP request

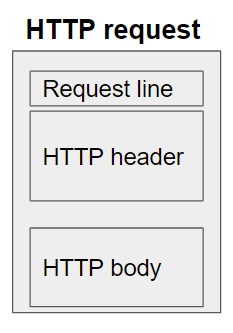
HTTP request consists of request line, HTTP header and body.

Request line

Request line is the first line of the HTTP request.

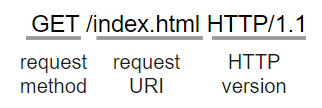
 GET /index.html HTTP/1.1 

Request line consists of request method, request URI and HTTP version.

Request Methods

  • GET
  • HEAD
  • POST
  • PUT
  • DELETE
  • CONNECT
  • OPTIONS
  • TRACE
  • PATCH

Refer “HTTP request methods” for detail of each method.

Constitution of HTTP response

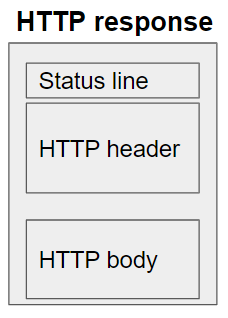
HTTP response consists of Status line, HTTP header and body.

Status line

Status line is the first line of the HTTP response.

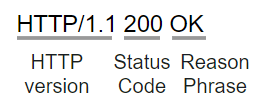
HTTP/1.1 200 OK

Status line consists of HTTP version, Status Code and Reason Phrase.

Status Code

Status code has 5 class

  • Informational responses (100–199)
  • Successful responses (200–299)
  • Redirects (300–399)
  • Client errors (400–499)
  • Server errors (500–599)

Refer “HTTP response status codes” for detail of status code.

HTTP header

HTTP header contains fields and their values as a format “field: value”.

GET / HTTP/1.1
Accept: image/image01.png, */*
Accept-Language: ja
Accept-Encoding: gzip, deflate
User-Agent: Mozilla/4.0 (Compatible; MSIE 6.0; Windows NT 5.1;)
Host: www.example.com
Connection: Keep-Alive

There are 4 types of HTTP header, General headers, Request headers, Response headers, Entity headers.

General headers

Examples of General headers

  • Connection: Keep-Alive or Close
    • whether or not the network connection stays open after the current transaction finishes
  • Date: <day-name>,<day>,<month>, <year>, <hour>:<minute>:<second> GMT
    •  the date and time when the message was originated
  • Cache-Control: public, no-cache, no-store, proxy-revalidate and so on
    • instructions for caching in both requests and responses

Request headers

Examples of Request headers

  • Accept-***:
    • items that the client is able to accept
    • Accept-Charset: utf-8, iso-8859-1 and so on
    • Accept-Language: en-US, ja and so on
    • Accept-Encoding: gzip, deflate, br and so on
  • If-***
    • conditional request
    • If-Match: ETag
    • If-Modified-Since: <day-name>,<day>,<month>, <year>, <hour>:<minute>:<second> GMT
  • User-Agent: <product>/<product-version> <system and platform>
    • the application, operating system, vendor and version of the requesting user agent.
  • Referer: <url>
    • the address of the previous web page from which a link to the currently requested page was followed

Response headers

Examples of Request headers

  • Age: <delta-seconds>
    • the time in seconds the object has been in a proxy cache
  • Location: <url>
    • the URL to redirect a page to

Entity headers

Examples of Entity headers

  • Content-Length: <length>
    • the size of the entity-body, in bytes, sent to the recipient
  • Allow: <http-methods> such as GET, POST and HEAD
    • the set of methods supported by a resource

What is body in HTTP request/response?

In HTTP request the body contains parameters. If the method doesn’t need any parameter to pass, body is blank. This is example of body in HTTP request. (name and age are parameters.)

name=taro&age=18

In HTTP response the body is content requested such as hypertext written in HTML. This is example of body in HTTP response.

<!DOCTYPE html>
<html lang="en">
<head>
  <meta charset="utf-8">
  <title>The HTML5 Herald</title>...

How To Set WordPress URL and Site URL Separately

GOAL

Today’s goal is to set site address and WordPress address different. For example, the WordPress address is “example.com/admin” if the site address is “example.com”.

Environment

WordPress 5.4.1

What are WordPress address and site address?

On the Settings -> General screen in a single site installation of WordPress, there are two fields named “WordPress Address (URL)” and “Site Address (URL)”.

from Changing The Site URL in wordpress.org

The “Site Address (URL)” setting is the address you want people to type in their browser to reach your WordPress blog.
The “WordPress Address (URL)” setting is the address where your WordPress core files reside.

from Changing The Site URL in wordpress.org
(more…)

Let’s Migrate WordPress Into The New Sever or New Domain.

GOAL

To migrate my WordPress Website into the new domain , in other words, to change the URL into the new one.

Environment

WordPress 5.4.1

Method

I chose a method with an useful plugin.

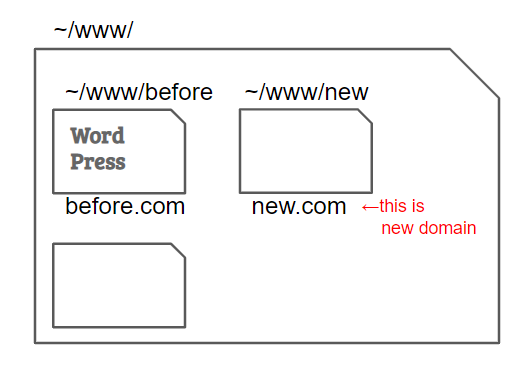
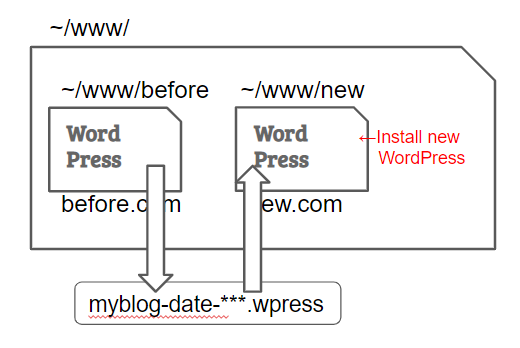
1. Get a new domain and set the name server.

I set a directory created on my web server to the new domain.

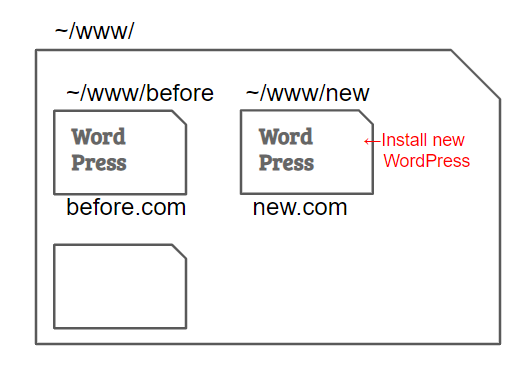
2. Install new WordPress on the target directory

3. Export file

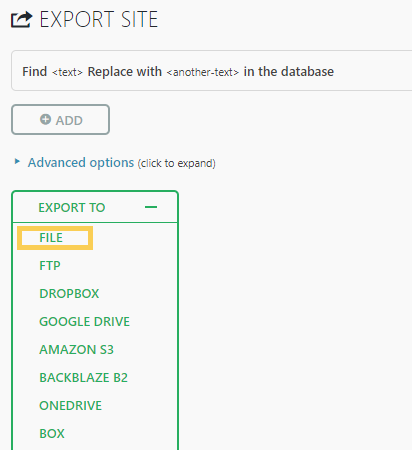
Install plugin “All-in-One WP Migration” into the WordPress in before.com.

Open “Export” menu and export files by pressing “FILE” button and download created .wpress file.

.wpress file contains database, Posts, Pages, Images, Themes, Plugins, User settings and so on.

4. Import site

Open “new” WordPress and install plugin “All-in-One WP Migration” into the WordPress in new.com.

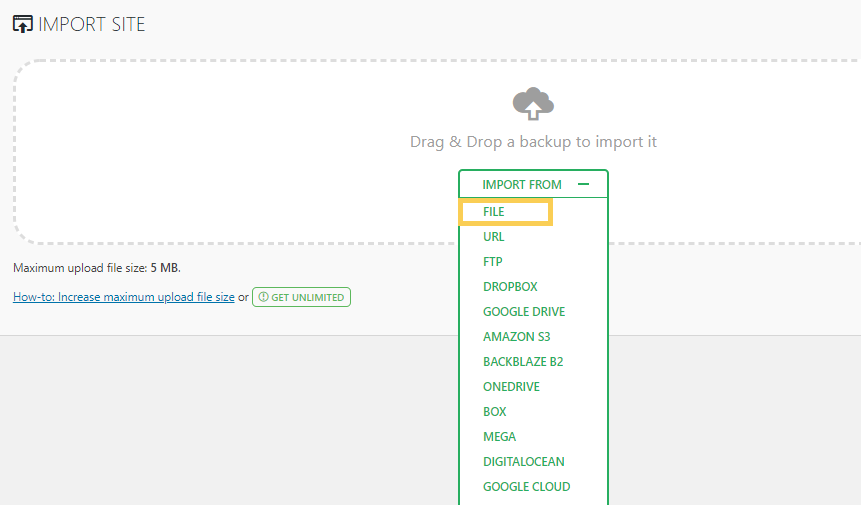
Open “Import” menu and click “IMPORT FROM” to import .wpress file.

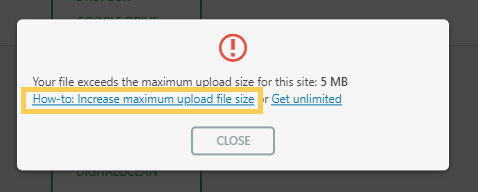
If you got message “Your file exceeds the maximum upload size for this site”

You should increase the maximum upload size. Click “How-to: Increase maximum upload file size”.

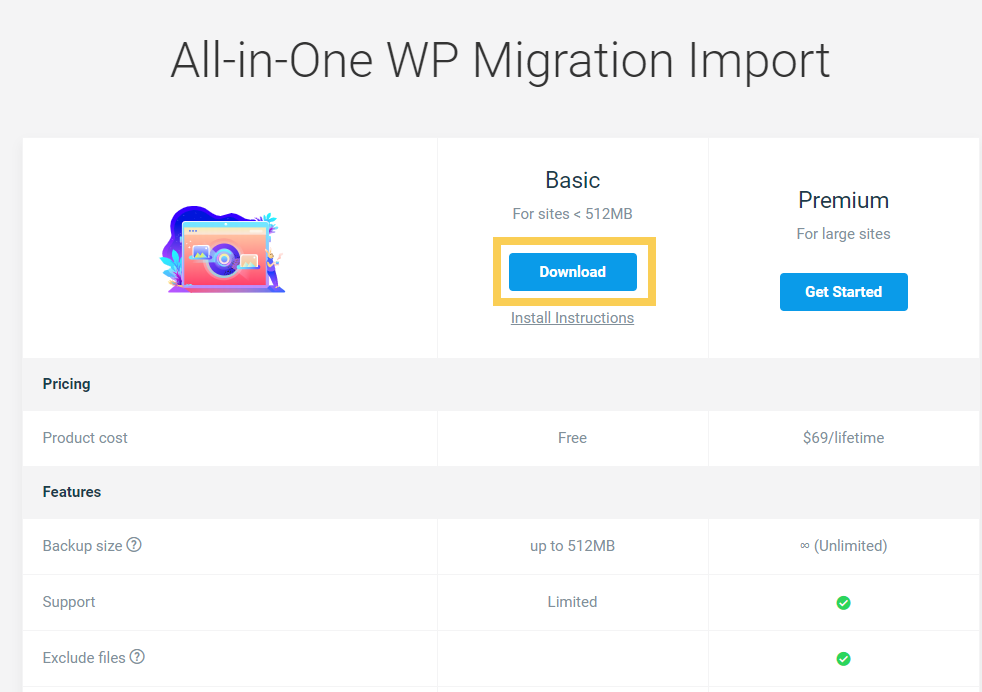
There are some ways to increase maximum upload file size. You can use a plugin if the .wpress file size is less than 512MB. Install Basic or Premium All-in-One WP Migration Import. I used Basic one.

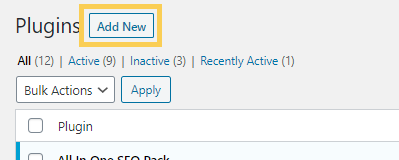
Open “Plugins” menu and click “Add New” button.

Upload Plugin and upload the plugin zip file “all-in-one-wp-migration-file-extension.zip”.

Then you can upload data up to 512 MB.

5. Check

You can see the items, images, themes and so on after uploading site.

[C++]How to separate header file and source file.

GOAL

To understand the rules and general method to separate header files and source files in C++.

What is header files?

Header files are files where class definitions and function declarations are summarized. You can use the class written in the header file by writig #include or #include “myheader.h” in source file as follows.

#include <iostream>
#include "myClass.h"
using namespace std;
int main(){
   myClass instance1;
   cout << instance1.getName() << endl;
}

Why are header files necessary?

In C++, variables, classes, functions and so on should be declared before used, like sayHello() or myClass in the sample code below.

//mysource.cpp

#include <string>
#include <iostream>
using namespace std;
void sayHello(){
    cout << "Hello!" << endl;
}
class myClass {
    private:
        string name;
    public:
        myClass();
        myClass(string name_str);
        string getName();
};
myClass::myClass(){
    name = "nothing";
}
myClass::myClass(string name_str){
    name = name_str;
}
string myClass::getName(){
    return name;
}

int main() {
    sayHello();
    myClass cat1("Joe");
    cout << cat1.getName() << endl;
}
//console result
Hello!
Joe

If this declaration is missed or called by wrong name, an error will occur. And when you use the same function or class in multiple files, you have to declare it many times in each file. It is difficult to understand the structured of code if the names of functions that have same function are different. And it is also difficult to make corrections collectively. For this reasons, the declaration part are split into the header files separately from the main source files.

//myClass.h
#include <string>
#include <iostream>

class myClass {
    private:
        std::string name;
    public:
        myClass();
        myClass(std::string name_str);
        std::string getName();
};
myClass::myClass(){
    name = "nothing";
}
myClass::myClass(std::string name_str){
    name = name_str;
}
std::string myClass::getName(){
    return name;
}
//mysource.cpp
#include <iostream>
#include "myClass.h"
using namespace std;
int main() {
    myClass cat1("Joe");
    cout << cat1.getName() << endl;
}
//console result
Joe

About #include

Header files can be loaded with #include or #include “filename”. The difference between the two styles is that when #include is used, the system searches the directory of the library specified by the compiler preferentially, but on the other hand, when #include “filename” is used, the system searches the current directory.

See below for C and C++ standard libraries.

What to put in a header file

Reference: What to put in a header file from Microsoft C++ language reference

In header files, write classes, methods and variable declarations. You can also make class-related definitions.

  • Definitions
    • Class definition
    • Inline function definition
    • Macro definition
  • Declarations
    • extern variable declaration
    • typedef declaration
    • Global function declaration

The declared functions in the header file are defined in the source file. Be aware of items not to be included in the header file. For example, the next chapter explains why variables are only declarated and are’nt defined in the header file.

Items that should not be written in the header file

Reference : What to put in a header file from Microsoft C++ language reference

Items such as duplicate definitions, that may cause confusion.

  • Definition of built-in types (int, float, string, etc.)
  • Anonymous namespace
    • That is definition a class in a namespace that is not named.
  • Using directive
    • If “using” is used, the namespace is also applied indirectly to the source file that read the header file, and it is easy to get confused.

Items that allocate memory area. (When multiple source files are read, each item reserves another area with the same name, which results in duplicate definition.)

  • Non-inline function definition
    • Inline function will be expanded to the call destination, so they have no problem.
  • Defining non-const variables (variables that are not constants)
    • Even if it is static, the variables are not shared and the entity is created for each source file.
    • Use const variables to define constants.

How to define a function?

Write only the declaration in the header file myClass.h.

//myClass.h
void myFunction();

Define the function in one of the .cpp files that are compiled together (either the main source file or myClass.cpp created for each header file).

//myClass.cpp
#include "myClass.h"
void myFunction(){
    printf("This is my function!");
}

In other .cpp files, you can use and use myFuction() defined in myClass.cpp by including only myClass.h.

How to define a variable?

Only “extern” is used in the header file myClass.h.

//myClass.h
extern int myVar;

Define the global variables in one of the .cpp files that are compiled together (either the main source file or myClass.cpp created for each header file).

//myClass.cpp
#include "myClass.h"
int myVar;

In other .cpp files, you can use variables by including only myClass.h. However, it is not recommended because it rarely uses variables in header file and it’s good to use class variables in C++.

Use include guards

Reference: Include guards from Microsoft C++ language reference

Include guard is a mechanism to prevent duplicate inclusion of header files. Duplicate inclusion can occur, for example, if you include one header file A in another header file B, then include A and B from a C++ source file.

//myClass.h
#ifndef MYCLASS_H
#define MYCLASS_H
/*myClass.h本体*/
#endif
[Kotlin] What is Operator Functions?

GOAL

To understand operator functions in Kotlin.

What is operator function?

Operator function can upgrade certain functions to operators allowing their calls with the corresponding operator symbol such as + – / *. (Kotlin documentation)

Implementation example

operator fun Int.times(str: String) = str.repeat(this)
operator fun String.minus(str2: String) = this.replace(str2,"")

fun main() {
    println(3 * "hey")
    println("Mr.Jonny" - "Mr.")
}

output

heyheyhey
Jonny

Primary operators

a + ba.plus(b)
a – ba.minus(b)
a * ba.times(b)
a / ba.div(b)
a % ba.rem(b) a.mod(b)
a..ba.rangeTo(b)
a++a.inc()
a–a.dec()
+aa.unaryPlus()
-aa.unaryMinus()
!aa.not()

Check Kotlin language guide documentation for more information about operators and functions.

[Kotlin] What is Infix Functions?

GOAL

To understand infix functions in Kotlin.

What is infix function?

In Kotlin, functions marked with the infix keyword can also be called using the infix notation (sited from the documentation of Kotlin). An example follows.

infix fun Int.add(a:Int): Int {
    return this+a
}

What is infix notation?

Infix notation is one of the notation types. In infix notation the operator is described in thee middle of the targets. + – * / are usually used as infix notation. (1+2, a-b)

  • Infix notation
    • (1+2)*(3-4)
  • Prefix notation (Polish notation)
    • *+12-34
  • Postfix notation (Reverse Polish notation)
    • 12+34-*

Implementation in Kotlin

fun pre_add(a:Int, b:Int): Int{
    return a+b
}

infix fun Int.in_add(a:Int): Int {
    return this+a
}

infix fun Int.in_sub(a:Int): Int = this-a

fun main() {
    println(pre_add(1,2))
    println(1 in_add 2)
    println(1.in_add(2))
    println(1 in_sub 2)
    println(1.in_sub(2))
}

output

3
3
3
-1
-1