Author: Nako

How to adapt your AE plugin for 8, 16, 32bit color

Hello. In previous article “First After Effects Effects-Plug-In Development“, I implemented a simple After Effects plugin. This article is supplement to it.

What is color (bit) depth

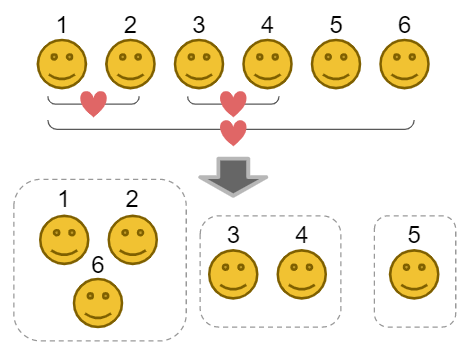
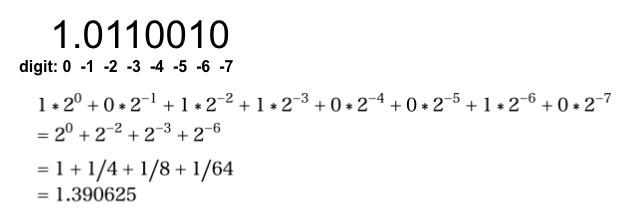
Colors are represented as numbers in computers. In RGB color system, color is represented (R, G, B) such as (100, 120, 144) or (0.5, 0.2, 0.7). In gray scale mode, color is represented as one value such as a integer form 0 to 255 or float from 0 to 1.0.

Color bit depth is resolution of each values. When the color is 8 bpc(bit per channel) each channel, R, G, B and A is expressed using 8bit. When the color is 8bpp(bit per pixel), each pixel color is expressed using 8bit, 3bit for R and G and 2 bit for B.

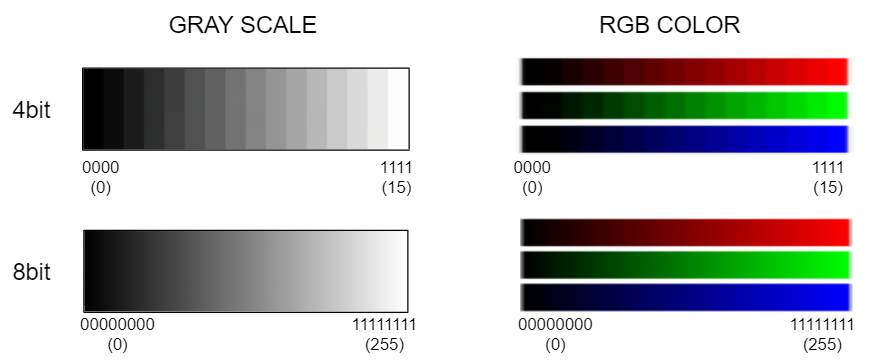
The following is the image of the difference between 4bit color (4bpc) and 8bit color (8bpc).

Difference 4bpc and 8bpc

Color bit depth in After Effects

In After Effects, you can use 8-bpc, 16-bpc, or 32-bpc color. (check “Color depth and high dynamic range color” for details)

8bit: 0-255 for each channel (256 gradation)
16bit: 0-32767 for each channel (32,768 gradation)
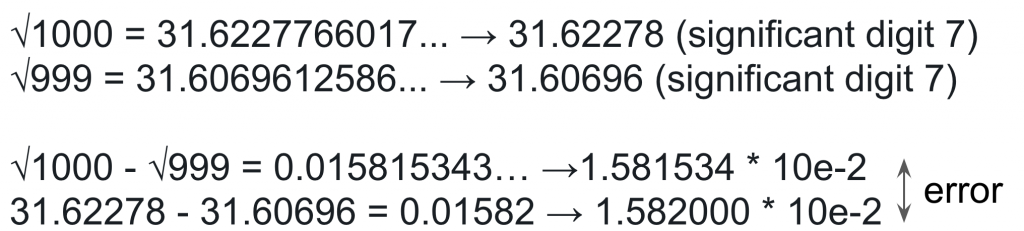
32bit: The range represented by a 32-bit float for each channel (4,294,967,296 gradation)

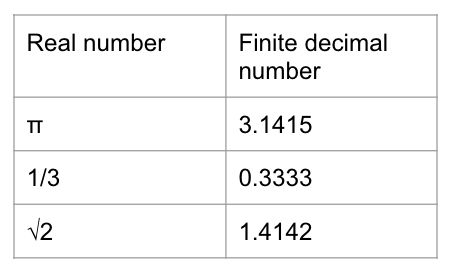
The color is represented by integer in 8bpc and 16bpc color. Float value is clamped into [0.0 – 1.0] and convert to [0-255] or [0-32767] in 8bpc and 16bpc.

Color bit depth in AE plug-in development

When you develop After Effects plug-in, you should consider all color 8/16/32bit.

8bit

8ARGB color is stored using PF_Pixel8

//this is from AE_Effect.h

// Basic pixel defn's
typedef struct {
	A_u_char	alpha, red, green, blue;
} PF_Pixel;

typedef PF_Pixel		PF_Pixel8;
typedef PF_Pixel		PF_UnionablePixel;

16bit

//this is from AE_Effect.h

typedef struct {
	#ifdef PF_PIXEL16_RENAME_COMPONENTS
		// this style is useful for debugging code converted from 8 bit
		A_u_short		alphaSu, redSu, greenSu, blueSu;
	#else
		A_u_short		alpha, red, green, blue;
	#endif
} PF_Pixel16;

32bit

32bit color is supported in CS6 (11.0) and more.

//this is from AE_Effect.h

typedef A_FpShort			PF_FpShort;
typedef A_FpLong			PF_FpLong;
typedef struct {
	PF_FpShort				alpha, red, green, blue;
} PF_PixelFloat, PF_Pixel32;

And as you can see below, each channel is char type (8bit) in PF_Pixel or PF_Pixel8, unsigned short type (16bit) in PF_Pixel16 and float type (32bit) in PF_PixelFloat or PF_Pixel32.

//picked up from A.h

typedef char			A_char;
typedef float			A_FpShort;
typedef unsigned short	A_u_short;

Tips of color depth handling in AE plug-in development
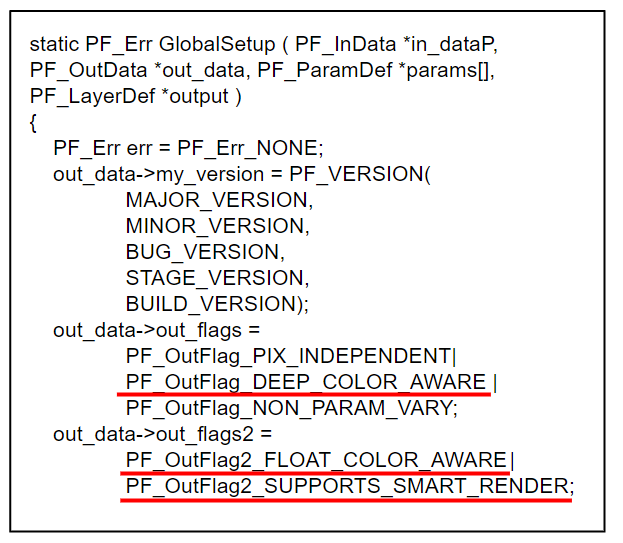
Global setup

To make your effect handle 16-bpc color, set out_data->out_flags PF_OutFlag_DEEP_COLOR_AWARE.

And to make your effect supports 32-bpc colors, set out_data->out_flags2 PF_OutFlag2_FLOAT_COLOR_AWARE and PF_OutFlag2_SUPPORTS_SMART_RENDER.
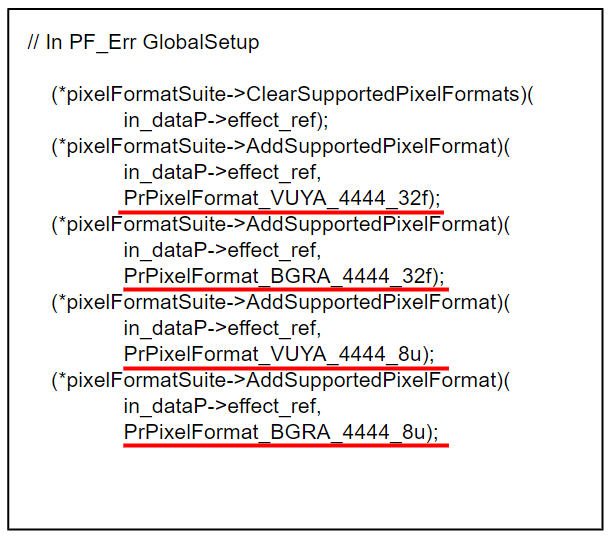
Set pixel format

Before CS6, PF_CHECKOUT_PARAM() only returned 8-bit ARGB buffers, regardless of the pixel format currently being used for rendering. Starting in CS6, an effect can opt in to get frames in the same format as the render request, whether it is 32-bit float, YUV, etc.

from  After Effects SDK Guide
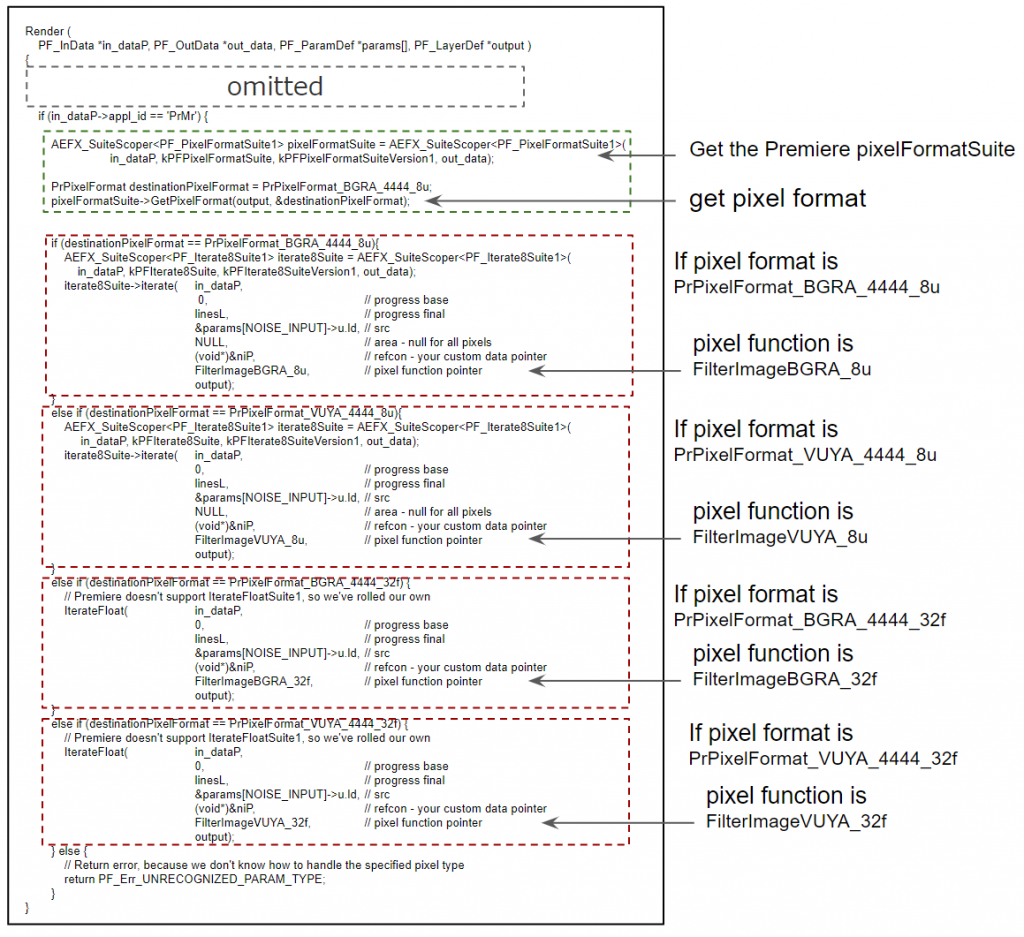
Render

In Render function, the iterate function scan input flame and calculate output frame as pixel to pixel operation, pixel function. The iterate functions is selected separately depending on the PrPixelFormat of destination pixels. Check After Effects SDK Guide “Progress During Iteration” for details.

Smart Render

In Smart Render function, pixel functions is selected separately depending on the PrPixelFormat like Render function.

If you want to know about the difference between Render function and SmartRender function, check the article “The difference of Render and Smart Render in After Effects”. (sorry, it will come soon)

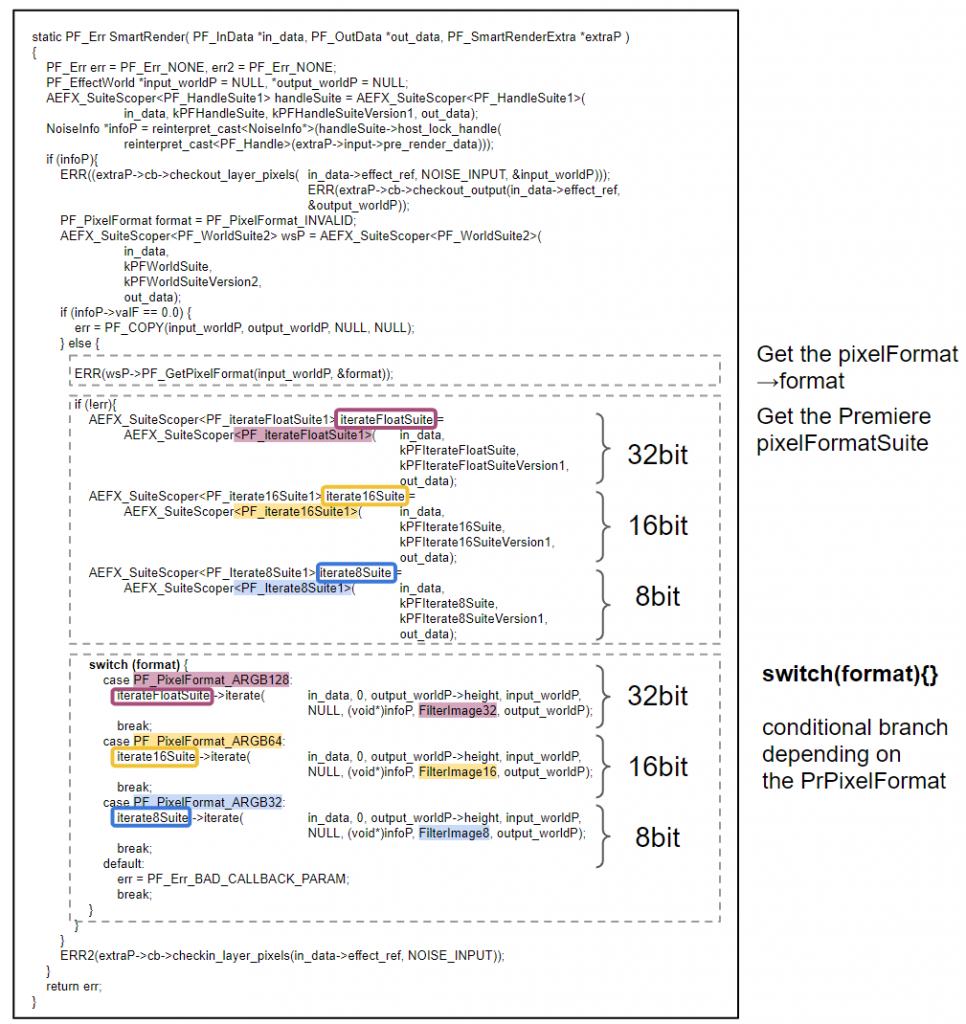
The conditional branch by switch sentence is following.

 switch (format) {
    case PF_PixelFormat_ARGB128:
        iterateFloatSuite ->iterate(
            in_data, 0, output_worldP->height, input_worldP, 
            NULL, (void*)infoP, FilterImage32, output_worldP);
        break;
    case PF_PixelFormat_ARGB64:
        iterate16Suite ->iterate(
            in_data, 0, output_worldP->height, input_worldP,
            NULL, (void*)infoP, FilterImage16, output_worldP);
        break;
    case PF_PixelFormat_ARGB32:
        iterate8Suite ->iterate(
            in_data, 0, output_worldP->height, input_worldP,
            NULL, (void*)infoP, FilterImage8, output_worldP);
        break;
     default:
         err = PF_Err_BAD_CALLBACK_PARAM;
         break;
}

Pixel functions

Prepare each functions for 8/16/32 bit separately. The follow example is in SDK_Noise.cpp.

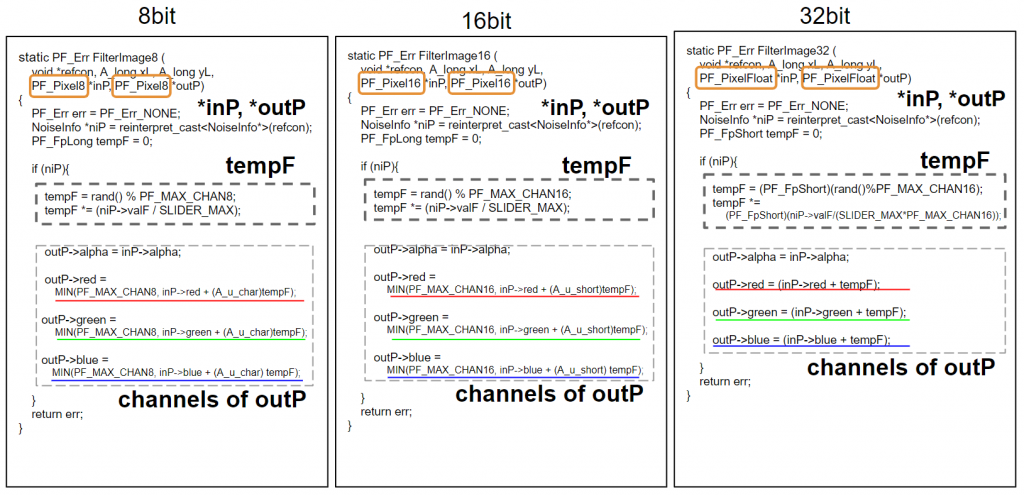
The differences are following.

*inP and *outP

// 8bit
static PF_Err FilterImage8 (
    void *refcon, A_long xL, A_long yL, 
    PF_Pixel8 *inP, PF_Pixel8 *outP)

// 16bit
static PF_Err FilterImage16 (
    void *refcon, A_long xL, A_long yL, 
    PF_Pixel16 *inP, PF_Pixel16 *outP)

// 32bit
static PF_Err FilterImage32 (
    void *refcon, A_long xL, A_long yL, 
    PF_PixelFloat *inP, PF_PixelFloat *outP)

tempF

// 8bit   clamp in range [0, PF_MAX_CHAN8]
tempF = rand() % PF_MAX_CHAN8;
tempF *= (niP->valF / SLIDER_MAX);

// 16bit   clamp in range [0, PF_MAX_CHAN16]
tempF = rand() % PF_MAX_CHAN16;
tempF *= (niP->valF / SLIDER_MAX);

// 32bit    clamp in range [0, 1 = PF_MAX_CHAN16/PF_MAX_CHAN16]
tempF = (PF_FpShort)(rand() % PF_MAX_CHAN16);
tempF *= (PF_FpShort)(niP->valF / (SLIDER_MAX * PF_MAX_CHAN16));

channels of outP

// 8bit  clamp in the range [0, PF_MAX_CHAN8] 
outP->red = MIN(PF_MAX_CHAN8, inP->red + (A_u_char) tempF);

// 16bit  clamp in the range[0, PF_MAX_CHAN16] 
outP->red = MIN(PF_MAX_CHAN16, inP->red + (A_u_short) tempF);

// 32bit
outP->red = (inP->red + tempF);

Understanding typedef in C/C++

GOAL

To understand “typedef” in C++

What is typedef?

typedef is a reserved keyword that gives a new name to existing data type used in C/C++ programming. That new name like this is called alias or synonym.

The following is an example of typedef. typedef is used just for user convenience.

typedef int USER_Id;
USER_Id john_id; //this is same as int john_id
john_id = 24;

When to use typedef

These are some of many use cases of type def.

To clarify the meaning of variable

For example, when you handle data of date many times, you may want to identify month and day.

typedef  int Month;  //define alias "Month"
typedef int Day;  // define alias "Day"

This is an example of use.

#include <iostream>
using namespace std;

typedef  int Month;
typedef int Day;

void print_birthday(Month m,  Day d){
    printf("your birthday is %d/%d\n",m, d);
}
Day last_day(Month m){
    if(m == 4 && m==6 && m==9 && m==11)
        return 30;
    if(m == 2)
        return 28; //ignore leap year 
    else
        return 31;
}
int main(void){
    print_birthday(12,24);  /* output is "your birthday is 12/24" */
    cout << last_day(10);  /* output is "31"*/
}

To omit long type

typedef long long unsigned int LLUInt;

int main(void){
    LLUInt test1 = 10;
    LLUInt test2 = 20;
    cout << test1+test2 << endl;  /* output is "30"*/
}

To omit the “struct” keyword in C language

When you declare a defined structure, you should use the “struct” keyword in C language.

struct person{
    char *nickname;
    int age;
};
//declare
struct person john;

If you use typedef and rename the structure, you don’t need the “struct” keyword.

typedef struct person{
    char *nickname;
    int age;
} person_type;

//declare
person_type john;

The definition of the structure in above source code is the same as this.

struct person{
    char *nickname;
    int age;
};
typedef person person_type;

self-referencing structure

The following is the Node structure used in linked list.

struct Node {
    int data;
    struct Node *next;
}

This self-referencing structure is also defined by using typedef.

typedef struct _node{
int data;
struct _node * next;
} Node;
Node* top;

To create a pointer type

Usually you should use * to declare a pointer.

int *p1, *p2, *p3, *p4;

You can define pointer type by using typedef.

typedef int* IntP
IntP p1, p2, p3, p4;

string

#include <iostream>
using namespace std;

typedef char* my_str;

int main(void){
    my_str name = "Nako";
    printf("My name is %s\n", name); /* output is "My name is Nako"*/
}

Variations

Structure and its pointer

typedef struct _node{
    int data;
    struct _node * next;
} Node, *pNode;

Function

In this example, variable f can store a pointer to function int FUNC(int n).

#include <iostream>
using namespace std;

int next_int(int x) { return x + 1; } //example of int FUNC(int n)
int half_int(int x) { return x/2;}  //example of int FUNC(int n)

int main(void){
    int (*f1)(int n);
    int (*f2)(int n);
    f1 = next_int;
    f2 = half_int;
    cout << f1(4) << " " << f2(4) << endl;  /*output is "5 2"*/
}

Typedef can add the name to the pointer of function.

typedef int (*FUNCT)(int n);

The above example of function pointer can be changed as below.

#include <iostream>
using namespace std;

int next_int(int x) { return x + 1; }
int half_int(int x) { return x/2;}

typedef int (*FUNCT)(int n);

int main(void){
    FUNCT f1;
    FUNCT f2;
    f1 = next_int;
    f2 = half_int;
    cout << f1(4) << " " << f2(4) << endl;    /*output is "5 2"*/
}

list

typedef can define list as type.

#include <iostream>
using namespace std;

typedef int Members[5];

int main(void){
    Members team_a = {13, 25, 66, 89, 100};
    Members team_b = {21, 22, 50, 78, 81};
    for(int i=0; i<5; i++){
        cout << team_a[i] << " ";  /*output is "13 25 66 89 100 "*/
    }
    cout << endl;
    for(int i=0; i<5; i++){
        cout << team_b[i] << " ";  /*output is "21 22 50 78 81 "*/
    }
}

using in C++

The “using” declaration introduces a name into the declarative region in C++. The “using” declaration is usually used for making a declaration of namespace such as “using namespace std;”, but it can be also used for alias.

using Month = int;
using Day = int;
using FUNCT = int (*)(int);

I’ll write about the difference between typedef and using and its features someday. Thank you!

What is Hermite interpolation?

GOAL

To understand Hermite interpolation.

Abstract

Hermite interpolation is one of the interpolation method that needs n points and slopes of each point.

$$ nth\quad point: (x_n, f_n)$$ $$nth\quad sloop: (x_n, {f_n}^{(1)})$$

@2020 Nako

Hermite interpolation polynomial

$$f(x) = \sum_{i=0}^{n}h_{i0}(x)f_i + \sum_{i=0}^{n}h_{i1}(x){f_i}^{(1)}$$

$$h_{i0}(x) = p_i(x)[\frac{1}{p_i(x_i)} – (x – x_i) \frac {{{p_i}^{(1)}}(x_i)}{{[p_i(x_i)]}^2}$$

$$h_{i1}(x) = (x – x_i) \frac {{p_i}(x)}{{p_i}(x_i)}$$

$$p_i(x) = {(x-x_0)}^2{(x-x_1)}^2… {(x-x_{i-1})}^2{(x-x_{i+1})}^2…{(x-x_n)}^2$$

Proof

1

Because

2

Because

3

Derivation method

Derivation of interpolated function from 2 points and 2 slopes on that points. Given values are point (x_0, f(x_0)), slope f'(x_0), point (x_1, f(x_1)) and slope f'(x_1).

f[x], f[x, y], f[x, y, … ,z] is divided difference. Please refer to “Divided Difference” for detail.

$$f[x,x]=f'(x)$$ $$f[x_0,x_1,…,x_n]=\frac{f[x_1,x_2,…,f_n]- f[x_0,x_1,…,x_{n-1}] }{x_n-x_0}$$

f(x) is computed in the following way.

Divided Difference

GOAL

To understand what “divided difference” is.

POINTS

The divided difference is the difference between the values ​of functions divided by the difference of the arguments. The higher-order divided difference is the divided difference of the divided difference.

DEFINITION

0th divided difference

$$f[x_0] = f(x_0)$$

1st divided difference

$$f[x_0, x_1] = \frac{ f(x_0)-f(x_1)}{x_0-x_1}$$

2nd divided difference

$$f[x_0, x_1, x_2] = \frac{ f[x_0, x_1] – f[x_1, x_2] }{x_0-x_2}$$

Generalized nth divided difference

$$f[x_0, … x_n] = \frac{ f[x_0, … x_{n-1}] – f[x_1, … x_n] }{x_0 – x_n}$$

PROPERTIES

Linearity

$$(f+g)[x_0, … x_n] = f[x_0, … x_n] + g[x_0, … x_n]$$

Symmetry

σ is one of the permutations.

$$σ = \begin{pmatrix} 0 & 1 & … & n \\ σ(0) & σ(1) & … &σ(n)\end{pmatrix}$$

$$f[x_0, x_1, …, x_n] = f[σ(0), σ(1), … ,σ(n)]$$

Relationship with the derivative

$$f'(x) = \frac{df}{dx} = \lim_{h \to 0}f[x + h, x]$$

Union-Find in Python

GOAL

To understand and to implement union-find in Python.

Example of problems using union-find algorithm

Dividing clusters

There is a list of friends from N people. Divide them in cluster.

n = 6
friendship = [(1, 2), (3, 4), (1, 6)]
(more…)

Bucket sort, counting sort and radix sort.

GOAL

To understand the difference and pros and cons of “bucket sort”, “counting sort” and “radix sort” and implement them.

Bucket sort

Bucket sort is one of the sorting algorithm that has “bucket” to put numbers in.

import random
import itertools
length = 50 #length of the list
input_list = [random.randint(0, 99) for x in range(length)]

#input: list that has 0~99 int elements
#output: sorted list
def bucket_sort(input_list):
    bucket = [[] for x in range(100)]
    for i in input_list:
        bucket[i].append(i)
    return list(itertools.chain.from_iterable(bucket))

print(input_list)
print(bucket_sort(input_list))
#output
[6, 27, 26, 38, 90, 80, 69, 14, 65, 53]
[6, 14, 26, 27, 38, 53, 65, 69, 80, 90]

Complexity: time O(n), space O(r) as n is length of the list, r is range. In the worst case, space complexity is O(r+n)
Pros: Fast algorithm, stable sort
Cons: big memory, the range of input number should be limited.

Counting sort

Counting sort is one of the derivation of bucket sort. Create Bucket and put the number of “occurrences” in it. Iterate the input list counting the number of occurrences.

import random
length = 10
input_list = [random.randint(0, 99) for x in range(length)]

def counting_sort(input_list):
    bucket = [0 for x in range(100)]
    for i in input_list:
        bucket[i] += 1
    output = []
    for idx, num in enumerate(bucket):
        for i in range(num):
            output.append(idx)
    return output

print(input_list)
print(counting_sort(input_list))
#output
[84, 33, 72, 10, 31, 4, 4, 46, 89, 52]
[4, 4, 10, 31, 33, 46, 52, 72, 84, 89]

Complexity: time O(n), space O(r) as n is length of the list, r is range.
Pros: Fast algorithm, fixed size memory
Cons: unstable, big memory, the range of input number should be limited.

Radix sort

Radix sort is one of the derivation of bucket sort. Convert each elements into n-adic number and put each digit into the bucket.

import random
import itertools
length = 10
input_list = [random.randint(0, 99) for x in range(length)]

def radix_sort(input_list): # n = 10
    for i in (range(2)): #digit is 2
        bucket= [[] for i in range(10)]
        for num in input_list:
            index = (num//(10**i)) % 10
            bucket[index].append(num)
        input_list = list(itertools.chain.from_iterable(bucket)).copy()
    return input_list

print(input_list)
print(radix_sort(input_list))
#output
[26, 4, 7, 48, 71, 31, 95, 20, 94, 55]
[4, 7, 20, 26, 31, 48, 55, 71, 94, 95]

Complexity: time O(n), space O(d) as n is length of the list, d is number of digits. In the worst case, space complexity is O(d+n)
Pros: Fast algorithm, small memory, stable sort
Cons: the range of input number should be limited

Because it takes some time to calculate division and modulo, using shift operation of binary numbers is efficient.

The difference between Unix and Linux.

When I asked, it was difficult for me to explain the difference of them strictly.

GOAL

To understand the difference and history of Unix and Linux.

What is Unix and Linux

They are some of OS.

PublishInterfaceSpecificationlanguage
UnixAT&T(1968)CLI (&GUI, X-windows)Single UNIX SpecificationC, Assembly languagemac OS
LinuxUniversity of Helsinki (1991)GUI (& CLI)Linux Standard Base
Specifications
C, Assembly languageOpen source, Unix-like, used in Android
WindowsMicrosoft (1985)CLI (& GUI)C, C++, Assembly language

Difference of Unix and Linux

Unix is a general term to express operating system that meets some conditions(Single UNIX Specification).

Linux is one of the Unix-like operating system. It is developed taking after Unix, but it is different OS. Linux has its source code and original kernel called Linux kernel.

Linux is open source in contrast to Unix. This is the

Similarities of Unix and Linux

Linux is  UNIX compatible operating system that meets POSIX. So they have similar interfaces. POSIX, Portable operating system interface, is API standard that define application interface programming of Unix and Unix-like OS. OS that meet POSIX have similar system calls, formats, structures of directories and files, processes and databases.

By combining Linux kernel and GNU software, a complete UNIX compatible operating system is available as free software.

Internal Representation of Numbers in Computer.

I found the following phenomena but why?

#source code
a = 1.2
b = 2.4
c = 3.6
print(a + b == c)
False

GOAL

To understand the mechanism of the internal representation of integer and float point in computer.

Binary Number

Numbers are represented as binary number in computer.

Unsigned int

Signed int: Two’s Complement notation

What is complement?

Complement has two definition.
First, complement on n of a given number can be defined as the smallest number the sum of which and the given number increase its digit. Second, it is also defined as the biggest number the sum of which and the given number doesn’t increase its digit. In decimal number, the 10’s complement of 3 is 7 and the 9’s complement of 3 is 6. How about in binary number?

One’s complement

One’s complement of the input is the number generated by reversing each digit of the input from 0 to 1 and from 1 to 0.

Two’s complement

Two’s complement of the input is the number generated by reversing each digit of the input, that is one’s complement, plus 1. Or it can be calculated easily by subtracting 1 from the input and reverse each digit from 1 to 0 and from 0 to 1.

The range that can be expressed in two’s complement notation

The range is asymmetric.

Floating point

The following is the way to represent floating point number in computer.

The digit is limited and this means that the floating point can’t represent all the decimals in continuous range. Then the decimals are approximated to closest numbers.

Why float(1.2)+float(2.4) is not equal to float(3.6)?

In computers float number can’t have exactly 1.1 but just an approximation that can be expressed in binary. You can see errors by setting the number of decimal places bigger.

#source code
a = 1.2
b = 2.4
c = 3.6
print('{:.20f}'.format(a))
print('{:.20f}'.format(b))
print('{:.20f}'.format(c))
print('{:.20f}'.format(a+b))
1.19999999999999995559
2.39999999999999991118
3.60000000000000008882
3.59999999999999964473

*You can avoid this phenomena by using Decimal number in python.

from decimal import *
a = Decimal('1.2')
b = Decimal('2.4')
c = Decimal('3.6')
print(a+b == c)

print('{:.20f}'.format(a))
print('{:.20f}'.format(b))
print('{:.20f}'.format(c))
print('{:.20f}'.format(a+b))
True
1.20000000000000000000
2.40000000000000000000
3.60000000000000000000
3.60000000000000000000

Numerical Error in program

GOAL

To understand numerical errors in computers.

Error of input data 

Input data error occurs when real number such as infinite decimal numbers are input as finite decimal number by users.

Approximation error

For example, square root are generated by approximate calculation such as iterative method and bisection method in computers.

Round-off error

Round-off error is caused because the calculation result is rounded to within the number of significant digits in computers.

1.105982 -> 1.10598
40156.245618 -> 40156.24562

Truncation error

Truncation error occurs when iterative calculation such as infinite series or iterative method aborted halfway because of time restriction.

Loss of significance

Loss of significance occurs in calculations of two close numbers using finite-precision arithmetic.

Example

1.222222- 1.222221 = 0.000001
(significant digits 7) – (significant digits 7) = (significant digits 1)

Why loss of significance is undesirable?

For example, calculate √1000 – √999 to 7 significant digit.

Information loss

Information loss occurs when add or subtract big number and small number.

Example

122.2222 + 0.001234567 = 122.2234 (significant digits 7)

[Tips]How to Select a Face Loop in Blender -Element select-

I tried to select thin side of cube, but I couldn’t select by double-click.

What I want to do

GOAL

To summarize some ways to select elements in Blender.

Environment

Blender 2.8a

Keymap

Selection methods are different depending on keymap.

How to check and change keymap in Blender

Edit > Preference > Keymap

When Keymap is “Blender”, alt + click(left) is the key to select loop element.

When Keymap is “Industry Compatible”, double-click is the key to select loop element. I usually use this keymap.

The method to select loop elements

Vertices

Change the select mode into “vertex select” and double-click the edge on the vertex loop you’d like to select.

Example

Edges

Change the select mode into “edge select” and double-click the edge on the edge loop you’d like to select.

Example

Select another side.

Faces

Change the select mode into “face select” and double-click the side that is near the on the face loop you’d like to select.

Example

Select another side.

Other selection methods

Select one element

Click face, edge or vertex.

Multiple selection

Shift + click

Select continuous elements

Ctrl + click

Select All

Press A key