Author: Nako

How To Build Sample Projects In After Effects SDK

GOAL

Today’s goal is to build sample projects in AE SDK.

Environment

Windows10
Visual Studio 2015 Community
After Effects CC2019
After Effects 17.1.2 Win SDK

Method

Download AE SDK

Access Adobe Developer Console (https://console.adobe.io/servicesandapis) and sign in with your Adobe user account.

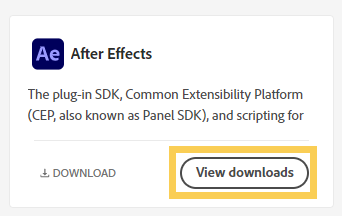
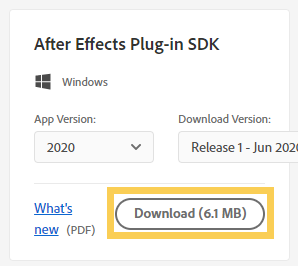
Select After Effects “View downloads” and download After Effects Plug-in SDK. Then extract downloaded folder.

Build single plug-in

Select project

Open AfterEffectsSDK\Examples and select a project that you’d like to build. For example, “AfterEffectsSDK\Examples\AEGP\Artie” is one of the project directory. See the list of sample project in Sample Project Descriptions.

Open solution file

Open the solution file (for example, AfterEffectsSDK\Examples\AEGP\Artie\Win\Artie.sln) with Visual Studio 2015(v140). While you can use later versions, you should upgrade the project from v140 to using version.

(more…)

How To Install Older Visual Studio

GOAL

Today’s goal is to install Visual Studio Community 2015 in Windows. It was complicated a little to install from scratch.

Environment

Windows10(2021/05)

Method

1. Access the site to install visual studio

Access https://my.visualstudio.com/  and login with your Microsoft account. If you don’t have Microsoft account, please create here.

2. Buy visual Studio subscription or Join Dev Essentials

In my case, I’d like to install Visual Studio community edition only, so click “join Dev Essentials program” (that doesn’t cost anything). User can access to developer tools and services in this way.

(more…)

Trying to fix Blender “Mirror” bug

The behavior of Mirror in blender is for some reason. So I tried to fix it by myself. I do not take any responsibility for any damage or loss if you follow this article.

Problem

I don’t know why but object menu “Mirror > X Local” calls operation of “X Global” in my blender 2.83 on windows10. Actually this problem can be solved by update and re-install blender 2.83.

# the same function is called as below
bpy.ops.transform.mirror(orient_type='GLOBAL', constraint_axis=(True, False, False), use_proportional_edit=False, proportional_edit_falloff='SMOOTH', proportional_size=1, use_proportional_connected=False, use_proportional_projected=False)

What I did to fix

I searched word “Mirror” in C:/Program Files/Blender Foundation/Blender 2.83/2.83 and find the definition of mirror menu in C:/Program Files/Blender Foundation/Blender 2.83/2.83/scripts/startup/bl_ui/space_view3d.py.

class VIEW3D_MT_mirror(Menu):
    bl_label = "Mirror"

    def draw(self, _context):
        layout = self.layout

        layout.operator("transform.mirror", text="Interactive Mirror")

        layout.separator()

        layout.operator_context = 'EXEC_REGION_WIN'

        for (space_name, space_id) in (("Global", 'GLOBAL'), ("Local", 'LOCAL')):
            for axis_index, axis_name in enumerate("XYZ"):
                props = layout.operator("transform.mirror", text=f"{axis_name!s} {space_name!s}")
                props.constraint_axis[axis_index] = True
                props.orient_type = 'GLOBAL' # the point that cause a problem!!!

            if space_id == 'GLOBAL':
                layout.separator()

So change ”props.orient_type = ‘GLOBAL’” into “props.orient_type = space_id” and save with administrative privileges.

Restart Blender and check the result.

bpy.ops.transform.mirror(orient_type='LOCAL', constraint_axis=(True, False, False), use_proportional_edit=False, proportional_edit_falloff='SMOOTH', proportional_size=1, use_proportional_connected=False, use_proportional_projected=False)

It was easy to modify blender program in python level.

Rotate and Scale Don’t Work in Blender

This is trouble shooting.

Problem

I couldn’t resize or rotate widget in Blender.

example) expanding box in the x-axis direction

Environment

Blender 2.83
Windows 10

Check List

Affect Only check box

If the Options > Affect Only > Locations checkbox is on, check it off.

Transform is rocked

If the Rotation and Scale are rocked, the arrows to resize or rotate are not displayed.

How To Use QInputDialog in PySide

GOAL

Today’s goal is to create a simple dialog by using QInputDialog in PySide.

Environment

Windows 10
Python 3.8.7
PySide2 (5.15.2)

Method

Reference: QInputDialog

Create the simplest dialog

There are 4 types of dialogs, getText, getInt, getDouble and getItem. Here is an example of QInputDialog() in https://gist.github.com/s-nako/1821d3c25997ec4a868f1e5f0bd2f687.

main UI to display dialogs

getText Dialog

def show_get_text_dialog(self):
    name, ok = QInputDialog.getText(self, 'Name form', 'input name:')
    if ok:
        print("input is ", name)
(more…)

How To Use Keymap Preference in Blender

The system of keymap preference in Blender is complex a little.

GOAL

Today’s goal is to summarize how to customize keymaps in Blender. The main contents are how to change keymaps, save and import/export key configuration presets. This article doesn’t contain how to use keymap editor or details of UI.

Environment

Blender 2.83 (Python 3.7.4)
Windows 10

What is keymap preference?

The following is an excerpt from the Blender manual.

The keymap editor lets you adjust your keymap via:

Presets: Predefined keymaps which come with Blender and can be added to.
Preferences: Keymaps may define their own preferences to change the functionality or add additional key bindings.
Key Map Items: You may add/remove/edit individual keymap entries.

from “Keymap” in Blender 2.92 Manual

How to change keymap

Keymaps can be changed in each keymap editor.

(more…)

Command-line Arguments and argparse in Python

GOAL

Today’s goal is to understand how to get command-line arguments in Python and how to use argparse module.

Environment

Windows 10
Python 3.8.7

What is command-line arguments in Python?

This is an example for parsing command-line arguments without argparse. The system can get the list of command line arguments with sys.argv.

import sys

def args_test():
    args = sys.argv
    for idx, args in enumerate(args):
        print(idx, args)

args_test()

An example of input in command prompt and the result are as below. Please note that the arguments are only string type and separated by spaces.

> python\test\argparse_test.py aa 100 "cc" [item1, items]

0 python\test\argparse_test.py
1 aa
2 100
3 cc
4 [item1,
5 items]

Optional arguments and flags

The following is an example to use optional arguments in command-line. It takes an effort to parse the list sys.argv.

import sys

def print_student_info():
    # the argument template name, age, --classes class1 class2 --absence
    # example1 Sulley 12 --classes math music science
    # example2 Mike 11 --absence --classes math
    args = sys.argv
    print("{} is {} years old".format(args[1], args[2]))

    if "--absence" in args:
        print("He/She is absent today.")

    if "--classes" in args:
        classes = []
        class_start = args.index("--classes")+1
        flag_item = list(filter(lambda x: x.startswith("--"), args[class_start:]))
        if flag_item:
            class_end = args.index(flag_item[0])
            classes = args[class_start:class_end]
        else:
            classes = args[class_start:]
        print("He/She has {} classes".format(" ".join(classes)))

print_student_info()
>python\test\argparse_test.py Sulley 12 --classes math music science
Sulley is 12 years old
class_start 4
He/She has math music science classes

>python\test\argparse_test.py Mike 11 --absence --classes math
Mike is 11 years old
He/She is absent today.
He/She has math classes

What is argparse?

The argparse is the module that makes it easy to write user-friendly command-line interfaces. It is useful when you’d like to use optional command-line arguments in your python program.

How to use argparse

You can add the argument with add_argument() function. Check the Python documentation for details about parameters for add_argument() such as “nargs” or “action”.

import sys
import argparse

def print_student_info():
    parser = argparse.ArgumentParser()
    parser.add_argument("name", type=str)
    parser.add_argument("age", type=int)
    parser.add_argument("--classes", nargs='*') # for list of optional arguments
    parser.add_argument("--absence", action="store_true") # for optional arguments with no value

    args = parser.parse_args()

    print("{} is {} years old".format(args.name, args.age))
    if args.absence:
        print("He/She is absent today.")
    if args.classes:
        print("He/She has {} classes".format(" ".join(args.classes)))

print_student_info()
>python\test\argparse_test.py Mike 11 --classes math science --absence
Mike is 11 years old
He/She is absent today.
He/She has math science classes

How To Add Context Menu Into QTreeWidget

GOAL

Today’s goal is to add context menu to the QTreeWidget in PySide.

Environment

Windows 10
Python 3.8.7
PySide2 (5.15.2)

Method

Change the ContextMenuPolicy of the widget.

Use CustomContextMenu if you’d like to connect your function to the signal that is emitted when the context menu is requested by actions such as right-clicked. See Qt::ContextMenuPolicy in Qt Documentation for details about ContextMenuPolocy types.

self.tree_widget = QTreeWidget()
self.tree_widget.setContextMenuPolicy(Qt.CustomContextMenu)
self.tree_widget.customContextMenuRequested.connect(self._show_context_menu)

And define the function to connect. Please use exec_() instead of show() to display the menu. The mapToGlobal function is used to determines the position to display the menu.

    # the function to display context menu
    def _show_context_menu(self, position):
        display_action1 = QAction("Display Selection")
        display_action1.triggered.connect(self.display_selection)

        menu = QMenu(self.tree_widget)
        menu.addAction(display_action1)
        
        menu.exec_(self.tree_widget.mapToGlobal(position))

Complete Code

cotext_menu_test.py

import sys
from PySide2.QtWidgets import *
from PySide2.QtCore import Qt

class MyMainWindow(QMainWindow):
    def __init__(self, parent=None):
        super(MyMainWindow, self).__init__(parent)
        self._generate_ui()
        self._init_tree_widget()

    def _generate_ui(self):
        main_widget = QWidget()
        main_layout = QVBoxLayout()
        main_widget.setLayout(main_layout)
        self.setCentralWidget(main_widget)
        self.tree_widget = QTreeWidget()
        self.tree_widget.setSelectionMode(QAbstractItemView.ExtendedSelection)

        #----------add context menu--------------------------------------
        self.tree_widget.setContextMenuPolicy(Qt.CustomContextMenu)
        self.tree_widget.customContextMenuRequested.connect(self._show_context_menu)
        #----------------------------------------------------------------

        main_layout.addWidget(self.tree_widget)

    def _init_tree_widget(self):
        headers = ["header1", "header2"]
        self.tree_widget.setHeaderLabels(headers)
        tree_widget_item1 = QTreeWidgetItem(["group1"])
        tree_widget_item1.addChild(QTreeWidgetItem(["item1_1", "item1_2"]))
        self.tree_widget.addTopLevelItem(tree_widget_item1)
        tree_widget_item2 = QTreeWidgetItem(["group2"])
        self.tree_widget.addTopLevelItem(tree_widget_item2)
        tree_widget_item2.addChild(QTreeWidgetItem(["item2_1", "item2_2"]))
        tree_widget_item2.addChild(QTreeWidgetItem(["item3_1", "item3_2"]))

    # the function to display context menu
    def _show_context_menu(self, position):
        display_action1 = QAction("Display Selection")
        display_action1.triggered.connect(self.display_selection)

        menu = QMenu(self.tree_widget)
        menu.addAction(display_action1)
        menu.exec_(self.tree_widget.mapToGlobal(position))

    # the action executed when menu is clicked
    def display_selection(self):
        column = self.tree_widget.currentColumn()
        text = self.tree_widget.currentItem().text(column)
        print("right-clicked item is " + text)

def launch():
    app = QApplication.instance()
    if not app:
        app = QApplication(sys.argv)
    widget = MyMainWindow()
    widget.show()
    app.exec_()


launch()

Result

When the item “item1_2” is right-clicked, the menu appears.

Click the “Display Selection”, the message is displayed.

[tips]How To Convert Tab To Space In Sublime

This is just a tip about editor “sublime”.

GOAL

Today’s goal is to summarize the 3 way to convert tab to space in sublime.

  1. How to convert tabs in the current code to the spaces
  2. How to convert the spaces in the current code to the tab
  3. How to change the tab into spaces. In other words, how to insert spaces when tab key is pressed.

Method

1. How to convert tabs in the current code to the spaces

Use command pallet. Open command pallet with Ctrl+Shift+P on Windows and Cmd+Shift+P on OSX.

The command pallet

And click “Indentation: Convert to Spaces“.

(more…)